
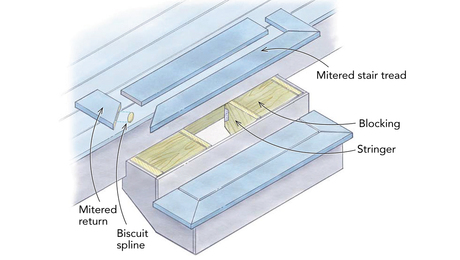
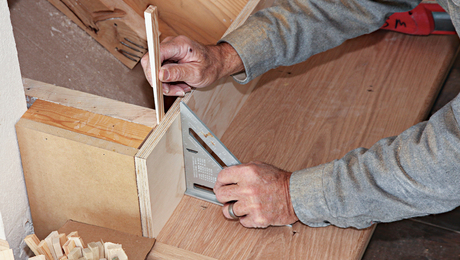
When laying out stairs, I use a small story stick to ensure even spacing. Once I’ve determined the rise and run of the stair and I’ve affixed the stair nuts to my square, I lay out the first tread and riser. Next I use a small, straight piece of scrap wood to note the diagonal distance between the tread line and the riser line, as shown in the drawing. With this distance marked on my story stick, I go the length of the stringer, marking the distance for each tread and riser. Then I abut the other stringer to the one I’ve marked, and I transfer the marks to the second stringer. Using these marks as control points, I can now finish my layout with the square without fear of the layout running off.
—Richard Mead, Dryden, NY
Edited and illustrated by Charles Miller
From Fine Homebuilding #99


View Comments
Layout 1 stringer and stack on top of additional stringers flushing all edges. Set the saw blade to full depth. As you cut the stringer it will kerf the one underneath it and automatically mark a duplicate of the first one you cut.
I have come across recommendations of drilling a 1" diameter hole in the corner before you make the cut to prevent a stress point. Worth considering.
1/4" diameter drill hole in the corner is good enough, or layout the finished template below a rough, approx. 1/4" undercut, second stringer. Then route out the rough cut stringer with a 1/2" diameter straight bit w/ a flush guide bearing. Thanks goes to Tom Silva of This Old House for showing this one. I scored a new 1/2" chuck router in the process.
Good tip Richard. I too use the diagonal as a simple cross check of the placement of my square. However, I have developed an additional way to get even better accuracy. You can use a construction calculator (I use the Construction Master Pro app on my smartphone) to calculate the diagonal as well as the rise and run of the stringer. Once you pick the starting point on your board for the first rise and run, you can hook your tape on the end of the board and read the distance to it. Plug this measurement into the calculator, and then mark each successive point on the edge of the board by adding the stored diagonal. Successive presses of the equal button keeps the calculator adding the next diagonal. This eliminates any error due to movement of the story stick, and even eliminates normal rounding error because the calculator internally keeps the diagonal measurement to a much higher accuracy than it displays on the readout. The tape hooked over the end of the board doesn't move, and your resulting stringer is dead-on.