I install pulldown attic stairs in half the homes I build. The easy part is framing the rough opening in the ceiling and hanging the stairs. Figuring out the angle of cut and the length of the lower stair section is the hard part, and the installation guides aren’t much help.
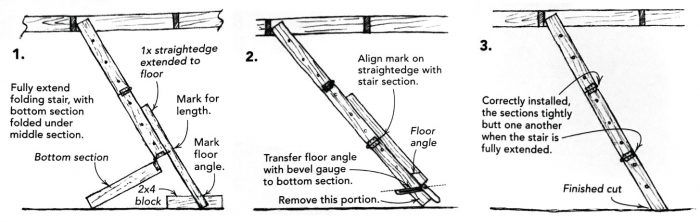
As shown in the drawing, I came up with a simple trick that’s accurate and quick — and a tape measure isn’t even necessary. After the stairs are fastened within the opening, I fold them out, except for the last section (1). I hold a 1x straightedge on top of one of the stair stringers, slide it down until it touches the floor and mark the straightedge to indicate the bottom corner of the middle section of the stair. Then I place a 2×4 block on the floor against the straightedge and draw a line that gives me the angle to cut the stair. Next, I extend the bottom stair section and align the mark on the straightedge with the middle section’s corner (2). I mark the end of the stair and use an adjustable bevel square to transfer the angle and draw cutlines.
The angled cut should fit tightly to the floor, and the sections should butt tightly together when the stair is folded down (3).
Click here to enlarge the illustration.
Mike Guertin, East Greenwich, RI
Edited and illustrated by Charles Miller
From Fine Homebuilding #152


View Comments
"Bevel square" is incorrect. It is properly called a Sliding T Bevel or a Bevel gauge
Shut up Edspa...
What is the best way to insulate the stairway so cold or hot air doesn't fall down from the attic?
Build a 2 inch thick Dow Blue or other box to cover the opening and stair volume. Glue and screw it together. Cover the whole stair hole. Easy to lift up and replace. .