
PLAY THE LATEST INSTALLMENT OF
THE INSPECTOR.
Here’s how the game works: Read the intro describing the problems in the photo to get an idea about what code or safety problems The Inspector is looking for. Click on any detail in the photo that you believe might match the problems we’re looking for. Once you make your first click, a timer will keep track of how long it takes for you to find all of the errors or problems. See how fast you can find them. Enjoy!
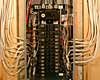
If you’re new to The Inspector, check out a previous challenge: Help the Inspector pass a building code refresher. Untangle the mess in a docotored photo of an electrical panel. Keep some carpenters from falling off some scaffolding. And spot six things wrong in a doctored photo from the article Rebuilding a Brick Chimney, featured in Fine Homebuilding issue #201.
We encourage you to post a comment to brag about your score or to sound-off about our game (or both).
Good luck!
Try All of Our Inspector Games: 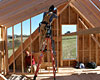


-
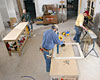
Find 5 ways to reduce the lead-paint health risks in this remodeling project. Play The Inspector.
-
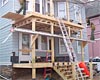
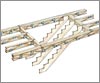
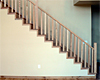
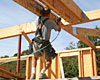
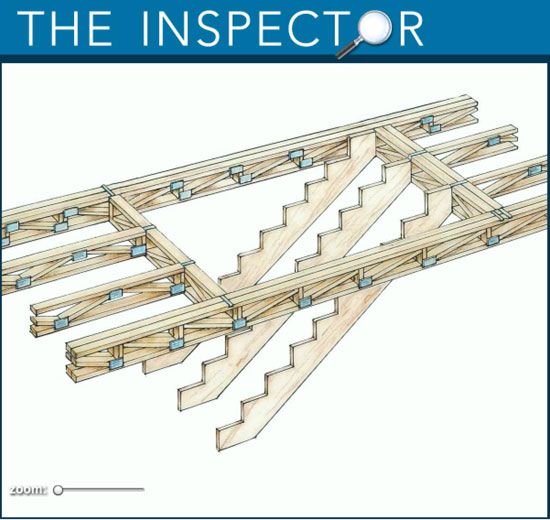
Find the four framing errors, and help The Inspector firm up this flimsy staircase. Play The Inspector.
-
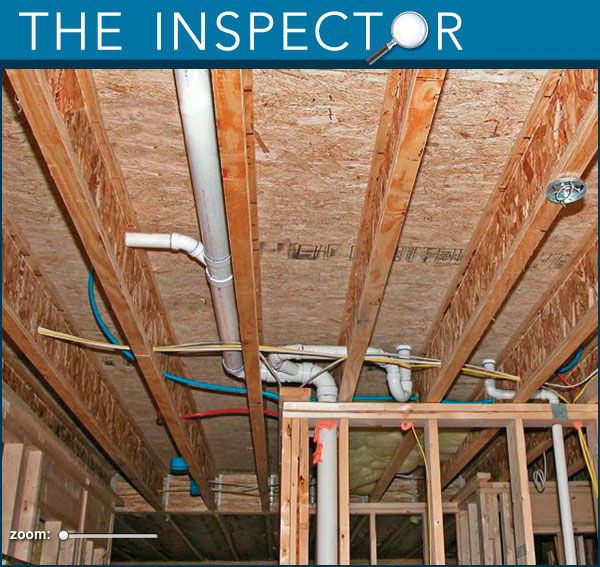
Find four details this plumber needs to fix before the rough-in is complete. PLAY THE INSPECTOR GAME.
-
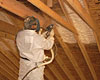
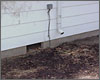
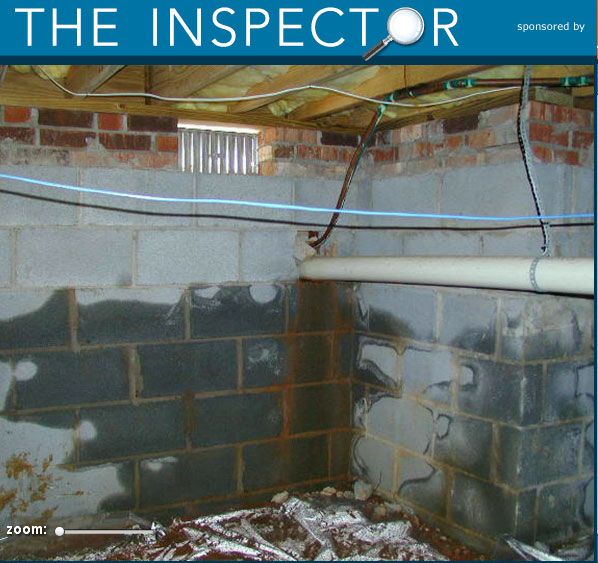
Find four crawlspace errors. Play the Inspector Game
-
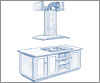
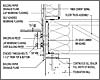
Spot six serious problems with this assembly. Play the Inspector game
-
Find five safety tips to keep these roofers from falling and hurting themselves. Play The Inspector.
-
Find five ways to keep this deck on solid ground. Play The Inspector.
-
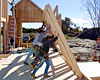
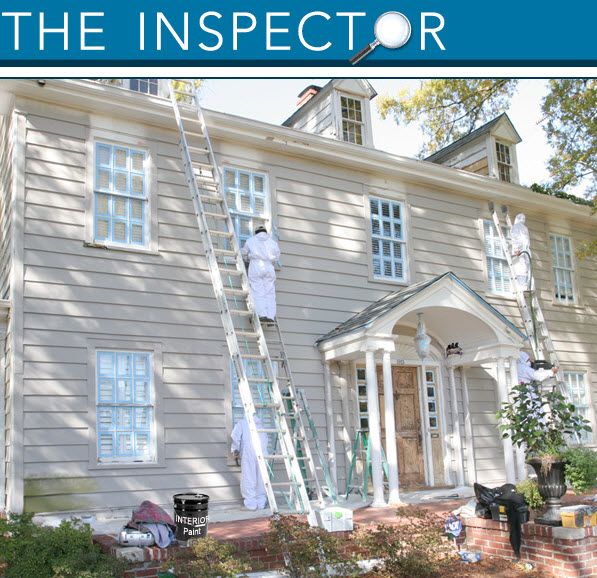
Find five ways to keep these painters from falling down on the job. PLAY THE INSPECTOR
-
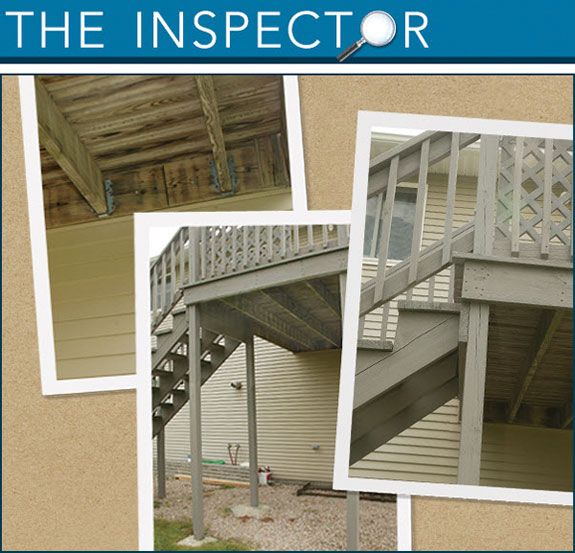
Find 6 likey details that would make this deck unsafe. Play The Inspector
-
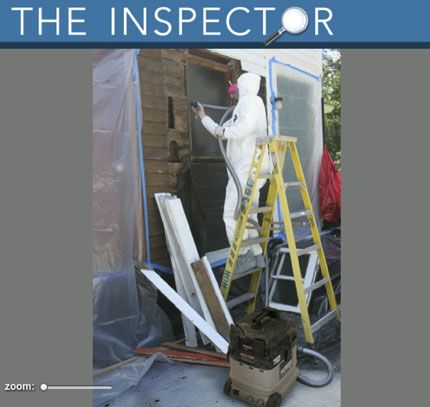
Find five issues that will get in the way of a perfect paint job. PLAY THE INSPECTOR
-
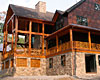
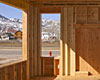
Find the six errors that the builder didn't get quite right on this Colonial reproduction. PLAY THE INSPECTOR GAME


View Comments
Hi,
I just wanted to let you know that I think that you are on to a good idea, but I think that some improvements would be helpful.
First, the picture is too small. I have great eyesight, and I had to strain to figure out/look for the problems (I am a web developer, and know that you can right-click and choose the zoom-in menu item). Second, some of the errors are poorly implemented (the guy is working on the stud next to the one that is missing, so that is probably the next one that he is going to put in, and besides, you can see the rest of the stud below his ladder). The third leg of the ladder missing - who would probably ever get on a ladder that has that problem, and besides, it is just Photoshoped out? The lower plate missing under the wall - that is extremely hard to spot because of the way that the shadows are.
Otherwise, the other items are reasonable, IMHO.
How you doing?
I agree with above comment,good idea but needs a little work. I felt like I was in a bar playing a video game about finding the missing items or ones that don't match. It was fun but not really what I thought it was going to be, I was looking for more real code vialation and not missing legs on ladders but still had fun, will be looking for more in the future
lukas555
Shouldn't the bottom of the rafters be sitting on top the wall plate instead of overhanging the interior side of the wall? And the scaffold plank to the left of the gable-end window opening, seems like a springboard to disaster... too long a span to support a worker setting rafters at the ridge... and a real potential head-banger for the guy on his knees squinting in the sunlight. Hope he remembers how close it is when he gets up!
Oh, and nail a temporary 2x across the window openings 36" to 42" off the floor until you're ready to set the windows; those rough-in sills are too low to be left unsupervised!
The 'framing code' violations are not necessarily so. It took me half an hour clicking all over the photo to sort a couple out. Some are 'maybe' code violations, dependent on details not defined (The gable window header - you only need a structural header if the ridge is structural, The stud in the cheek wall - only needed if the distance between the main and dormer roof rafters exceeds the span rating of the sheathing, The wall plate - not necessary by code unless the floor sheathing is less than 3/4 inch). Shear blocking is not needed in all regions, plus it probably wouldn't be needed on a gable end due to the rigidity of the rafter triangle, and There actually are ladders designed with only 3 legs -though I get the point with that one).
One thing that would be good to add to the game is a listing of how many people have played and their rankings. That way players can see where their score placed. And include a Top Score Holder - like the old PacMan machines from my younger years, we'd play just to try and get our moniker listed on a machine for bragging rights. I think I own the alltime low score on the Inspector; I got a -3500.
Interesting idea, but I think the items should be real, not a "missing leg" photoshopped off the ladder.
Where's the answers button? I still don't know what all of the 7 errors are.
I think we should add another "error" item to that gable-wall picture...the fact that I left the camera bag on the floor in the photo. Whoops! We could probably start a game based on that concept alone...always happens to me!
Let's not overlook some very important safty violations. Guard rails, and hard hats.
I couldn't figure out how to end the game without finding all 6 -- so that I could see what I missed. I also think clothes blocking most of a wrung on the ladder is asking for a fall. Stepping on that thickness of cloth with most of your weight when you were expecting a wrung could send you backward to the floor. I also think the picture needs to be bigger. But, all in all, a lot of fun.
Safety again: safety shoes/boots on the women in the foreground, trip hazard with tools + air line and last but not least the photograph's angle is poor.
great idea to train, tease or just smile but get it right.
mal
Over this side of the pond, with so many trip hazards and the lack of safety clothing (hard hats etc) not to mention climbing a step in that way (even if it had six legs), would get the site closed down....! Still it was great fun, keep 'em coming.
This is a great tool for my Architectural, Civil and Construction students.
Very good start! A little bigger and/or easier to see pic would be nice, but overall a very good idea.
Keep up the good work.
I look forward to the next one!
Like the game but posting scores wouldn't help I expect we all lost points on finding a couple of the items and ended up clicking around until found. Then going back and getting a perfect score.
On the second one I sure would be upset if someone piled their jacket on the ladder I was standing on yet that wasn't one of the errors.
Well I do agree with most of the comments above about the photo, too small, ladder with leg missing, etc, however overall I have found if I focus on the subject and enlarge the photo I can find all the faults. This inspector missed a very intense hazard, the jacket on the ladder, that is a no no @ any jobsite. I esp. liked the 2x4 on the bottom of a 2x6 wall, heh heh, I think that was a no brainer however it took me to the last to find it. I ranked my hightst score on this one, and if I hadn't gotten frustrated and just clicked a couple of things I would have had a better score. Over all it was fun. Thanks guys, keep up the good work.
I got 6 out of 6, however i agree with the jacket on the ladder rung, also some state's OSHA is pretty strict on hardhats on the jobsite.
Hi,
I am small building contractor in the Netherlands. I am, ofcourse, not aware of the US-building codes and regulations. So the game is a lost game for me. When I was clicking away in the photo, I clicked on the shoes. I looks to me that they aren't wearing any safety shoes or boots. In the Netherlands that would be a big NONO. Also the lack of hard hats is good for a penalty.
RGDS,
Martin.
It was interesting. I found all of them but lost 50 on the shirt on the ladder thing and apparently missed when I tried to click on the missing header and got dinged for another 50.
Bobby
Always enjoy this type of endeavor. However, it would be nice to be able to "zoom in" or increase the size of the photo. I also called out the shirt on the ladder and lack of hard hats.
Good idea but the photo needs to be larger or oriented better. It's hard to tell there is a 2 x 4 plate on a 2 x 6 wall. Also hard to see the missing framing below the window. And what about the jacket hanging on the ladder? That's a mistake but it's not included.
Fun game, I managed a perfect score the second time 'round! First time I missed the 2x4 bottom plate and the sill cripple. Next time I'll use the zoom option - Thanks "John316" !
I got the guy at the tippy top of the ladder first thing as this is an extremely familiar situation to me....25 years, several times a week, each and every time thinkin', "THIS IS WRONG!" I'll probably be back up there again today...
Is a triple top plate an actual code violation or just a waste of time and material?
A very enjoyable game. However, for us lesser lights, how about supplying answers for us to use when we can no longer figure out what's wrong.
For all those who want to zoom in on the picture, in Firefox, you can go to "zoom" in the view menu and select "zoom in" or press "ctrl" and "+". Repeat until the image is big enough. Other browsers probably have similar functions.
One really can't see the details because of the angle of the picture. I only got 5 out of 6. What was the last one?
First time comment. Logged onto website and saw the game. Took up the challenge and got all of them right with a 3000 score. Did not try to second guess but stayed objective.
Looking forward to playng next game.
Great game but how about an answers option, better to take the lumps than to play over until you get a perfect score.
This 3rd version of the game (the Timber-Frame) was TOUGH! I only got a 200!
Thanks for all your comments to date, everybody! I’m not sure I believe gadget2020, though. ; ) A perfect score the first time? Justin didn’t even break 300, never mind 3000 (course, he’s a carpenter, not a framer). Still, we better start making them harder! Anybody else get a perfect score on the latest one?
Isn't a downspout that dead-ends at the bottom of the foundation without some kind of diverter a code violation too?
took the plumbing one and got them all! HA! I am not even a plumber, just a homeowner who asks a lot of questions when the plumber is here doing his magic!
I took the plumbing inspector game and was surprised to find out the "gas" hot water tank needed to be "plugged in". Is this one of those tankless varieties? If so, I'll stick to my tank gas water heater that will still heat my water when the electric is off.
BIGGER PICTURE! Details are too difficult to see at this scale.Add "I give up" to relieve the obsessive types,"What did I miss?".Couldn't find all 6 in the last game and I still think the grade door needs a step or landing,lost 100 points trying to put one there.
Thought I got this one got 950 made 1 wrong call
I kept clicking on the pergola rails with no balasters.
I too clicked the no step at the door, but I guess maybe they were going to back fill and pour a walk? The missing bracing and webs were too easy. The down spout just looked wrongly done so I clicked on it....Good game though.
This is incredible activity. Add more. Many more.
Or, if you really want a viral thing - see if the software guys can create a widget that would allow users to post there own.
Great idea.
Aaron
Imagine my surprise. I got them all but missed the door without a step and the lack of ballusters on the gazebo so my score was 1100. But the best part you guys is that I'm a 78 year old woman who helped build my house thirty years ago! The reason. Reading Finehomebuilding for more than thirty five years.
I may have to rest on these laurels and not wreck my average score :)
Couldn't find one last item. I enjoy these but you need something to click for those of us who want the answers. First 5 were easy with no miss clicks, but I kept focusing around the door for the last one. Here in Scottsdale, there has to be a light on the outside by a door. After clicking on both sides with no success, I clicked where a step should be. Oh well, never did find it. Wasted 150 points looking.
I am a building inspector, and this game kicks my ass. Seriously, how am I to tell that the chimney is not flashed properly from a photo taken @ ground level from so far away? I'm here to tell you though, that the door to the basement needs a landing. I don't know how many points I lost clicking on the door and threshold.
It looks like the house is in snow country, in which case there should be snow splitters @ the vents & flues on the roof.
please insure we can see all the infractions. regards rossco
I'm a twenty-year building inspector, and I enjoy the heck out of this game. True, some of the mistakes are regional code requirements and/or have structural alternatives, and there are others that aren't marked, but overall it's plain fun for somebody in this field. Thanks FHB.
I've said it before and I'll say it again (as have a number of other players): The pictures are too small to be effective. Also, many of the "errors" appear to be regional as some of them are not a problem in my area. It would be nice if the errors were significant and not just a ladder leg Photoshopped off. It would also be nice to be able to see all of the errors by clicking on a button.
As Others have posted...Good Idea but needs work and the photos are way too small.
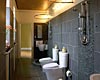
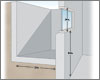
Regional changes would definitely be an aspect in the latest installment (5). In a NYC apartment (don't know about other places), due to ADA regulations, you need to provide blocking next to the toilets & showers for future grab bar locations.
Also, honestly, your TP holder and light do not need blocking. Sure, its helpful, but lets be honest it's far from necessary especially considering that the mounting location for a TP holder is almost always verified after all walls & Tile are put in place.
Keep 'em coming though...just make the photos bigger!!
Hi NS_1,
Look for possibly full screen images in the future. We're working on some ideas.
As for the TP blocking. You've got a point in that it's not mandated but I've got to admit, I feel it's necessary. In my opinion, there's nothing more annoying than a TP holder or other small accessory that jiggles loose in its screw anchors after a few months - and keeps jiggling loose over time!
Cheers and glad you enjoy the game!
-Ed
I was able to spot about 75% of the "errors" with the house framing scenes first time over, but didn't get anywhere with the scene with the hot water heating and all the gizmos' in that room. Not familiar with that.
On the picture of the bathroom/wall blocking, I wondered about no image of the camera in the mirror at the far end of the room. PhotoShop trickery or was the camera back far enough that it didn't show at that angle?
Good game. It gets you looking.
I like playing this game - nothing like humbling humility! Perhaps, as i get as far as i can and then resort to systematically clicking over the whole picture to find what i don't know - the rest of the answers!!!
My score of late is far better than my first and second which yielded -1200!!!!!!!
cool game and i appreciate the simplicity as i imagine it will become a bit more amped up in future!!!!
ps that was a minus 1200!!
Oh and i forget .... isn't the 2nd toilet missing a handle?
or won't the toilet paper get wet during a shower? Or
how about a drain on the floor for water that escapes the
shower basins???? can't wait to git the answer!!!!
Like the idea a lot & did fairly well on the bathroom. Is that a mirror in the middle of the pic making it a one sink one toilet BR????
Love the game.
AND, any project I do would include blocking for the shower curtain, esp. from the ceiling.
gday
the strange thing in the picture is that it is a full floor to ceiling mirror which gives the illusion of the bathroom being huge ( i would love to see how many people would walk into when selling the house). The item of interest is at the doorway, the person taking the picture is not there. He/She would shold be in the doorway, spooooky.
P.s love the games, we have similar codes and regulations here it's good to have a go.
cheers
This was a nice challenge for a Monday morning, a good way to get the brain working.
I certainly did not get a perfect score, because I kept trying to find the grab bar blocking. Not there! Also not provided was blocking for the shower curtain rod. And where was the shower curtain? Maybe not yet installed, but necessary to keep the toilet paper dry. Medicine cabinet? If the carpenter provided for the electrician, then he or she should have provided for the medicine cabinet also.
The full wall mirror is great. It took me a little while to figure that out, but then I smiled. Not only will it seem to double the space of the bathroom, it will double the light AND give the occupant the chance to inspect something without leaning over the sink. It is an incredibly practical design feature that catches one off guard.
Thanks for the challenge!
re: comment about water from the shower getting on the floor in the subject bathroom - in Holland & Germany I used numerous showers (both in homes & hotels) that didn't have either a threshold or a sill to keep water within the shower pan area, and I had mop up the tile floor everytime I showered. Couldn't get any rational explanation as to 'why' they build 'em like that, but it may explain why (many) Europeans do not bathe as often as Americans!
re: floor to ceiling mirror - in my opinion, a gimicky attempt to double the apparant 'size' of the bathroom. (and, who wants to look at themselves while in the shower, or while sitting on the pot?) Furthermore, the mirror would be a bear to keep clean, and may pose a safety hazard, too, esp w/ small kids in the house. Ain't hi-tech & trendy style just grand!
As for the photographer & their camera not visable in the image - perhaps they were 'photo-shopped' out of that image before beit was downloaded on here??
re: blocking in one-piece fiberglass & acrylic shower enclosures - there should be sufficient blocking for mounting garb/assit bars & handles, but most do not have them. Absolutely needed for the elderly and the physically challenged!
Enjoy the Inspection Games, and I got a 1200 'cause I just went thru a similar project while recently remodeling a home that should have had blocking in all of those places, but lacked some of them. . .Blocking is cheap, easy, and only the lazy and/or dumb don't do it. . .
Whoever designed it was clueless, just like the builder who went on with the task. The are so many things wrong, I wouldn't know where to begin...other than tear it all out and start from scratch.
WSJ
As a plumbing contractor I found all the items including the lighting backing but lost valuable clicks testing the items shown in the mirror because at first I tried to avoid this area.
Final score 1050. Would like to see more of these and larger pictures.
Great game. I like Mike's idea of posting a list of people with a perfect score. You'll need people to log in first and only be allowed to take it once for a score before seeing the answers.
Please give us the button to give-up to see all the answers and stick to realistic situations, not ladder legs PhotoShopped out.
You don't need to just do code violations. These are sometimes debatable anyway. Just "what's wrong with this picture"? stuff. It could be wasteful or inefficient practices, for example. You can use the vast store of knowledge from Fine Homebuilding and test tradesmanship, not just code. Then we could have some lively discussions. You could actually refer the the magazine article the practice came from for more info on the topic.
Beginners luck!
got all 6 although i wasnt sure about the tp holder, but of course when in dought block it. as for the other part of the quiz. shouldnt one of the toilets be ada (17")?
Got all 6, although wasn't sure about the TP holder. But I remembered what an old carpenter told me. When in dought block it. As for the other part of the quiz. Shouldn't one of the toilets be ADA 17")? assuming this is a commercial application.
Fun game ...but for those who think there are two toilets....have a closer look....I think you will find a wall to wall and floor to ceiling mirror....which would also explain the two shower controls ...the two lights ...the two towel bars...I guess pretty much two of everything
Where is the shower valve blocking?
BigFishOn,
"Blocking" for the shower valve would be stud framing located 6 in. o.c. on either side from the center of the valve.
WorkshopJon, c'mon give us a hint. Where would you begin?
Well well, this was a bit of a stretch, mirror mirror on the wal.... did that confuse anyone else? Somehow it just didn't look right, then wa-la a small line appeared near the ceiling and it came to focus. I got them all--- eventually. By-the-way, just remember if you are using windows sys on your compt. in your "tool" box er bar click on view and scroll down to "zoom" and enlarge the frame. Sometimes it helps to see the little things. I know it helps me. CUL jr
You all did a great job on this one. A good challenge!
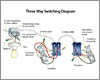
Snap, Crackel, & Pop! Did you find the 6 or did you not? Not too difficult, but a bit of a challenge. What was a small challenge was following the wires, but no diff than in real life. Have you ever encountered this type of a sit, before? I am a bit confused of how he got too many wires in a 2 wire cable. That is not a real life situation, is it? Oh well, it was fun. Thanks guys. jr
As a homeowner who did my own wiring in the basement I am happy that I got a perfect score on the first attempt, even if this was just a simple 3-way circuit. Would love to see more of these. I had a lot of fun learning the right way to do stuff (subpanels, AFI/GFI, bathrooms, etc) and would enjoy testing my knowledge further. :-)
It seems that the travelers should be switched on one of the switches or the switch turned 180 degrees. I believe that as pictured the light would be on if both switches are down. I like to wire so that if all switches are down then all light are off.
The 3 way switch was good. The only thing I noticed extra was labeling the lamp HOT and neutral. It should be Switch leg not hot. This fixture is a keyless(trade name and is typically Plastic or porcilin. When you see a metal housed fixture ground it also.
Yes, the travelers need to be switched or the 3-way will not work. That is, if the red is on the left on switch A, then it should be on the right on switch B.
I can't believe I got that. I *hate* 3/4 way switches. I've only got a couple in the house so I have to do them with a schematic in one hand and tool in the other.
Got everything else on the first try though :-).
As an English player in this forum, this weeks electrical quiz is a stinker, most of what's permitted in the picture is illegal here ! Wire nuts are completely forbidden in our code for a start. Links in earths, not terminated in a permanent terminal are also illegal.
Steve
I remember being so intimidated by 3 and 4 way wiring. Then I learned a simple guideline that will help all who struggle with these ( I wired at least 8- 4-way configrations and probably 15- 3 way in my own home (4 stories)...here's the dilly---LINE(hot) and LOAD(lamp feed or fan feed) each need to be connected to one of the COMMON terminals of each 3 way switch.. and make sure the travelers are identically connected at each switch
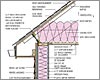
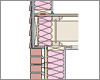
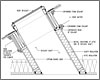
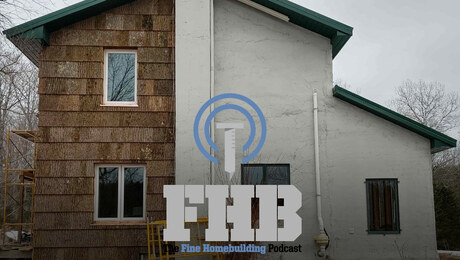
Uh, the metal drip edge should be installed UNDERNEATH the self-adhered underlayment....
Did I miss It or should there be vapor barrier on the ceiling?
This was a nice challenge for a Monday morning, but I see a number of problems remaining in the corrected diagram.
Given 2x6 studs @ 24" o.c., and a single top plate, the spacing of the ceiling joists and roof rafters must be stated - and they must match the location of the studs below. Otherwise, provide a double top plate.
Also I expected wood blocking or something above the top plate between the rafters, and no rafter clips or nailing instructions were given. But you also did not say anything about the sizes of the rafters or joists.
I did not see a housewrap or any similar air and/or vapor barrier. If the polyiso was for that purpose, then the seams must be taped, and shouldn't it be over the sheathing? There wasn't even felts below the siding. They note vented air space, but that looks like sheathing - especially the way it extends up to the top of the polyiso.
The error noted about needing ventilation through the rigid insulation was goofy - the note already said it was to be cut around the insulation baffle and sealed, therefore airflow happens through the insulation baffle only.
Also, you should have stated which part of the country this was in in order to give us direction about the interior vapor barrier (which would be needed also on the ceiling IF it is appropriate on the walls).
The other comment about the drip edge belonging UNDER the self-adhered underlayment is also right on.
And finally, this should be reviewed by the Architect of Record in the office that the apprentice works in before it gets to the Plan Examiner. The Inspector should only be making sure the Contractor gets things installed correctly.
I'm not a homebuilder - just a do-it-yourselfer. I don't understand the vapor barrier thing in this puzzle. I've always understood that a vb was needed on the INSIDE of a wall - otherwise moisture will condense within the fg insulation. So I thought the plastic was good. Can someone explain why this is not so?
Ken,
I think there is an unspoken assumption in the drawing: that the 3/4" polyiso insulation is faced with aluminum foil. Foil being impermeable, it would create a second vapor barrier on the outside face of the wall cavity. The stud cavity would then be more or less encapsulated and any moisture that got into it (vapor barriers aren't perfect, after all) would have no way to get out and it would likely condense on the inside face of the foil sheathing if it were cold.
If I were detailing this wall as a rainscreen assembly with outboard insulation the materials would be: (starting from the outside face of the stud outwards): 1. plywood sheathing 2. vapor permeable air/moisture barrier 3. rigid insulation board 4. furring strips 5. exterior finish.
The key is the vapor permeable air/moisture barrier. It keeps liquid water out and limits air moving through the wall. However, since it is vapor permeable it allows water vapor to escape.
Self adhered underlayment must go UNDER the drip edge. I know it's a bit counter intuitive... but read the manufacturer instructions and it'll make sense.
Where is the exterior plywood sheathing? A layer of polyisocyanurate is not a substitute for plywood. Also, the wall plywood must extend to the roof sheathing with wood blocking or similar for shear transfer/resistance. Also noticed that the graphic for the insulation allows it to extend through the baffle. It should leave a 1" minimum air space for venting directly under the sheathing.
Hi Joe_Bob,
Thanks for the reply. If I read it right, you would NOT have a vb on the exterior side of the wall, so I'm guessing you would have a vb on the interior side, right? If so, it seems like the polyiso is what's wrong here, and not the plastic. That would jibe with what I learned in school.
So far, one of the two biggest issues I have about this game have been solved... the 'hints' are great! However, I personally would appreciate the ability to take the game to fullscreen -- my old eyes don't always find the mistakes just because of the image size!
I'm w/ Wayn. The photos are too small for my aged eye balls
Don
To the writer of the game:
Please, Please, Please-
For those of us who want to learn and aren't in the industry, we look at the pictures in the inspector and say, "Hmmm, looks ok to me, I don't know." But we would like to know, if you could post the answer in some way as a teaching tool after the fact, we home-repair-never-taughts could learn.
We want to learn!
Put a link in if you are stumped.
We need clear pictures and arrows and good explanations. We need to why it is done a certain way.
If this was available, I would be clicking on most of your sent e-mails, instead of saying this isn't at my level of understanding.
But we want to learn.
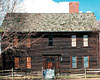
The game was letting me select the same thing multiple times. Also I don't think gutters and downspouts were common on homes of this era. Exterior door is not original.
To the writer of the game:
Improved my knowledge, it was fun.
I finally got 4 right
my score=-1080
I know gutters are not period but couldn't find the 5 total.
If you could have it so when we get to some number of points, the answers would reveal themselves and the game is over. At -1050 points would have been right for me.
Well I must say this one was a stretch? I got them all only because I live in MA just down the road from this house and I have a copy of "historic deerfield a portrait of early america" on the book case in my office and this house is featured on page 79 of that book.
A little history about this house for those interested in such things:
A house of this era could just as well of had a salt box roof and a single central chimney and not two. And in fact there are actually indications that the Ashley's house began life (around 1726) with a center chimney and a steep pitched roof. Then in 1750 the gambrel roof was added and the center chimney was replaced with a center hall and stair with a chimney on ether side.
These changes were not the norm for a house of this era only that Jonathan Ashley had married into affluence and wanted to emphasize his status so he remodele his house in the Newly fashionable Georgian style. For a house this far from a port City like Boston it was not common to find such refinement.
And as for that beautifully carved broken pediment we see today it was actually added to this house in 1945 by Bill Gass the contractor hired by the Flynt's, the primary benefactor of the historic deerfield restoration projects. Although it was inspired by traditional connecticut valley doorways of the second half of the 18th century this door and pediment are not even a exact copy of a historic pediment. It was completely of William Gass's own design. So although it does convey the formality of originals it is not original to this house. Although there was evidence of a similar pediment from the 1750 remodel by the Rev. Ashley but it was long gone by 1945. And as for the unpainted weathered brown exterior this too was decided during the renovation in fact there is documented proof that the Rev. Ashley had actually painted the exterior blue. This also was to emphasize his status for blue paint was one of the most expensive pigments you could buy.
The house lost all it's paint and the much of it's Georgian style exterior details during a time of neglect, the house was moved from it's original location to a back field to make way for a more modern home. After the Flynts bought the property they had the newer house moved to deerfield academy and the Ashly house was moved back to it's original location and the restoration started. At that time (around 1945) the house was in very bad condition and what little had not been stripped out and sold was in very bad shape due to years of neglect.
As for other's comments on the gutters this house did not have gutters originally nor did it have a box gutter installed when the Gambrel roof was added. So yes the gutters are not original.
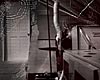
Dumb Luck and a good hint on the last two items. The register to keep pipes from freezing was way too obvious, but it is something I could expect from home grown solutions or Quick Fixes often seen. At least this was not a fire hazard. The uninsulated pipes were something I do not run into much on the west coast.
It's not a code violation-but that wet cement they are using for that cap will surely crack and let water get in to destroy that brand new rebuild.
Where's the safety? These fellows are not properly protected from falling off the roof and they are not wearing basic personal protection such as safety eyeware or gloves. Have to give them and you a failing mark there!
1140 points on the chimney rebuild!! I too would appreciate having a full screen picture to look at. If other commenter's would identify which game they played in their first sentence, that would be good also.
I just tried this game for the first time with the "plumbing from hell". I was surprised about the "hot water heater" needing to be plugged in....I always thought the redundant "hot water heater" was a home-owner term! :-)
Safety above ground: no fall protection, no safety glasses, no safety shoes, no clay liner in the chimney and the ladder could have had a ladder hook made for roof work, I could not see behind the worker.
You ignore many safety violations, the ladder on the roof was the least of them. No PPE (hard hats , work boots, pants, eye protection), fall protection is non existant, the scaffold in the back is too low, there are no handrails anywhere! Where is the camera man standing?
After playing the chimney inspector game, i was disappointed to lose 50 points right off the bat for clicking on the inadequate safety system these guys were using on the roof. Dont they need a harness / lifeline system for working at these heights?
Re: chimney-building. The guy on the right weighs more than any residential roof is going to stand. This is obviously a doctored photo.
I got 4 of the 5 with no errors or hints, and I take issue with the fifth, the ladder on the roof. I was unable to determine that ladder was not on a ridge hook as I believed I could not see the top of it. Only later after clicking all over to find the violation could I see the ladder terminated visibly short of the ridge. The photo is too small to expect people to see fine details like that.
1st and foremost SAFETY none of these guys are wearing any type of harnesses, SAFETY glasses, SAFETY boots. None of these infractions were even a choice.
WAKE-UP live for another day.
I have been a building contractor for approx. 40 years.Chimney process has not changed much during above mentioned time. These dudes don't look like they are the sharpest knives in the drawer. Are'nt we supposed to get smarter as we get older? Safety should be an issue. Regards, Rossco.
I found the chimney inspection too easy! I would have have asumed that safety harneses would have been required. in Canada if you are over 8' off the ground you require a safety device.
No Safety harnesses? that would/ should be a violation.
Santa does exist!
It is too difficult to find the right spot to click on for an error. The first error I noticed was that the ladder was not opened and locked, so I clicked all over the ladder, accumulating negative scores until the leg missing error popped up, and hit the exact spot for the ladder not opened properly only by chance at the end when I clicked all over the picture to find the last error. I noticed the missing header on the facing window and clicked on the window but once again not in the right spot adding more negative scores. So I guess the test of finding errors is whether you can say what they are before finding them, rather than the score. An interesting exercise. Thank you.
That electrical panel looks a little full!
These "inspections" are a terrific feature and I wanted to play this one. But after the doorbell transformer I tried to zoom in on a section of the panel. Each time I tried to zoom in and move to a different location on a picture section I was penalized in score. There was no way I could find to adjust the zoom to a section. For example, there appears to be a staple through a wire but I could not be sure. When I tried to focus on that location for a zoom the score dropped. Soon I was at a minus score just trying to get a view. Very frustrating.
Hey, got em all, but aren't you suppose to clamp/staple NM cable within 12" of the box (NEC 334.30)? Looks like a "long" 12" to me......
The staple through the cable should be the easiest item to hit, but the game designer seems to have missed it. The ground wire also requires a bushing in this part of the world. Doesn't this house have bedrooms? Where are the arc-fault breakers?
I too, found it frustrating -- accumulating negative scores simply because of a misplaced the cursor. Also, in Canada, at least in most provinces, it is contrary to code to have a panel on a wood wall. Usually, electrician I use at our business or home, cuts a piece of plasterboard (gyproc) slightly larger than the area of the panel (another area I was clicking on)
Nice basic electrical check, but there appears a single #12/2 romex coming into the panel in the upper left side, just below the black NM wire, with a large cable clamp, leaving the wire not properly secured. I also agree with others that noted that the romex on the right side of the panel isn't properly attached within 12" of the panel, another code violation.
Further, the Canadian comment about using wall board (Gypsum) to mount an electrical panel to, makes no sense at all, as the wall board would absorb moisture from the direct contact with the concrete foundation wall and degrade quickly, falling apart. The plywood backer should be PT type and at least 1/2" thick.
Lastly, the panel box doesn't appear to be bonded with a green bonding screw at the neutral bar, if req'd by local code. Frankly, it is one messy looking and crowded panel and could have been better "dressed out" to make any future service work easier to undertake. A sloppy panel makes me wonder what other "short cuts" were taken on this project.
It also appears that the panel has used more than the 90% of capacity which is stipulated in most codes. Fun game and great tool to keep us sharp.
I also appreciate the estimating calculators. They are simpler and quicker than my other programs although they could be improved with a few more varibles such as regional labor costs or complexity.
Thanks FHB for becoming more useful to us contractors at the same time when your articles are sometimes more softmoric.
Jim B
Hi
I think you should be giving out a bonus of 1000 points just for clicking on the entire picture of the electrical panel. The level of conscious care and the standard (lack of) in the entire installation is disgusting if not down right scary! Any subcontractor on my projects that attempted such an inferior install would be spending a lot of time redoing it at their expense and would not be considered for any bids on any future work. Spec's are Spec's and there are a few issues with those, but the workmanship is !!!!!!!. So goes pride of workmanship and integrity of many a tradesperson in the name of laziness, indifference and greed.
'Good enough is not an option'
As someone who's studied architecture and hopes
to ( someday ) be a residential designer, I love the
Inspector scenarios that involve exterior design/detail
mistakes and the others that involve framing, roofing
and bathroom details. I've got a pretty good home library
on architecture, especially residential, but don't refer
to all my books to try to get a good score. Actually, a
few decades of watching This Old House has helped a lot
on my scores. Keep 'em comin'. I love things that are
fun and educational.
I like the improvements to the game. As a western building inspector, I really don't know jack about colonial architecture, but it's still fun all the same. Sometimes I wish there was a link to the answers because I can't find them all. Please keep the challenges coming!
Hey,
If it's true or false and then you give the answer is neither, you've misled us as to the parameters of the possibilities. This ain't Star Trek where Kirk changes the rules.
That constitutes a trick question. Shame on you.
cutdude2, true it is a trick question but if you notice you don't loose any points no matter what your answer is (unless of course you answer outside the box).
Just completed the lastest "Inspector",moisture control,not impressed,parameters weren't clear.I would also install a flashing to divert water at the siding/ brick veneer interface.
Just did the armor game. I agree with Raab. It is another non-functional version. I must have wasted 300 points clicking on the rimjoist seal before I stumbled on the sweet spot. Ditto some other spots. What about vapor barriers? What if we don't waste our time watching the endless reruns of This Old House and don't care how the New Englanders do it? How would we know you want us to fir-down the ceiling to seal the exterior envelope? Our way works for us, and theirs for them. How about doing an installment that is based on seismic codes, or high-slope anchorages?
We don't want you to fir down the ceiling, berferdt, that's why we didn't hide it. It was a bonus, almost a 'What's wrong with this picture?' item.
A vapor barrier in this assembly would be a bad idea as brick and mortar absorb a lot of water that is driven inwards by the sun. mortar bridges shuttle it into the wall, which is often detailed poorly, causing moisture problems. Anywhere but Duluth-like climate places do well with retarders or smart retarders, (like Membrain). Vinyl wallpaper (a vapor barrier) inside the house will often trap tons of moisture in brick wall assemblies, especially in places like Tennessee -- mixed humid climates.
The foam sheathing does a good job of preventing wetting, allowing drying, and keeping the heat inside the house.
Sorry about the rim-joist points, I'll send you a 350 point refund for the next game.
And thanks for the seismic idea -- we'll work one in.
--Dan
I was referring to the lack of any barrier shown between the brick veneer and the wall. I would spray an inch of foam in the wall to help seal an isolate the outside from the inside and add more R, and fill cavities the glass won't fill effectivly. Your reply makes that sound like a bad idea, but it works very well.
berferdt,
I thought you were talking about an interior plastic vapor barrier.
I think what you're saying is to add an inch of spray foam inside the wall cavity because fiberglass won't do the job. What you're describing is called 'Flash and Batt' by some people and it's a great way to get a tight air seal without the extra cost of filling wall cavities with expensive spray foam. If the exterior sheathing isn't air tight, this is a good approach.
The drawing shows exterior foam as the air control layer, water control layer, and thermal control layer.
If you've install exterior rigid foam insulation (detailed well) the spray foam would be added cost you don't need. The exterior foam places the framing inside of the insulation layer, which moves the dew point away from framing and eliminates the risk of condensation inside the walls.
Videos of exterior foam insulation: http://www.greenbuildingadvisor.com/video-superinsulating-home-rigid-foam
Flash and batt does almost the same thing, but the studs are still thermal nosebleeds.
Code Test:
Which code? The IRC would require rebar in continuous footings and walls.
Insulated, enclosed, semi-conditioned attics and crawlspaces are not against the law....
Perhaps the code reference(s) should be stated.
Just finished the rain-screen siding inspection. Lost points because I kept clicking on the siding. It looked like there was no overlap on the clapboard. Never saw clapboard that didn't overlap. Learn something new everyday.
In California (Los Angeles and Ventura counties anyways) rebar is required in footings and concrete floors. Also in California , roof drainage must be directed to the street in front of the house. I think leaving the jacket on the ladder should be counted as a safety violation. I don't know how many points I lost by clicking the wrong spot for the picture window header in the gable end wall. I started to wonder if, as one reader stated, that it was not structurally bearing, or that the shear panels provided the necessary load bearing capacity.
On the "sketchy scaffolding" test, it misses the electrical extension cord laying across the scaffold near the worker. It is a trip hazard. The cord should have been placed behind the scaffolding so the workers did not have to maneuver around it.
I lent my framing contractor my aluminum scaffold plank to assist in the siding of a spec home I was building.
I drove up to the site one afternoon to find an ambulance, two police cars and a emergency fire vehicle.
A partner of the framer walked out on the scaffold just like in the image and fell about 20 feet, landing on his chest with the plank then landing on him, severely brusing his heart muscle, breaking a scapula and two cervical vertibrae (no paralysis!).
Since he was a sub-contractor, he wasn't covered under my worker's comp. Since he was an owner, he chose not to cover his self with worker's comp.
Since the plank was OSHA approved and installed by the framer, he didn't have a legit liability claim against me.
That little fall cost the County of Santa Clara a bit over $200,000 and the injured guy ended up filing a BK.
RE: Workshop Design.
Come on - I know everyone does it, but you can't have a safety test and not give points for a tablesaw without a blade guard. Never mind the power cords stretched across the floor to power the tablesaw and chop saw or the air hose lying there.
As for the bare foot - that's just silly. Who in their right mind is going to walk around in one shoe?
I like the inspector challenges, but I thought this one was poorly done. Sorry.
I didn't play the games referred to above, just the most recent one on "wasted material time and energy". First I'd like to say that doubling window sills is always a good idea over 4 ft. because it reduces warping. I've also heard a framer from California say it's common practice to double all window jacks so as to provide counterpressure against sill twisting (the jacks closest to the opening are cut to fit above and below the sill end). Might not be code but definitely not a waste of anything. Finally, where are the answers? Maybe you could make this a "teachable moment" for us unenlightened ones?
Several points on the framing vs insulation pic,
1)Why is the window spotted so close to the corner? The corner detail is not easy to see to make an informed observation. The window should be over 6" to the right. Its current possition is a loss of a critical shear point. Also, I would be pissed if I had to trim that window since it leaves me with little to no room on the left depending on the desired look to balance the case work given its proximity to the door.
2) The headers didn't need to be that beefy but it is always a good idea to have them over doors and windows. The headers should just be single members placed on the out side thus leaving space for insulation.
3)The double sill plate at the window could just have been a framing flub and it's alot easier to add a 2x so as to not screw the window install later. We have all done it
The other flagged points like studs,criples etc. are a waste of wood. In the Larry Huan method of production work they should have not been placed.
Can somebody please delete the product SPAM?
The inspection games are alway fun. In the Attic furnace game, you touched on not having water pipes in an uninsulated attic but also you can not have a humidifier either. Typically the IBC codes tend to call for a fully weatherstriped door for an insulated enclosure around an attic furnaces in cold climates.
Can there be a "Inspector" game segments on the following areas:
1. Trusses (as looking from inside the attic) to spot things wrong. Also, how to conx trusses to ICF walls.
2. Floor joists and how they conx to ICF (insulated concrete foam) walls.
3. ICF -how to build these correctly and what to watch form when concrete is being poured into the ICF bricks.
4. Tell me what kinds, types and lengths of screws should be used on a home (floor, joists, roof, etc.).
Got my first perfect score on the 3-way switch wiring. I may be only a homeowner, but I've wired these like a bazillion times. As a teenager, I had to replace a 4-way where we had two sets of three lights controlled at three locations in the hallways/stairs. The box with the pair of 4-way switches in it looked like an octopus gang fight. I couldn't find a 4-way at a "home store" so I had to go to a real electric supply place.
Great teaching tool!
On the stair opening test, the near truss is missing plates connecting the webs to the top chord. There is no rule requiring the opening to be framed with double ply trusses. The spain to the girder truss at the head of the stair might be short enough to only need the one ply girder. The stringers should be attached with hangers or into solid web members, but neither is shown. I could only count ten risers and for an indoor space I do not think your going to get a full story of headroom below the bottom of the trusses. The hangers are a odd single strap configuration with no bucket. Since I am being picky the metal gusset plates should have holes indicating there are teeth. Fun game.
BigRed56,
Thanks for the game-topic suggestions. I can't make any promises that we'll cover all of them, but I'll certainly put your ideas on our list.
Thanks,
Rob Wotzak
Egress test: One obvious flaw: the window doesn't open!
On the egress test I would like to see a drain at the bottom of the well and a cover over the opening. Having a window that opens would be useful too. :-)
This one was much more intuitive than usual... But an operative window would really be useful - and code compliant, or else a hammer to break the glass. (then a first aid kit for the nasty cuts!)
I just came across this "the inspector" challenge, I think it's GREAT. By the way I got them all right.
This is some of the reasons it's great 1) it educates the home owner, and #2) all inspectors don't know what they are talking about. This is very important when you buy a home and want an inspection.
I do find it frustrating to figure out where exactly the "inspector window" wants you to click in order to note a problem. Where I click is for the right problem, but isn't exactly where the programs wants me to... Makes for an odd result when looking at the "score".
"Correct! For this gable-end wall the window opening needs a header to support any load that may transfer from the ridge."
Who writes this stuff? Last time I checked, barns have been built for hundreds of years without a ridge. Ridges are just something people came up with to hold the rafters while they're at lunch until they get back to flop the roof.
What's the point of putting headers in non-load-bearing walls; other than to keep my heating bill high?
Wow! This rookie found all five items. Woo Hoo!
HELLO FINE HOMEBUILDING GOT EVERYTHING THAT WAS ON THE PICTURE FOR THE INSPECTOR BUT WHAT IS NOT IN SAFETY BUT I HAD CLICK THE MOUSE ON WAS THE SAFETY OF THE PERSON..... NO HELMET AND NO STEEL TOE WORKING SHOES...... PLEASE REPLY..... THANK YOU..........MOE
YOU THINK YOU KNOW IT ALL MR.YOU HOO...........HA PROBABLY DONT KNOW HOW TO HOLD A HAMMER. SUPPOSE YOU KNOW BETTER....HA...
On the inspector refresher quiz the answer to the crawl space ventilation question references R408.3. It should be the exceptions to R408.2. Although there are exceptions to ventilation openings to the outdoors, each exception does have a condition that will ventilate the area. In other words each exception allows for air movement through the space.
Great game, lots of fun.
Job-site safety. Don't know about the rest, but that sidewinder saw is going to be running on the narrow part of the shoe when he finishes his cut--the wider part of the shoe is on the offcut side. There are few times when I would do this if there were no other option, but here, he could have just cut from the other direction. As is, he is going to have a very tipsy saw as soon as that last piece of 2x falls off.
where is the vent riser for the p-trap & 1-1/2 to 4 lat?
I blew a hundred points trying to find where they hid the vent.
the advertizment is right over the box with the explaination and clue
In the basement plumbing one...is there a vent stack anywhere? I couldn't see one in the picture.
Need vapor barrier
sometimes ignorance is bliss. i got them all
Noticed some typ of blue cord hanging down. It needs to be supported.
The Inspector game is can no longer be played with Mac powerPC machine. Latest Adobe Flash Player requires an Intel based machine.
so if venting a crawlspace is no longer considered the right way by virtually evry source I find these days, why are places like SLC, UT where I operate a residential design firm still requiring them!?!
1- having crawl space at all!
2- having a MAC !! what gives ?? THis won't work.
Re. Crawlspace: Other issues: (1) Sewer pipe not properly sloped - actually looks bowed. (2) copper shouldn't be bent like that and it will freeze here in the northeast with that vent open and it going directly outside. (3) wires need to be through the floor joists if less than #8 gauge. (4) doesn't look like there is a sill gasket.(5) The vent would be ok if it had louvers to open and close paired with a fan. The lovers would and the fan blow outside when the humidity were higher inside and close when the humidity is higher outside. Of course this means the air pressure would need to be balanced somehow - i.e. a real HVAC design would need to be done - obviously not the case here. (6) Brick issue: can't see from the pic, but the mortar joints need to be raked properly to shed water. I wouldn't use brick as part of the foundation - too prone to early failure. I prefer full concrete and add a veneer for aesthetics.
You left out one of the biggest saftey violations in my opinion. The workiers should all have been wearing saftety harnesses and have been tied off to prevent falling off the roof. You should watch some of the Holmes on Homes or Holmes Inspection priograms, when they are working on roofs, any slope roof, they are wearing safety harnesses and are tied off to prevent falls.
I sincerely hope this is posed. Where's the harnesses - the guy leaning over the eaves should have a short length of hose and a strong grip just in case he slips - it's going to be the only thing holding him up there!
Lost many points trying to click on the one tiny spot where the air hose's "hot spot" was! It was the first thing I spotted, and clicked on way too many parts of it before it responded! Very frustrating, when that was so obvious!
Bragging here! My 5 year old was perfect, with only 1 hint used, on the latest Inspector game. He loves it. He has opinions on the not so obvious flaws in the past Inspector games. If I typed in what he said, he would sound too much like you guys!
RE the roofers picture: The first thing I notices is none of the 4-guys on the roof has on a fall arrest system. Looks like 4 OSHA violations to me.
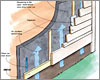
Well, really People build like this?, and I noticed another issue..Don't build the deck against the house, use rubber spacers and drip edge/flashing to the rafter, not the house!
ON the deck puzzle...
In our area hardhats are mandatory. Bolts must secure the ledger to the house frame normally from the inside on second level decks. The flashing method these guys used was shoddy.
Location of these securing bolts are paramount (staggered in the central 1/3 of the open joist space on ledger--not that any building inspector knows that--this is the single best way of not having a deck fall off a house), and building brackets such as joist hangers are always required to reinforce the connection.
many areas are mandating a specialized bracket at the outer ends of the deck to secure to the dwelling.
L
Although it's hard to tell from the photos, I suspect there is no graspable handrail at the the stair.
If the deck is from 2004-on and using the updated ACQ pressure treated wood, you should include a statement regarding the use of proper fasteners - which the rusted nails apparently is the dead give-away. Every time they report of deck failing in the DC Metro area, I check the property for possible date when built. 2 out of 3 noted 2004 or later.
Don't know if it was coded like this on previous inspectors, but this time around I discovered that re-clicking on a previously-discovered hotspot counted for you again. You could literally find one mistake, click on it 6 times, and "win."
According to my research, there have been 23 deaths and hundreds of serious injuries do to deck failures since 2000. A properly designed and built deck cannot be overloaded even if you stacked people onto it shoulder to shoulder. There are two main reasons for deck failures. 1) The ledger (the board that runs parallel to the side of the house and supports the edge of the deck, securing it to the house) is just nailed onto the house. Half the weight of the deck is on the ledger board and nails have a tendency to slide out over time. A ledger board needs to be attached to the house with fastners that are compatible with pressure treated lumber such as galvanized bolts, lags, or ACQ compatible Star Drive Lag Screws™. 2) ROT! Decks that have not been built correctly or have not been maintained are more susceptible to damage and weakening due to rot.
Look for rot’s discoloration in the lumber or anything growing out of the wood. Test for rot by stabbing the wood with a sturdy knife point . If your knife goes in more than one quarter of a inch or you find spongy spots, that means the wood is decaying. If only a few boards are damaged, replace them. You cannot get away with leaving the rotten boards and putting a new board beside it. This will only accellerate the rot by providing fresh food for it. The rot will quickly invade the new board. If you find soft spots in the support posts or beams, you will need to rebuild the deck. (This requires a building permit.) To minimize future problems, hire a professional that specializes in decks.
Assess whether the structure is solid. When you walk on the deck, you should not feel it move. It should not tilt. The railing should be firm and not moveable. The fasteners should not be loose or corroded. If you own a wood deck, you should clean and seal the boards every year. Check your deck yearly and before large gatherings for rot and other problems.
Because decks are exposed to the weather, they don't last forever, and they always come down with friends and family. So make sure your deck doesn’t come down unexpectedly.
Kim Katwijk
President of Deck Builders, Inc
Olympia, WA
Contributing Editor
Professional Deck Builders Magazine
http://www.deckmagazine.com
http://www.artistryindecks.com
The deck has more problems than 6. The end joist is held by nails to the posts which is a problem you run into when you use the upper extension of your support posts as guard rail posts. Beams and joists should bear on 1.5" of wood. The end joist not only is over spanned, the joists are end nailed to it. There wouldn't be end nails in a crooked line if there were hangers hidden on the joist side. I think I see bolts on the ledger board, they seem small, even in this picture. Proper .5" bolts with washers would be more visible. There is no graspable handrail. There are open stair risers. Using the 2x8 ledger as a guide, I believe the stair rail is about 30" high at the nose, of the top tread, it should be 34". Stair header isn't bolted to post. I wouldn't even mention the 'muffin top' footers. I don't like the gap under the heel of the middle stair stringer, but I see gaps at angle cuts all the time.
The moldy window was the last I found. Swore the unprimed boards on the right doghouse dormer would've been a gig.
Your crawl space disaster had a number of other issues like: improper support and pitch of the drain pipe; foundation seepage; hanging wires; improperly fastened wires; bad copper pipe joints and pipe not secured to the wall correctly... My score suffered accordingly. But the exercise was fun. Thank you.
Hi!
I am a building inspector, and this (https://www.ben10gamesfree.info/ro/) game kicks my ass.