previous
  • 10 Basement-Remodeling Tips and Techniques
    10 Basement-Remodeling Tips and Techniques
  • The Inspector Game: Decking Dos and Don'ts
    The Inspector Game: Decking Dos and Don'ts
  • Guide to Paperless Drywall
    Guide to Paperless Drywall
  • 2012 HOUSES Awards
    2012 HOUSES Awards
  • Roofing articles, videos, tools, and materials
    Roofing articles, videos, tools, and materials
  • 7 Small Bathroom Floorplan Layouts
    7 Small Bathroom Floorplan Layouts
  • 15 Coffered Ceiling Design Ideas and Tips
    15 Coffered Ceiling Design Ideas and Tips
  • Complete Kitchen and Bath Guide
    Complete Kitchen and Bath Guide
  • Buyer's Guide to Decking
    Buyer's Guide to Decking
  • 9 Design Ideas & Tips for Concrete Countertops
    9 Design Ideas & Tips for Concrete Countertops
  • 7 Solutions for Kitchen Layout and Design
    7 Solutions for Kitchen Layout and Design
  • Fine Homebuilding: The Digital Issues
    Fine Homebuilding: The Digital Issues
  • 12 Remodeling Secrets Revealed
    12 Remodeling Secrets Revealed
  • Outdoor Kitchen Design Inspiration
    Outdoor Kitchen Design Inspiration
  • Energy-Smart Details
    Energy-Smart Details
  • Meet the Fine Homebuilding Project House!
    Meet the Fine Homebuilding Project House!
  • 13 Door Design and Installation Tips
    13 Door Design and Installation Tips
  • Deck Design & Construction Showcase
    Deck Design & Construction Showcase
  • Painting Ideas, Tips, and Techniques for a Professional Finish
    Painting Ideas, Tips, and Techniques for a Professional Finish
  • How it Works
    How it Works
next
Pin It

Television Garage

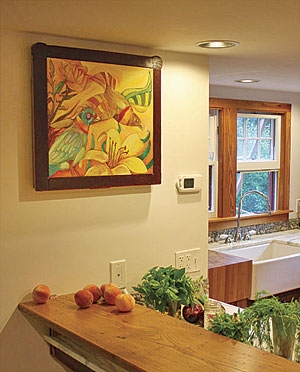
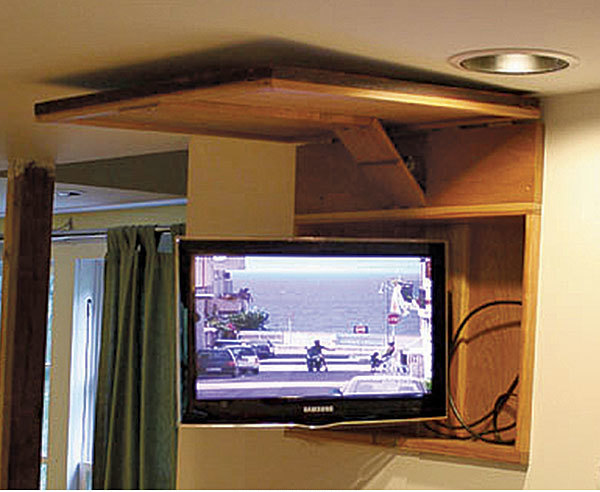
While my wife and I aren’t big TV watchers, she likes to watch food shows as she cooks, and I occasionally like to relax while watching a baseball game. We had a great place to hang a flat-screen unit in the kitchen, but we weren’t willing to move a favorite painting. The solution was to make a recess in the wall and use the painting as a lid.

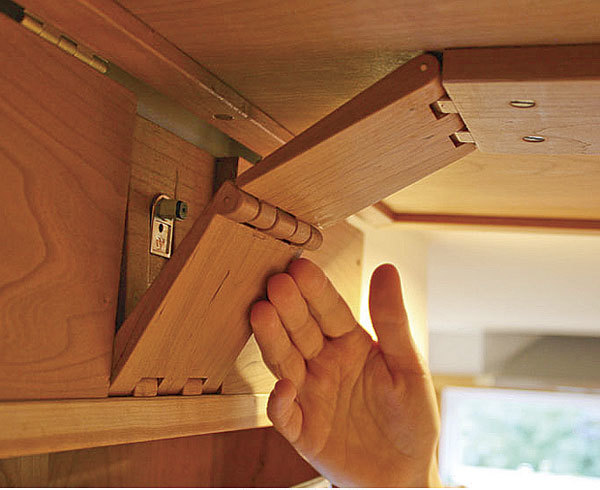
I looked at different mechanical flap stays and upper-cabinet door hinges to hold the lid open, but I couldn’t find one that was just right. I decided to make a hinge out of wood and try using those little soft-close dampers to let it close slowly. I drew the hinge layout to scale on a piece of plywood and used that as a guide to figure out how to carve the hinge.
Put a lid on it. A handmade hinge supports a favorite painting that doubles as the door to the recessed TV. Click to enlarge image Put a lid on it. A handmade hinge supports a favorite painting that doubles as the door to the recessed TV.
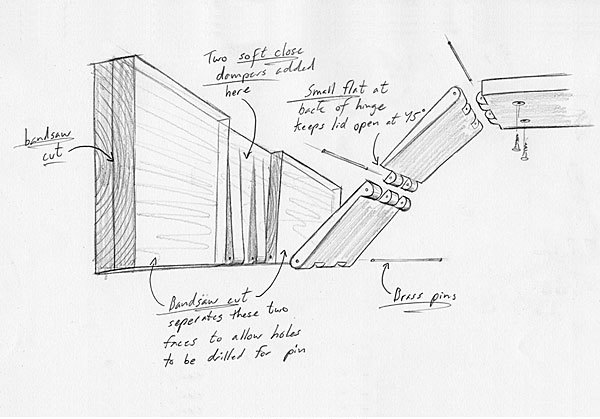
The one tricky part was how to get the brass pin in the bottom of the hinge knuckles on the board that would be mounted to the wall. There’s probably a better way to do it, but here’s the sequence I came up with:

1. Carve the hinge into the board that will be mounted to the wall.
2. Resaw the board from both ends, stopping at the hinge knuckles.
3. Drill the holes for the hinge pin through the hinge knuckles from both sides.
4. Drill the holes for the hinge pin into the two separated board pieces (about 1⁄2 in. deep).
5. Glue the board faces back on with the pin and hinge in place, and hope everything lines up straight.

It works great overall, but I would try to find stronger soft-close mechanisms if I built another. That way I could tap the hinge and let it close all by itself as I walk through the room.
Click to enlarge image
Photos: John Tetreault
From Fine Homebuilding223 , pp. 18 October 13, 2011