
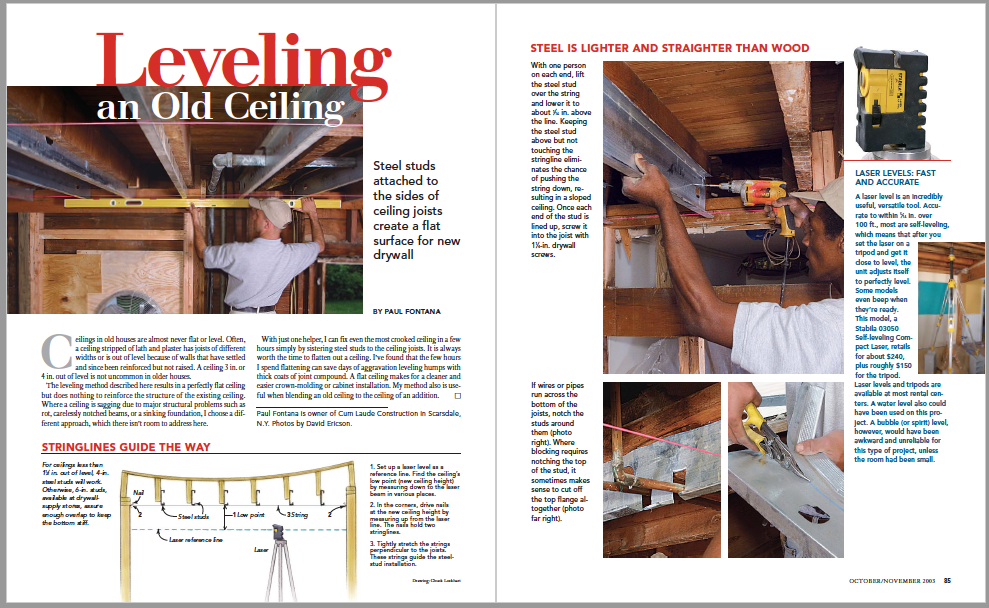
Leveling an Old Ceiling
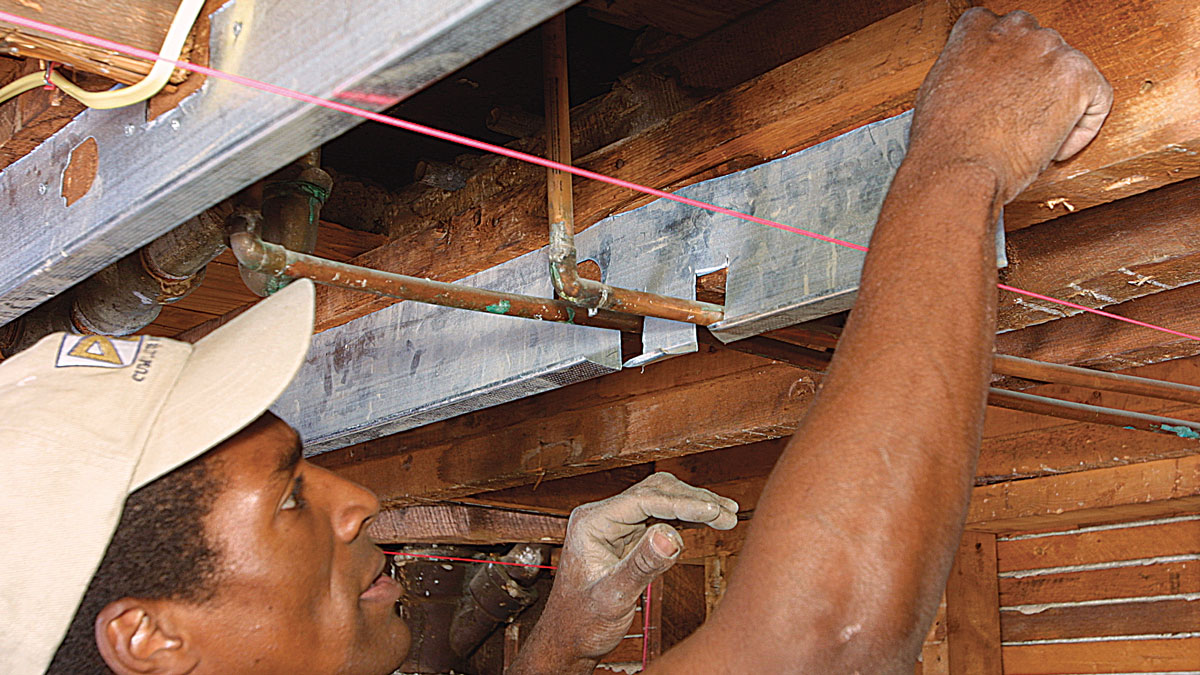
Steel studs attached to the sides of existing floor joists of the room above create a flat surface for new drywall.
Ceilings in old houses are almost never flat or level. Often, a ceiling stripped of lath and plaster has joists of different widths or is out of level because of walls that have settled and since been reinforced but not raised. A ceiling 3 in. or 4 in. out of level is not uncommon in older houses.
The leveling method described here results in a perfectly flat ceiling but does nothing to reinforce the structure of the existing ceiling. Where a ceiling is sagging due to major structural problems such as rot, carelessly notched beams, or a sinking foundation, I choose a different approach, which there isn’t room to address here.
With just one helper, I can fix even the most crooked ceiling in a few hours simply by sistering steel studs to the ceiling joists. It is always worth the time to flatten out a ceiling. I’ve found that the few hours I spend flattening can save days of aggravation leveling humps with thick coats of joint compound. A flat ceiling makes for a cleaner and easier crown-molding or cabinet installation. My method also is useful when blending an old ceiling to the ceiling of an addition.
Stringlines guide the way
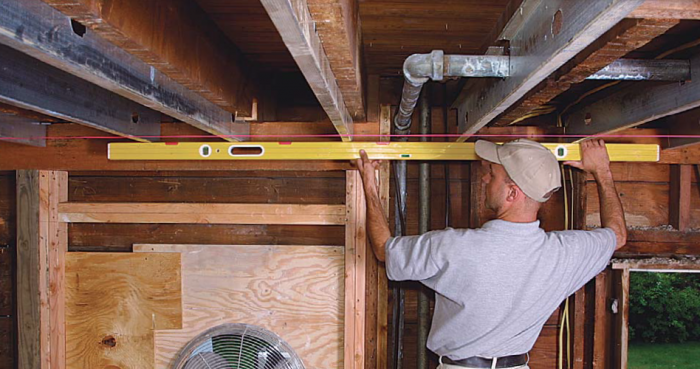
The first step in the process is to set up a laser level as a reference line (see Laser levels: fast and accurate). Find the ceiling’s low point (new ceiling height) by measuring down to the laser beam in various places (#1 in the drawing below). In the corners, drive nails at the new ceiling height by measuring up from the laser line. The nails (#2 in the drawing) hold two stringlines. Tightly stretch the strings (#3 in the drawing) perpendicular to the joists. These strings guide the steel-stud installation.
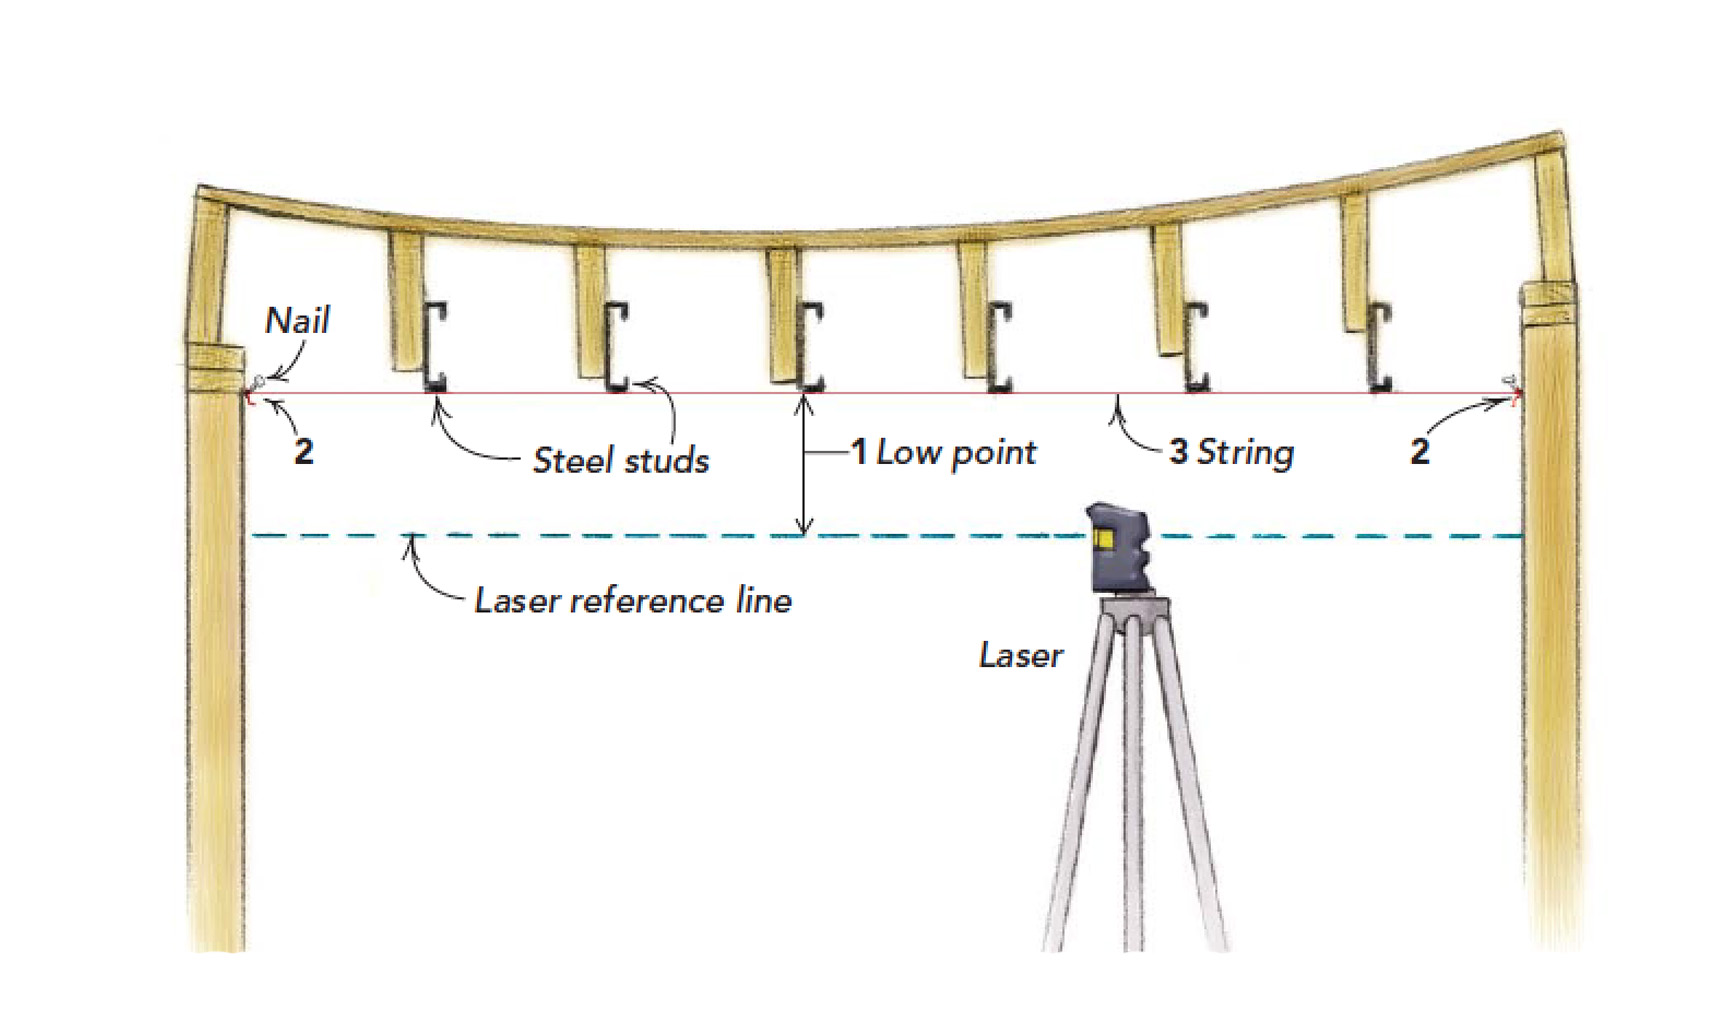
1. Set up a laser level as a reference line. Find the ceiling’s low point (new ceiling height) by measuring down to the laser beam in various places.
2. In the corners, drive nails at the new ceiling height by measuring up from the laser line. The nails hold two stringlines.
3. Tightly stretch the strings perpendicular to the joists. These strings guide the steelstud installation.
Laser levels: fast and accurate
A laser level is an incredibly useful, versatile tool. Accurate to within 5/16 in. over 100 ft., most are self-leveling, which means that after you set the laser on a tripod and get it close to level, the unit adjusts itself to perfectly level. Some models even beep when they’re ready.A laser level is an incredibly useful, versatile tool. Accurate to within 5/16 in. over 100 ft., most are self-leveling, which means that after you set the laser on a tripod and get it close to level, the unit adjusts itself to perfectly level. Some models even beep when they’re ready.
 |
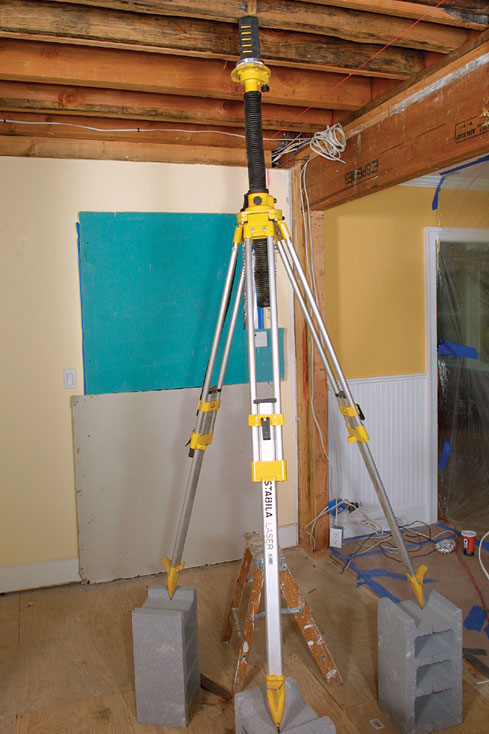 |
This model, a Stabila 03050 Self-leveling Compact Laser, retails for about $240, plus roughly $150 for the tripod. Laser levels and tripods are available at most rental centers. A water level also could have been used on this project. A bubble (or spirit) level, however, would have been awkward and unreliable for this type of project, unless the room had been small.
Steel is lighter and straighter than wood
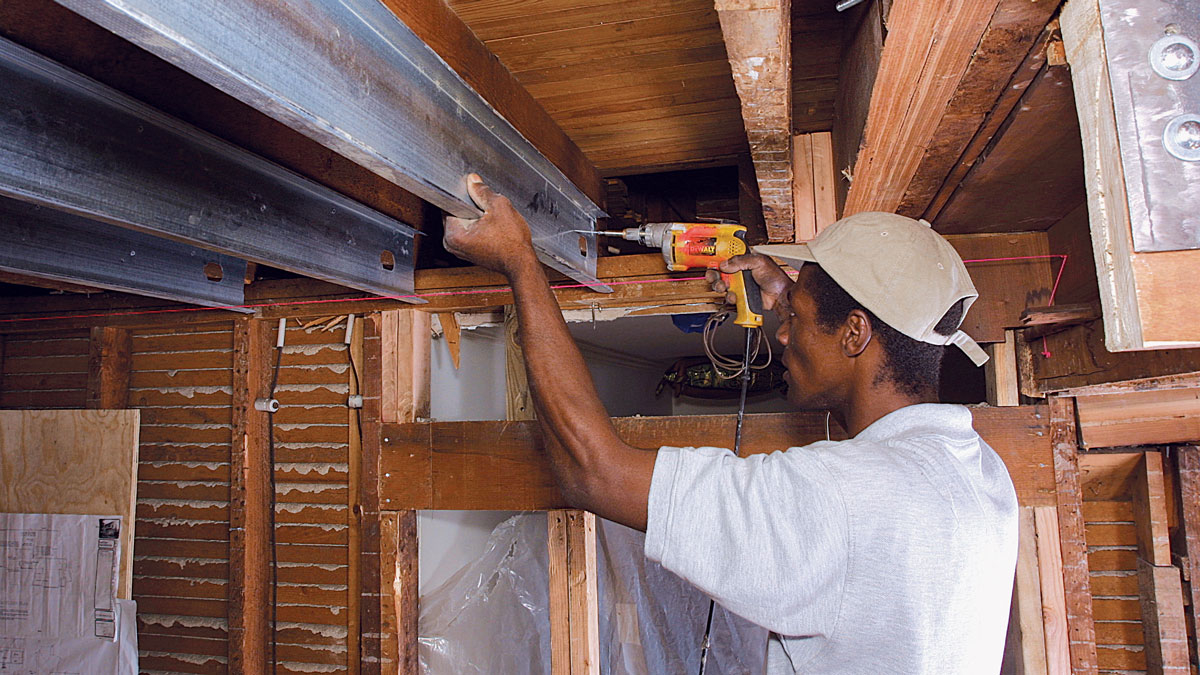
For ceilings less than 1-1/2 in. out of level, 4-in. steel studs will work. Otherwise, 6-in. studs, available at drywall-supply stores, ensure enough overlap to keep the bottom stiff.Attach the stud to the joist with 1-1/4-in. drywall screws.
With one person on each end, lift the steel stud over the string and lower it to about 1/16 in. above the line. Keeping the steel stud above but not touching the stringline eliminates the chance of pushing the string down, resulting in a sloped ceiling. Once each end of the stud is lined up, screw it into the joist with 1-1/4-in. drywall screws.
 |
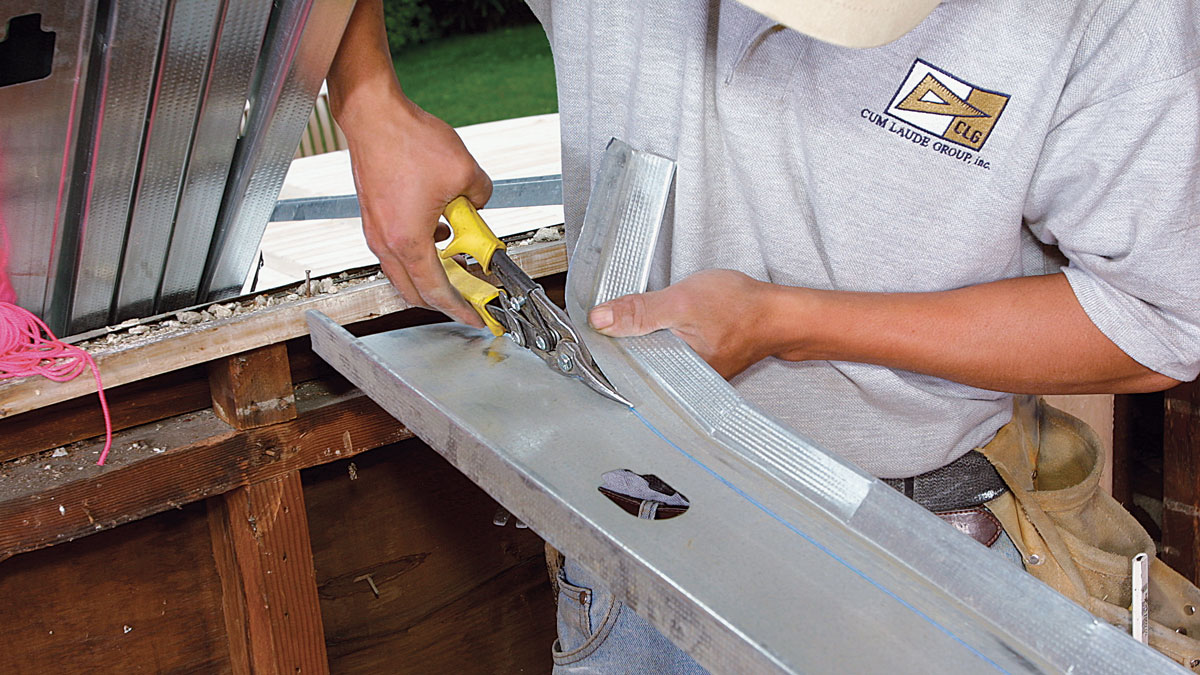 |
If wires or pipes run across the bottom of the joists, notch the studs around them. Where blocking requires notching the top of the stud, it sometimes makes sense to cut off the top flange altogether. Studs can be notched around pipes. If blocking interferes with the stud, the top flange can be snipped off.
Paul Fontana is owner of Cum Laude Construction in Scarsdale, New York.
Photos: David Ericson; drawing: Chuck Lockhart
 From Fine Homebuilding #158
To this article as a PDF, please click the View PDF button below.

View Comments
Could you share any suggestions or techniques applicable to leveling sloped ceilings in concrete slab construction? Commonly found in today's high rises, the slab itself is often skimmed (or sprayed with popcorn) surface treatments and painted to serve as the cosmetic ceiling. Tolerances are often poor with as much as a 2" difference in height from one side of a room to another. Any recommendations for leveling such a ceiling to its lowest point without reducing the overall height by more than the difference of the highest and lowest point?