Survey of 3-in. by 21-in. Belt Sanders
They all turn wood to dust, but some are more comfortable, others are quieter, and one has a really long cord
I own disk sanders in two sizes, angle and palm-grip random-orbit sanders, several orbitals, belt sanders, portable drum sanders, detail sanders–I have a lot of sanders. If I were reduced to one sander, I would keep my belt sander, forsaking all others. The belt sander is the one sander I consider indispensable.
As a stairbuilder, I belt-sand stock every day. From flattening glued-up boards to leveling edge moldings with the top of veneered-plywood stair-tread ends I reach first for my belt sander. This daily alternation between operations whose goal seems to be making bushels of wood dust to those where a moment’s inattention can ruin an hour’s work has shown me much about the capabilities of belt sanders. Twenty years of stairbuilding has given me a good feel for operating this machine and for what makes one work well or poorly.
For this article, I surveyed ten 3-in. by 21-in. sanders, the most popular size (for the tools, their specs and my write-ups, see Belt-sanders reviewed). No one sander was perfect, of course, but I eventually got good results with most of them. Many had features new to me; some were old standards. I tried the sanders on job sites and in the shop. Here is what I learned about them.
Variable speed provides less aggressive sanding for fine work
This was my first opportunity to use a variable-speed belt sander. I confess that most of the time, I ran the sanders full speed, slowing them down occasionally for fine work. The less aggressive slower speeds worked particularly well for sanding edge moldings flush with veneered-plywood treads. As the moldings snuck up on being flush, I could slow the sander and reduce the chance of sanding through the thin veneer face.
The usefulness of the variable-speed switch had a lot to do with location. Some switches were right at hand. These, I used. Others were so out of the way that it was hard to change speeds without stopping the sander. If a sander had a conveniently placed variable-speed switch, I used it more and more frequently.
The real measure of sanding power
I have yet to use a belt sander that had too much power. The amperage rating on the motor is one measure of power. In use, however, what matters is how efficiently the sander converts these amperes to a vigorous rotation of the sanding belt. The measure of this power is the amount of downward pressure that the sander will handle before the belt slows appreciably. A sander with good power and a high foot-per-minute (fpm) rating will grind down wood quickly. Without inventing some sophisticated testing rig, there was no way to quantify this. Although the feel of power in a sander is obvious, my comments in the individual reviews about power at the belt are subjective.
I judged the power of the sanders by using them for a common stairbuilding task: sanding tread ends flush. With a new Klingspor (800-228-0000; www.klingspor.com) 120-grit belt on each machine, I ran it full power and, if applicable, with the speed dialed down. The less the tool slowed under heavy pressure, the more power I judged it to have.
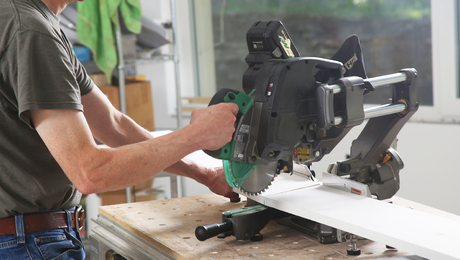
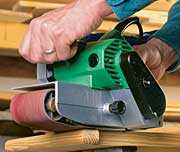
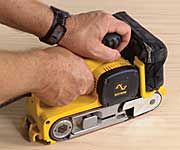
In-line and transverse sanders are balanced differently
An obvious difference between the sanders is whether the motor is mounted transversely or in line with the belt. Traditionally configured tools — transverse sanders such as the Hitachi or the Porter-Cable — have the axis of their motors perpendicular to the belt. In-line machines, such as the Bosch, the Craftsman and the Ryobi, have the motor’s axis parallel to the belt.
Because the drive pulleys of the transverse sanders are off to one side, some people find these machines to be unbalanced. I’ve never noticed a problem.
In-line sanders are more symmetrical and perhaps more evenly balanced. They’re certainly lighter, which can be an advantage if you’re stuck sanding overhead. And their flat tops make it easy to clamp them upside down to the bench for use as stationary sanders. For normal bench use, however, I like the greater weight of the transverse sanders because it means I don’t have to lean on the machine to hasten stock removal.
Tracking controls keep the belt where you want it
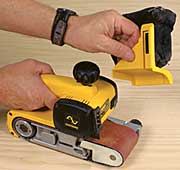
I constantly change between rough-grit and fine-grit belts. The belt-release lever on my sander gets a real workout. The release lever moves the front roller of the sander toward the rear of the machine, releasing the tension on the belt and allowing its removal. The lever must be capable of standing up to the stress of repeated belt changes.
The tracking mechanism on a belt sander steers the front roller to keep the belt in the middle of the platen. If the belt is too far in, it rubs against the frame. The sanders have stops to keep the belt from damaging them, but the belt will fray and fail prematurely if it rides against this stop for any length of time. If the tracking is adjusted too far outward, the belt can come off completely.
Tracking is adjusted by turning a knob near the front roller. Some of the adjusters were too coarse, and a small movement of the knob moved the belt disproportionately far. On other sanders, the adjustment was too fine. It took numerous turns of the knob to see any movement of the belt.
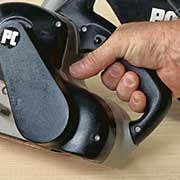
For the best performance, a sander must feel comfortable
Weight, balance and handle placement all affect the ease with which a belt sander is controlled. Handles that are too close, for example, put my hands too close together to steer the tool easily.
Conversely, in-line sanders were a bit too long for me with almost 12 in. between their handles. But comfort and control are slippery, subjective terms. What feels good in my hands when I’m sanding stair treads at a bench may mean nothing to you sanding a dinged fascia board while standing on a ladder.
With comfort and control, I expect matching performance. I didn’t always get it. The most common failing was uneven sanding caused by a warped platen. To aid in sanding surfaces flat, several manufacturers sell sanding frames that control how the sander contacts the work.
Noise plays into the comfort of using any machine, especially if you’re using it all day. I measured the noise produced by the sanders with a decibel meter set on a tripod and positioned about the same distance from the sanders that my ears would be when I was using the tools.
The noise levels of these sanders varied from 92 db. to 104 db. This doesn’t seem like a huge spread until you realize that 100 db. is ten times louder than 90 db.
Gathering dust at the machine improves air quality
Dust in the shop never used to bother me. The older I get, though, the more it does bother me, and the more I wish I had done something about it earlier in life. It’s probably impossible to remove every dust particle from the air in a wood shop, but air quality can be greatly improved by using tools designed to collect the dust they produce.
Most of these sanders’ dust-collection systems work well, capturing most of the dust created by the sander. To increase dust-collection efficiency, hook a vacuum hose to the sander in place of the bag.
Assembling the perfect belt sander
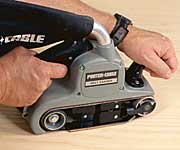
None of these sanders was perfect. Put together the parts to make the following machine, and I’ll be a happy man: the graphite platen and speed control on the Bosch; the 16-ft. cord on the Makita; the flat tops that enabled the Craftsman and Ryobi to lie upside down; the removable front cowling on the DeWalt; and the feel and metal case of the Porter-Cables.
Given the choices, though, the Porter-Cable 352VS, with a graphite platen installed in place of the metal one (see Quick fix for a platen that’s not flat) would be my first pick. That sander had good overall quality of workmanship, a metal case, variable speed, comfortable handles, good dust pickup and plenty of power. I think the look and feel of a sander are important, and this machine seems just right to me.
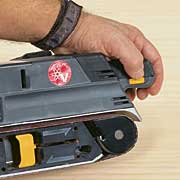
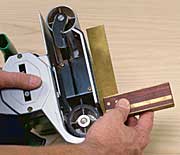
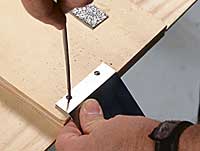
Quick fix for a platen that is not flat
Nothing affects the quality of the sanding job done by a belt sander more than the platen. The platen supports the belt where it contacts the workpiece. Like a block for hand-sanding, the platen must be flat to sand flat. Most of the sanders in this survey had metal platens that were not flat. If the platen is curved, the sander will dish out the workpiece, creating a streaked sanding pattern where there should be a smooth one.
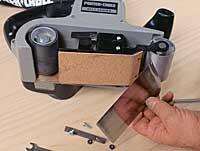
Nearly all belt sanders come with a metal platen cushioned by a layer of cork. The cork cushions the belt; without this cushion, the belt tends to take divots.
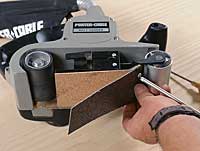
To check the platen on your belt sander, unplug the sander and hold a straightedge up to the platen, parallel to the belt direction, with and without a belt on the sander. Chances are you’ll see a crown in the belt exactly where it should be dead flat. If this is the case, you can correct the problem by removing the platen that comes with the tool and replacing it with a graphite one, as shown in the four photos below.
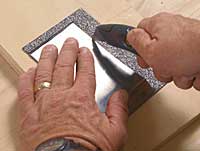
Most stroke sanders and edge sanders, heavy-duty stationary machines, use graphite-impregnated heavy canvas for the platen. The graphite not only reduces friction but also conforms to the bottom of the sander, which I found to be flat on all the machines in this survey. An added bonus is that with the reduced friction, a given machine can deliver more power to the belt.
The Klingspor Company (800-228-0000; www.klingspor.com) sells graphite-platen material that replaces metal platens. A 3-in. by 3-ft. roll costs $2.36, plus shipping. Replace the graphite periodically.
Lon Schleining is a stairbuilder in Long Beach, California.
Photos: Scott Phillips