previous
  • Wanted: Plumber for a Bathroom Remodel
    Wanted: Plumber for a Bathroom Remodel
  • VIDEO: Stop Paint from Bleeding
    VIDEO: Stop Paint from Bleeding
  • How To Make a Reciprocating-Saw Blade Guide Block
    How To Make a Reciprocating-Saw Blade Guide Block
  • Your Guide to Energy Smart Homes
    Your Guide to Energy Smart Homes
  • The Self-Taught MBA: Inspired Reading
    The Self-Taught MBA: Inspired Reading
  • Top 10 Videos of 2011
    Top 10 Videos of 2011
  • How to Avoid Complicated Fractions
    How to Avoid Complicated Fractions
  • Seven Steps to Choosing the Perfect Circular Saw
    Seven Steps to Choosing the Perfect Circular Saw
  • Replacing a Roof : Installing a Ridge Vent
    Replacing a Roof : Installing a Ridge Vent
  • The Inspector Game: Goofs on a Roof
    The Inspector Game: Goofs on a Roof
  • 10 Basement-Remodeling Tips and Techniques
    10 Basement-Remodeling Tips and Techniques
  • Fine Homebuilding: The Digital Issues
    Fine Homebuilding: The Digital Issues
  • Patrick's Barn: A Perfect Place for a Party
    Patrick's Barn: A Perfect Place for a Party
  • Fine Homebuilding: The Current Issue
    Fine Homebuilding: The Current Issue
  • 7 Small Bathroom Layouts
    7 Small Bathroom Layouts
next
continued 123next>VIEW ALL

Circular-saw repair

Learn how to replace a circular-saw cord and trigger switch

Don’t repair cords, replace them. OSHA regulations say, “Flexible cords shall be used only in continuous lengths without splice or tap.” Don’t repair cords, replace them. OSHA regulations say, “Flexible cords shall be used only in continuous lengths without splice or tap.” Photo by: Krysta S. Doerfler

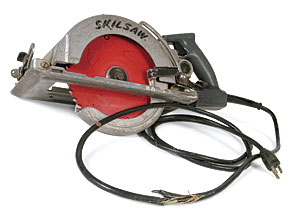
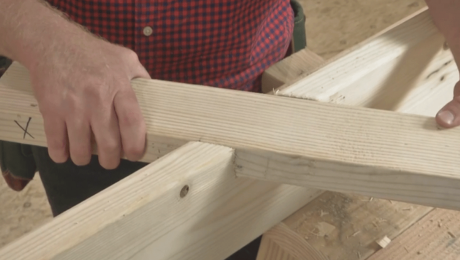
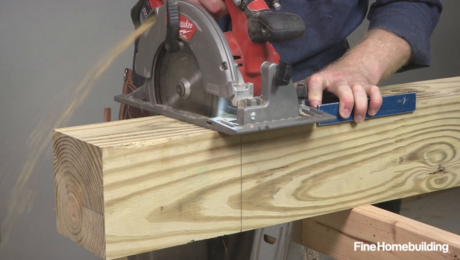
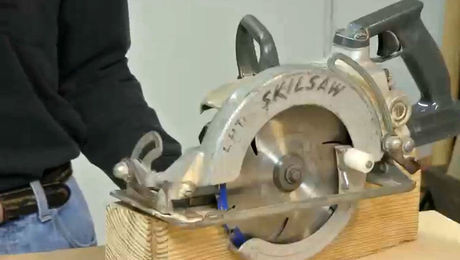
My first circular saw was a Skil HD77 worm drive. One of the first cuts I made with it was through its own cord. As the motor wound down, the weight of the saw caused me to let it drop to my side, where the cord was hanging in the wrong place. In an instant, the cord was in two pieces, and I was looking at lost time and money spent for repairs. According to Tom Peck, who specializes in power-tool repair and maintenance at Tibby’s Electric Motor Service in Bethel, Conn., cut cords are fairly common, especially with worm-drive saws. The repair procedure is the same for just about any type of portable power tool.

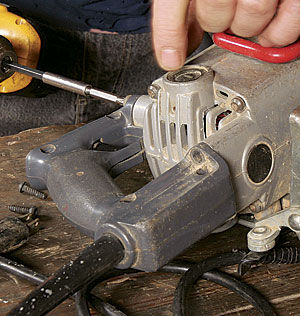
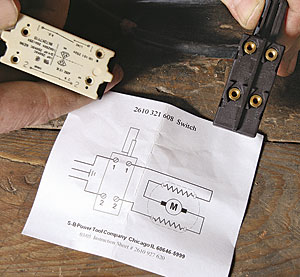
Peck says that if the trigger switch hasn’t been replaced recently, he recommends doing that at the same time you’re replacing the cord. Switches generally are not interchangeable among manufacturers, and cords can be specific to the model and year of manufacture. That’s why it’s important to double-check that the saw matches the replacement parts before starting the repair.

Peck also makes sure he has the right tools on hand. Even though the Torx-head screws on the HD77 can be turned with different-size straight screwdrivers, Peck relies instead on a multibit screwdriver that contains a good selection of interchangeable bits.

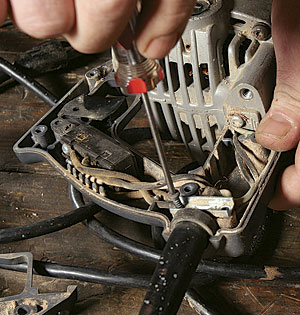
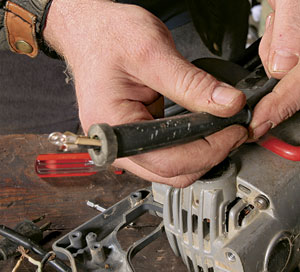
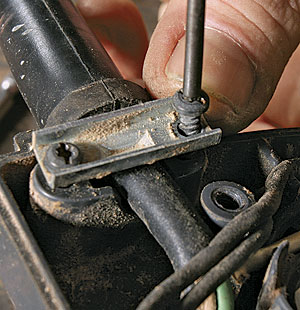
Step By Step: Take off the handle housing, then remove the cord and switch

Remove the housing screws. Lay the saw on a table with the screws in the handle facing up. Remove the screws that hold the two sides of the handle together. Then remove the two screws that attach this side of the handle to the saw’s body. Remove the housing screws. Lay the saw on a table with the screws in the handle facing up. Remove the screws that hold the two sides of the handle together. Then remove the two screws that attach this side of the handle to the saw’s body.
Remove the cord retainer and switch. The cord-retainer bracket and the switch both are secured with 15t screws. Once they are removed, use a 20t bit to loosen the ground wire. Remove the cord retainer and switch. The cord-retainer bracket and the switch both are secured with 15t screws. Once they are removed, use a 20t bit to loosen the ground wire.
Remove all four wires to the switch. Two wires go to the saw’s motor, and two wires go to the cord. Once all the wires are loose, discard the old cord and switch. Hold on to the rubber strain relief and all the screws; you’ll need to reuse them. Remove all four wires to the switch. Two wires go to the saw’s motor, and two wires go to the cord. Once all the wires are loose, discard the old cord and switch. Hold on to the rubber strain relief and all the screws; you’ll need to reuse them.
More Info
Photo by: Krysta S. Doerfler
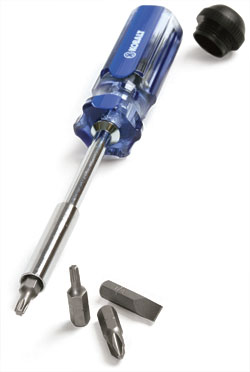
I like simple, well-designed tools. I even appreciate the engineering that goes into a multibit screwdriver. When I have to buy one, I look for a design that has a solid feel, good balance, and a nofrills mechanism for tip changes. I shy away from multibit screwdrivers that look more like robotic transformers than tools. For years, I carried one that had a choice of four drivers (two sizes for both slotted and Phillips heads). I relied on an old Altoids tin to store extra bits. However, plenty of new multibit screwdriver designs are worth a second look. The Kobalt looks and feels like a regular screwdriver, and it has a magnetic tip with interchangeable bits that are stored in a hollow handle. At $5.98 (www.lowes.com), it won’t break the bank, either.

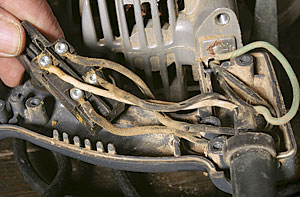
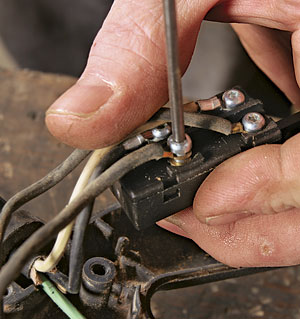
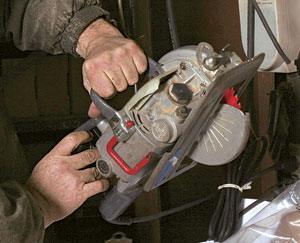
Step By Step: Attach the new cord to the motor, then to the new switch

The drawing shows where the wires will go. When you’re holding the new switch by the trigger, the neutral (white) wire and positive (black) wire attach to the left side of the switch. The white switch on the left is an old-style switch that might be found in some saws. The black switch is the new replacement. The drawing shows where the wires will go. When you’re holding the new switch by the trigger, the neutral (white) wire and positive (black) wire attach to the left side of the switch. The white switch on the left is an old-style switch that might be found in some saws. The black switch is the new replacement.
Slip the rubber strain relief onto the new cord. Push through enough wire so that the ground (usually green) wire can reach the saw’s body; then push the strain relief’s rubber flange into its slot in the handle. Slip the rubber strain relief onto the new cord. Push through enough wire so that the ground (usually green) wire can reach the saw’s body; then push the strain relief’s rubber flange into its slot in the handle.
Attach the wires to the switch. The wires from the saw’s motor are both black. They are interchangeable from top to bottom but not from side to side. Attach the wires to the switch. The wires from the saw’s motor are both black. They are interchangeable from top to bottom but not from side to side.
Screw down the cord-retainer bracket. With the strain relief in its slot, screw down the cord retainer, and screw the switch in place. Last, replace the housing. Screw down the cord-retainer bracket. With the strain relief in its slot, screw down the cord retainer, and screw the switch in place. Last, replace the housing.
Test the switch. Don’t put away the saw yet. Plug it in, and give the trigger a few pulls to make sure everything is in working order. Now is a good time to check the oil level, the brush condition, and the guard travel. Test the switch. Don’t put away the saw yet. Plug it in, and give the trigger a few pulls to make sure everything is in working order. Now is a good time to check the oil level, the brush condition, and the guard travel.
Magazine extras: Watch Tom Peck replace the switch and tune-up a circular saw.
Photos by John Ross, except where noted
From Fine Homebuilding188 , pp. 108-110 July 1, 2007
continued 123next>VIEW ALL