Q:
In a conventional tiled shower stall, the floor of the shower is lined with a shower an or membrane. A raised threshold or jam keeps shower water from running into the bathroom. However, in a shower for a wheelchair user, the shower floor must be at the same elevation as the main bathroom floor with no lip or threshold at the entrance. In this case, how do you create a waterproof shower and keep water from running into the bathroom?
Bill Holzhauer, Salem, SC
A:
Tom Meehan, a tile contractor in Harwich, Massachusetts, replies: On Cape Cod, where I do most of my work, there is a large number of retirees, any of whom use wheelchairs. So I’ve installed quite a few accessible showers in both new and old homes.
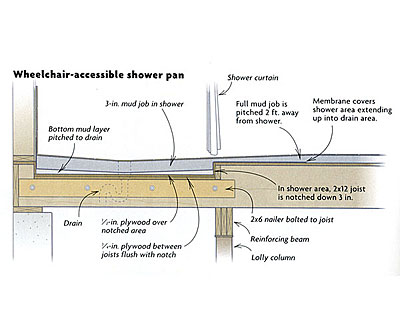
When building a tiled wheelchair-accessible shower stall, there are three main issues. First, you must provide adequate depth in the floor to allow enough pitch to the drain. Second, a drainage area of at least 2 ft. outside the shower stall should be pitched toward the shower to avoid a threshold. Finally, the vinyl or rubber membrane that lines the shower stall must be installed properly.
To gain the depth I need when retrofitting a wheelchair-accessible shower, I have the carpenter on the job remove the subfloor and cut the joists down 3 in. in the shower-stall area. Then 2×6 nailers are bolted to the joists 3/4 in. below the tops of the cut joists on both sides. Next, 3/4-in. plywood is cut and fit between the joists on top of the nailers, and 1/2-in. plywood is nailed in, covering the shower-stall area.
Reducing joists by 3 in. substantially weakens them, so check with an engineer about beefing up the floor. With most first-floor shower stalls, we add floor support with a beam and lolly columns in the cellar.
The second step is installing the shower membrane. To pitch the shower-stall floor to the drain, I put down a layer of mud the day before I install the membrane. In a conventional 4-ft. deep shower stall, I screed this layer from 1 in. thick at the perimeter to 1/2 in. thick at the drain, or a slope of 1/4 in. per ft.
The next day, I cut and install the membrane, running it 6 in. up the shower-stall wall, and then I continue the membrane up and out the shower 2 ft. into the outside area. I make sure that no debris or nail heads are sticking out under the membrane; they could puncture it and cause a leak. I then add a 3-in. mortar bed on top of the membrane in the shower stall.
Outside the shower stall, including the 2-ft. drainage area around the shower, I like to put in an old-fashioned 1-1/4 in. thick mud job over tar paper and wire mesh. The membrane takes the place of the tar paper in the 2-ft. drainage area that’s just outside the shower. With nails through it for the wire mesh, the membrane won’t be totally waterproof in that area, but that area outside the shower curtain should not be subjected to the same constant water flow as the shower area.
I float the mortar bed in the main part of the bathroom and then pitch the 2-ft. drainage area the same 1/4 in. per ft. down to meet the mud in the shower area. When all is said and done, the floor will have about 1 in. of pitch from the level part of the bathroom floor to the drain, and a shower threshold will not be necessary.