previous
  • 12 Remodeling Secrets Revealed
    12 Remodeling Secrets Revealed
  • Roofing articles, videos, tools, and materials
    Roofing articles, videos, tools, and materials
  • Complete Kitchen and Bath Guide
    Complete Kitchen and Bath Guide
  • Buyer's Guide to Decking
    Buyer's Guide to Decking
  • How it Works
    How it Works
  • The Inspector Game: Decking Dos and Don'ts
    The Inspector Game: Decking Dos and Don'ts
  • 10 Basement-Remodeling Tips and Techniques
    10 Basement-Remodeling Tips and Techniques
  • Guide to Paperless Drywall
    Guide to Paperless Drywall
  • Fine Homebuilding: The Digital Issues
    Fine Homebuilding: The Digital Issues
  • 2012 HOUSES Awards
    2012 HOUSES Awards
  • 7 Small Bathroom Floorplan Layouts
    7 Small Bathroom Floorplan Layouts
  • Meet the Fine Homebuilding Project House!
    Meet the Fine Homebuilding Project House!
  • 9 Design Ideas & Tips for Concrete Countertops
    9 Design Ideas & Tips for Concrete Countertops
  • Outdoor Kitchen Design Inspiration
    Outdoor Kitchen Design Inspiration
  • Painting Ideas, Tips, and Techniques for a Professional Finish
    Painting Ideas, Tips, and Techniques for a Professional Finish
  • Energy-Smart Details
    Energy-Smart Details
  • 15 Coffered Ceiling Design Ideas and Tips
    15 Coffered Ceiling Design Ideas and Tips
  • 13 Door Design and Installation Tips
    13 Door Design and Installation Tips
  • 7 Solutions for Kitchen Layout and Design
    7 Solutions for Kitchen Layout and Design
  • Deck Design & Construction Showcase
    Deck Design & Construction Showcase
next
Pin It

Help for solo crown-molding installers

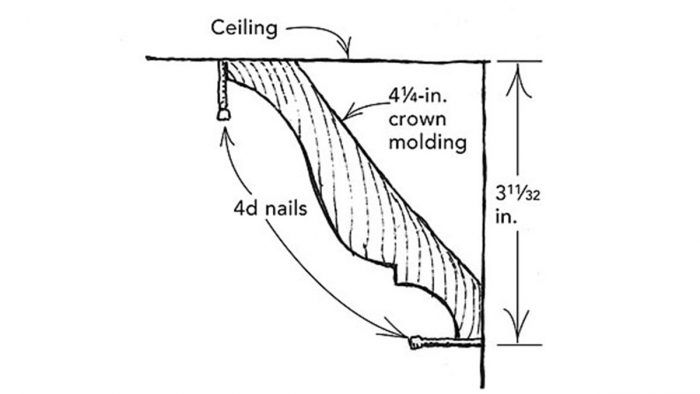
I recently installed 4-1/4-in. preprimed crown molding in my living and dining rooms. I was working by myself, so I needed a way to support and fit it together.

I measured down from the ceiling 3-11/32 in. and drove 4d nails halfway into the drywall, about every 4 ft. or so. These nails supported the weight of the crown molding. To lock the molding in place, I tapped a couple of nails into the ceiling, as shown in the drawing. Now I could go to the next wall, fit the coped joints, and temporarily support the molding in the same manner. Once I had all the crown molding fitted to my satisfaction, I nailed it to the walls and ceiling with an 18-ga. brad nailer loaded with 2-in.-long brads.

I then pulled out the 4d support nails and caulked the edges of the molding along the ceiling and wall with acrylic latex caulk. This filled any minor gaps in the trim and the holes from the support nails all in one process.


Otto Rhodes, Pueblo, CO
From Fine Homebuilding 173, pp. 26 September 1, 2005