Drying Racks for Painted Trim Work
Stain shoe moldings quickly with this reusable technique and structure.
I hate cutting in, that fussy job of laying down a clean painted edge where woodwork meets walls. I especially dislike the chore when it comes to new construction, where I consider it practically unnecessary. My crews paint or stain virtually all the woodwork and trim before we put it up.
This policy has its drawbacks, however. It requires us to find a place to lay out all those hundreds and hundreds of linear feet of baseboard, casing and crown moldings while they dry.
For years, we had to wait for good weather, then set up every sawhorse, stepladder and milk crate we could find along with a few dozen 1x3s for crossbars. We’d paint or stain outside, then spend a lot of time picking mosquitoes and black flies from the dried finish. Yuck.
Last autumn, I got a bit behind schedule and wound up finishing a major kitchen project in November. Staining the wainscoting, chair rails, baseboards and crown moldings outside was not possible. Already, 6 in. of snow covered the ground, and my next window of good weather was about seven months in the future.
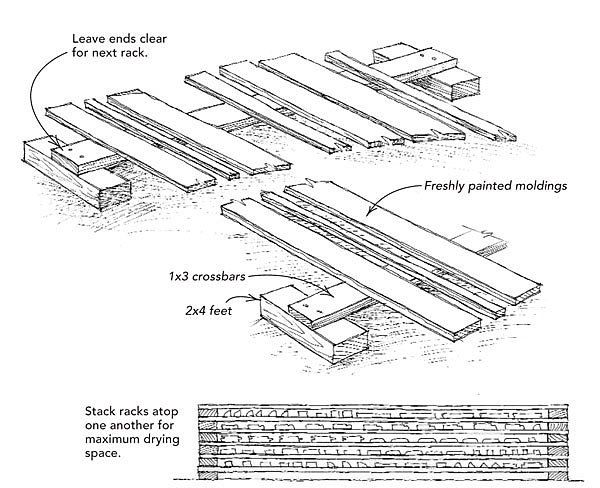
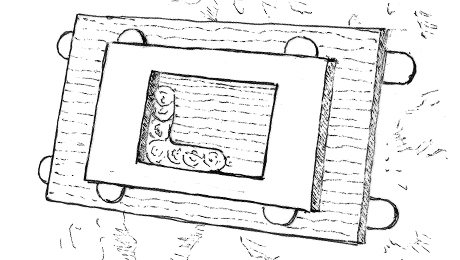
The solution that I came up with was so laughingly simple that I nearly smacked myself on the back of the head for not having thought of it years ago. As shown in the drawing, I used my finish nailer to affix 4-ft. long 1x3s to a 2×4 block at each end. I made 20 of these pieces in about 15 minutes.
Next, I laid out a length of poly sheeting on the floor and set two racks on it about 6 ft. apart. I then stained a couple of dozen shoe moldings and laid them across the two racks. When they were full, I simply put two more racks atop the first two and continued staining. I was able to stack the racks ten high without any trouble.
Although the racks didn’t cost much, I didn’t toss them at the end of the job. Instead, I wrapped them into bundles and put them in the shed. They’re never there for long, though. If I charged rent to my friends and competitors for each time someone borrowed them, I’d probably be able to take a little more time off and work on my own house.
—T. H. Richards, Mont-Tremblant, None
Edited and illustrated by Charles Miller
From Fine Homebuilding #149


View Comments
I do the same, but be warned, one has to do a lot of scraping and sanding of the backs of the trim so that they sit flat on the table/mitre saw for cutting. --but it is still worth it.
Several painting contractors I work with have asked me to make similar racks, but ours have 2x3 or 2x4 blocks set on edge and a notch for the 1x3, which makes a tall stack much more stable. They usually roll the paint but follow up with a brush to minimize the drips that need to be scraped off later.