
During my 40 years in the trades, I’ve had a number of high-end drywall jobs that required dead-flat ceilings — no telltale bulges allowed where the ends of the drywall sheets abut one another. The method shown in the drawing is our solution to the problem. I’ve inspected some jobs that we did 25 years ago using this method, and you still can’t see where the butt joints occur.
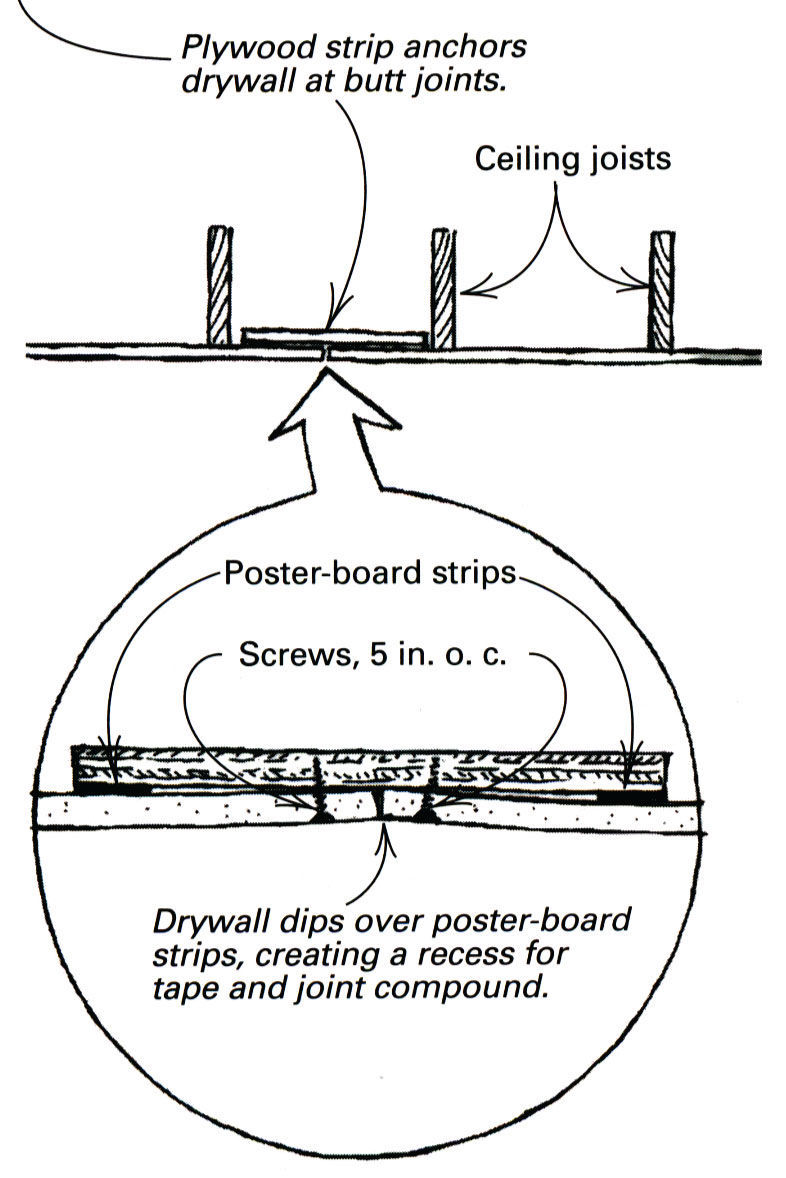
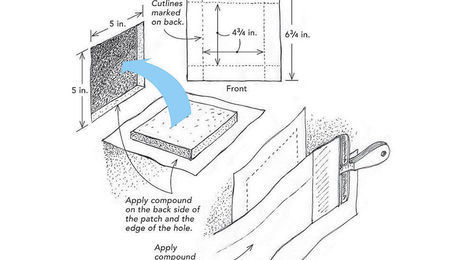
This drywall trick starts with a sheet of plywood. The plywood should be the same thickness as the drywall. First, trim an inch off the width of the sheet, then crosscut it into 10 equal strips. They will be 9-1/4 in. wide by 47 in. long. As shown in the drawing, we next staple strips of 1/16-in. thick poster board to the long edges of the plywood strip.
Before raising a drywall panel for installation, we screw one of the plywood strips to the end of the panel. The poster-board strip goes between the plywood and the drywall. As the drywall goes up, the butt ends are arranged to fall between the ceiling joists. When the adjacent drywall panel is screwed to the plywood strip, a shallow dip is created where the drywall bends over the poster board. This shallow dip creates a hollow for the tape.
We tape our joints in the usual manner, beginning with the butt joints. Once that joint compound has dried, we tape the long edges. Incidentally, a 20-in. long piece of 1-1/2-in. aluminum angle is a handy tool for leveling the finish coats of joint compound over the butt ends. Using this technique, we never had a joint show up on a punch list at the completion of a job.
—Tim Hanson, Indianapolis, IN
Edited and illustrated by Charles Miller
From Fine Homebuilding #99


View Comments
For years I have used this too and it works great! I am surprised more don't use it.
Sounds like a good technique. However, your explanation is hurting. Hard to picture what you are talking about in the third paragraph. Try again?
I had to read it a couple of times to make sure I got it. He screws the 47" length of the piece of plywood along the back side of the end of a drywall sheet, leaving 4 5/8" (half of the 9 1/4" width) of the plywood strip exposed. The drywall screws are driven into the plywood near the edge of the drywall as if going into a ceiling joist (or stud). The plywood needs to be secured to one piece of drywall before going up in order to hold the plywood in position. This is so that once this first piece of drywall is screwed to the ceiling joists, the next piece of drywall can be butted up against the first piece of drywall and screwed to the exposed plywood in the same manner as the first piece of drywall. The strip of plywood is essentially taking the place of a ceiling joist. Hopefully this helps you to picture things a little better. I tried not to repeat details that were already covered in the third paragraph, so you might have to re-read that paragraph too. Best Regards.
Why is it necessary for the plywood to be the same thickness as the drywall?
It's really not necessary for the plywood to be the same thickness. Consider though, that you're torquing the drywall into a curvature. Ordinary (not flex grade) has a radius ability of 10'. Tim is essentially creating a radius of 1/16th inch over 3 1/2" on each side. I'd prefer the shim to be 1/8" not 1/16th inch and wonder if I would need then to use plywood that is wider. (Most will be limited by 16" spacing but in this old house the spacing is much greater.) At any rate should you use 1/4" or even 3/8" plywood, as you torque the board into its curve with screws, you might find that the thin plywood gives, causing the screw to spin, even before the drywall screw head rips through the board. 1/2" would likely be enough for the screw to not pull out of the plywood.
Does anyone know the answer to this:
If Tim's method creates a radius of 1/16th (the curvature of the drywall) and if the maximum curvature is 10', would a 1/8" deflection be within that curvature allowed? If not how wide would the plywood be such that the board will deflect without either the screws pulling through the drywall, or worse, cracking?
This method works great with 7/16 or 1/2" osb and scraps of 1/16-1/8 stapled on. Like author says, prep your plywood or osb to 46-47", and cut to 10-14" wide. Staple some scrap to each edge. Let your drywall joints overhang between studs and attach these pieces with screws. A spray bottle of water works great to soften the drywall if you end up with tight bends. This technique has had an entire article dedicated to it in the magazine, goes to show how these recycled tips aren't given any thought by editors.
I have always made my own, but you can also buy these at:
http://www.wilcotools.com/rock_splicer.html
Absolutely excellent suggestion but.....
Drywall? "High-end drywall job"? Really? I'm merely a homeowner, but the high-end jobs with which I'm familiar have skim-coated the drywall to produce a beautiful surface.
Another "high-end" finish is to use a second layer of drywall? Although seams would be aligned, is this method still effective with a second layer?
You make no mention of using glulam type joists for their dead-straight properties. Matt Reisinger did a video on the use of glulam studs in high-end homes where light, shining at a very oblique angle, would show any waviness in the wall.
I am by no means good at hanging drywall but this absolutely works. One tip is too ease the screws in on the second sheet. If you countersink the screws as you would normally, the heads will pop through. I drive the screws to where the heads just begin to dimple the paper and then I go back and go one by one down the edge driving the rest of the screw all the way into the board.
BTW, I use 7/16” OSB with two layers of drywall shims to make the taper.
I have painted my share of custom, million dollar homes and the builders that I dealt with solve this dead flat "issue" by using quality drywall crews that produce glass as finished product. A suggested solution that requires the non-tapered ends of drywall NOT to be secured to structural framing seems ridiculous to me as a work-around to not having taping ability.