previous
  • 15 Coffered Ceiling Design Ideas and Tips
    15 Coffered Ceiling Design Ideas and Tips
  • Meet the Fine Homebuilding Project House!
    Meet the Fine Homebuilding Project House!
  • Roofing articles, videos, tools, and materials
    Roofing articles, videos, tools, and materials
  • 12 Remodeling Secrets Revealed
    12 Remodeling Secrets Revealed
  • 7 Solutions for Kitchen Layout and Design
    7 Solutions for Kitchen Layout and Design
  • 2012 HOUSES Awards
    2012 HOUSES Awards
  • 10 Basement-Remodeling Tips and Techniques
    10 Basement-Remodeling Tips and Techniques
  • Energy-Smart Details
    Energy-Smart Details
  • The Inspector Game: Decking Dos and Don'ts
    The Inspector Game: Decking Dos and Don'ts
  • How it Works
    How it Works
  • 7 Small Bathroom Floorplan Layouts
    7 Small Bathroom Floorplan Layouts
  • Fine Homebuilding: The Digital Issues
    Fine Homebuilding: The Digital Issues
  • Buyer's Guide to Decking
    Buyer's Guide to Decking
  • 13 Door Design and Installation Tips
    13 Door Design and Installation Tips
  • Deck Design & Construction Showcase
    Deck Design & Construction Showcase
  • Painting Ideas, Tips, and Techniques for a Professional Finish
    Painting Ideas, Tips, and Techniques for a Professional Finish
  • Complete Kitchen and Bath Guide
    Complete Kitchen and Bath Guide
  • 9 Design Ideas & Tips for Concrete Countertops
    9 Design Ideas & Tips for Concrete Countertops
  • Guide to Paperless Drywall
    Guide to Paperless Drywall
  • Outdoor Kitchen Design Inspiration
    Outdoor Kitchen Design Inspiration
next
Pin It

Minimize circular-saw tearout

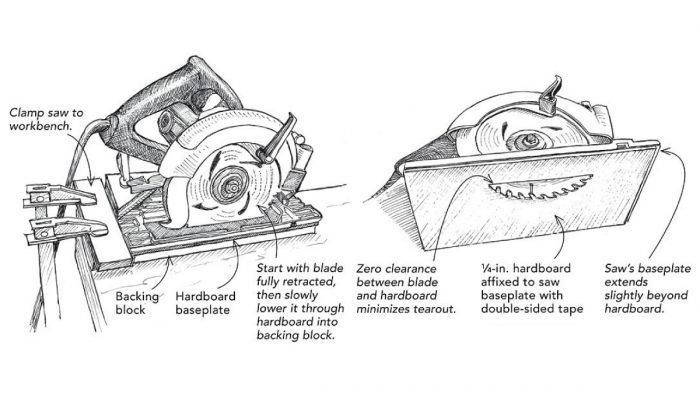
As a one-man trim-carpentry crew, I often use a circular saw to cut full sheets of cabinet-grade plywood to manageable sizes before making final cuts with my tablesaw. To minimize tearout, I've devised the zero-clearance circular-saw base.

I start by measuring the saw's baseplate. Then I cut a scrap piece of 1/4-in. hardboard slightly shorter in length and width so that it doesn't protrude beyond the saw's baseplate edges (they need to slide against my straightedge guide during cuts).

Next, I retract the blade so that it no longer extends through the saw's base, and I adhere the hardboard to the saw's baseplate with double-sided tape. With the blade in this fully retracted position, I clamp the saw to my workbench with a sacrificial block thicker than the stock I plan to cut sandwiched between the saw and the bench. I turn on the saw and slowly lower the blade through the hardboard and into the block until I've reached the necessary depth. The saw is now ready to go.

When I'm finished making my cuts, I pop off the zero-clearance plate by inserting a flat-bladed screwdriver or putty knife between the two baseplates and twisting.

Magazine extra: Watch a video where Chuck Miller demonstrates this tip.


Tom Walter, Alexandria, VA
From Fine Homebuilding 202, pp. 30 March 5, 2009