Removing paint and putty from old windows Our Victorian house has its original windows. They have lots of divided lites of different sizes glazed with lovely old wavy glass. Every window needed to be stripped of its paint and putty, then reglazed. It was a daunting job.
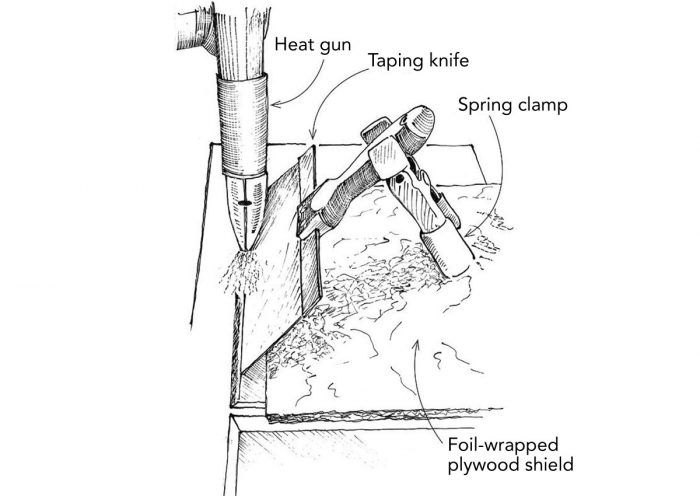
We used a heat gun with a tip that creates a concentrated stream of hot air capable of softening both paint and putty to where it can be scraped away. At first, we used foil-covered pieces of plywood to protect the glass. But that proved to be time-consuming because it required various sizes of plywood to match the different windows.
The drawing at left shows the method that we finally settled on. We used a drywall taping knife, propped up by a spring-clamp leg, as a heat shield to protect the glass. This worked surprisingly well because the radiant heat bouncing off the knife seemed to help speed things along.
Incidentally, we were concerned about the possibility of lead paint on the windows, so we worked on them outside, wearing suitable respirators. We took the scrapings to our local transfer station for proper disposal.
Jay Chen, York Harbor, ME
Edited and Illustrated by Charles Miller
From Fine Homebuilding #206


View Comments
My husband and I are also restoring old (1890's) window sashes and I have been using foils that rip easily, even heavy- duty foils, over plywood - frustrating. I like the suggestion of the tapping knife but the picture shows using the foil- wrapped plywood as well. I'm waiting for my Silent Paint Remover to arrive this week and hopefully speed up my projects - I'll take advantage of this tip when using the SPR. Please provide more tips (or feature articles) for those of those who prefer to not send 100 year old windows to the landfill. To my knowledge, there is not a "replacement" window advertised to last 100+ years.