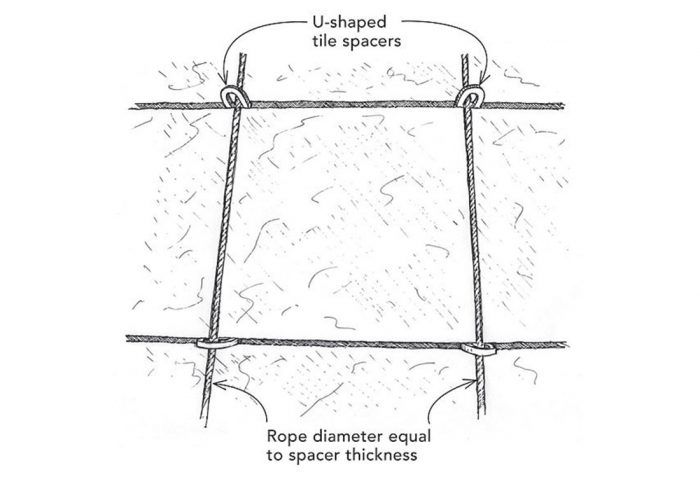
When laying tile on a large floor, I use rope in place of the usual plastic or rubber spacers. This shortcut saves time, plus I get straighter grout lines. I lay the first row using regular spacers; I prefer the U-shaped spacers shown in the drawing. Next, I trowel a layer of thinset for the next row of tile, and I place a length of rope the same thickness as the spacers against the tile I’ve just laid. I use spacers at the corners, straddling the rope, to space the tile in the other direction. In this manner, I work my way across the room, pushing the tile against the rope so that it’s sandwiched between the two rows of tile.
After running out two rows, I move the U-shaped spacers with me as I progress from row to row. I use 100 ft. of rope and weave it back and forth at the ends of each row. This technique also works well when laying wall tiles.
—James Tidmore, Summerville, GA
Edited and illustrated by Charles Miller
From Fine Homebuilding #198


View Comments
I'm sorry.. I thought this was FINE HOMEBUILDING.. a quality magazine.. what kind of tip is this?.
A. Rope varies in thickness when wet.
B. The line isn't straight unless pulled tight
C. This method can NOT be faster than spacers.
D. Rope varies in thickness with the tension applied.
I agree with both comments above PLUS once the thinset or adhesive dries that "rope spacer" has to be thrown away. The rubber spaces when thinset or adhesive dries on them you twist them or step on them and they're like new again...ready for next job.
I agree with the other replies and rope cant be faster with all the new spacers that are available this post comes from the time Noah built the arl Fine Homebuilding stop recycling all the old stuff