previous
  • 15 Coffered Ceiling Design Ideas and Tips
    15 Coffered Ceiling Design Ideas and Tips
  • Meet the Fine Homebuilding Project House!
    Meet the Fine Homebuilding Project House!
  • Roofing articles, videos, tools, and materials
    Roofing articles, videos, tools, and materials
  • 12 Remodeling Secrets Revealed
    12 Remodeling Secrets Revealed
  • 7 Solutions for Kitchen Layout and Design
    7 Solutions for Kitchen Layout and Design
  • 2012 HOUSES Awards
    2012 HOUSES Awards
  • 10 Basement-Remodeling Tips and Techniques
    10 Basement-Remodeling Tips and Techniques
  • Energy-Smart Details
    Energy-Smart Details
  • The Inspector Game: Decking Dos and Don'ts
    The Inspector Game: Decking Dos and Don'ts
  • How it Works
    How it Works
  • 7 Small Bathroom Floorplan Layouts
    7 Small Bathroom Floorplan Layouts
  • Fine Homebuilding: The Digital Issues
    Fine Homebuilding: The Digital Issues
  • Buyer's Guide to Decking
    Buyer's Guide to Decking
  • 13 Door Design and Installation Tips
    13 Door Design and Installation Tips
  • Deck Design & Construction Showcase
    Deck Design & Construction Showcase
  • Painting Ideas, Tips, and Techniques for a Professional Finish
    Painting Ideas, Tips, and Techniques for a Professional Finish
  • Complete Kitchen and Bath Guide
    Complete Kitchen and Bath Guide
  • 9 Design Ideas & Tips for Concrete Countertops
    9 Design Ideas & Tips for Concrete Countertops
  • Guide to Paperless Drywall
    Guide to Paperless Drywall
  • Outdoor Kitchen Design Inspiration
    Outdoor Kitchen Design Inspiration
next
Pin It

Decorative beam ends with a router

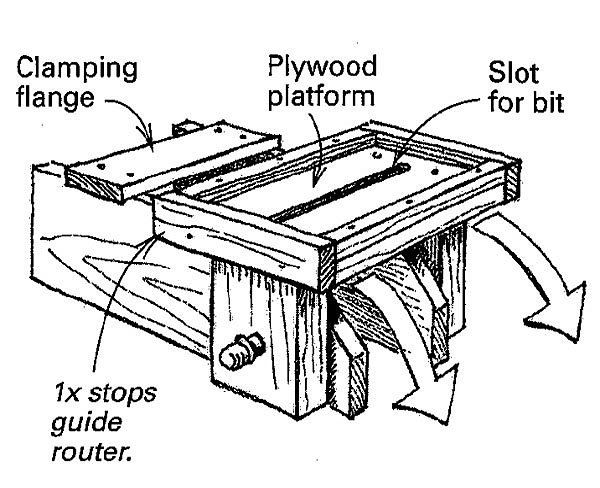
Cutting a profile in the exposed ends of rafters and beams is a nice custom touch, but it can also be tedious and time-consuming. When a job came up cutting about 100 decorative beam ends for an Austrian farmhouse-style building, I had the motivation to come up with an efficient method. Instead of mounting a bandsaw on casters or buying a portable bandsaw, I developed a jig for my router. As shown in the drawing, the jig consists of two parts joinedby a pair of axles. The movable portion is a plywood platform the width of my router base. The platform is bordered by 1x stops, which limit the movement of the router. A slot down the platform's center allows the bit to extend downward into the workpiece -- a beam in this case. The router platform pivots on a wooden housing made of 1x8s.

To use the rig, I first cut off most of the waste material on the end of the beam with a circular saw so that the jig will rotate. Then I clamp the housing to the beam and plunge the router into the work using a 1/2-in. spiral bit. It takes two passes with the router working back and forth on the platform and up and down through its arc to make the rough cut. Another minute or so working with a sanding block removes the fuzzy edges.


Robert S. Smith, Leavenworth, WA
From Fine Homebuilding 113, pp. 28 January 1, 1998