When a new customer referred by one of our local sawmills asked me to make some storm windows for her screened porch, I said sure. Then I went out to look at her place.
Her cottage was on the banks of the Rouge River, with the porch facing northwest. The builder of the porch hadn’t spent any more money or effort than was strictly necessary. Each screened opening was a different size, although they were all supposed to be 4 ft. by 6 ft. Regardless of their random dimensions, they were much too big to glaze with single panes of glass unless I installed 6mm or 7mm plate—way too expensive and way too heavy.
I built the sash of 1x pine stock and divided each sash into four lites. To save a bit of my time (hence money), I trapped the 4mm glass in place when the units were glued up. This practice is common here with factory windows. The customer’s grandson was told to play baseball on the other side of the house.
All went well until I started gluing up these 11 behemoths. I had only two long pipe clamps in the shop (most of my work is cabinet doors, so I don’t need pipe clamps often), and my plumbing supplier’s threader was on a job site in the bush for at least two weeks.
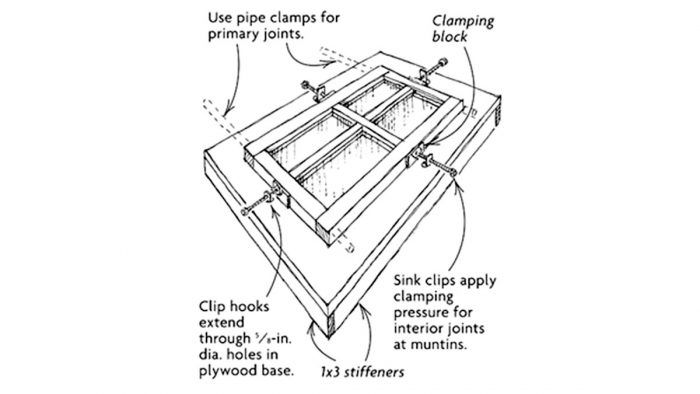
I solved the problem by making a gluing bench out of 1/2-in. plywood stiffened with some 1×3 screwed to its edges. Then I bored four 5/8-in. holes about 1-1/2 in. from the outside edge of the sash where it lies during glue up and in line with the ends of the muntins. Into each hole, I placed the hook of an ordinary sink holddown screw. I used my two long clamps to apply pressure at the rail-to-stile joints and the top and bottom of each window. Once I had a sash pipe-clamped and tweaked square, I tightened the sink clamps toward one another, thus clamping the muntins nicely.
Considering that a good pipe clamp costs about $30 around here and a sink clip costs about 30¢, I was pretty happy with the whole arrangement. By the way, if you’ve used them before, you know how sink clips tend to skew one direction or the other as you tighten them. So I suggest you keep the portion of the screw between the workpiece and the clip as short as possible. Interceding blocks work well for this, as shown in the drawing, and help to spread the clamp’s pressure.
—T.H. Richards, Mont-Tremblant, None
Edited and illustrated by Charles Miller
From Fine Homebuilding #136