previous
  • 13 Door Design and Installation Tips
    13 Door Design and Installation Tips
  • 7 Small Bathroom Floorplan Layouts
    7 Small Bathroom Floorplan Layouts
  • Deck Design & Construction Showcase
    Deck Design & Construction Showcase
  • Energy-Smart Details
    Energy-Smart Details
  • Fine Homebuilding: The Digital Issues
    Fine Homebuilding: The Digital Issues
  • Complete Kitchen and Bath Guide
    Complete Kitchen and Bath Guide
  • Buyer's Guide to Decking
    Buyer's Guide to Decking
  • 12 Remodeling Secrets Revealed
    12 Remodeling Secrets Revealed
  • Meet the Fine Homebuilding Project House!
    Meet the Fine Homebuilding Project House!
  • Painting Ideas, Tips, and Techniques for a Professional Finish
    Painting Ideas, Tips, and Techniques for a Professional Finish
  • How it Works
    How it Works
  • 15 Coffered Ceiling Design Ideas and Tips
    15 Coffered Ceiling Design Ideas and Tips
  • 7 Solutions for Kitchen Layout and Design
    7 Solutions for Kitchen Layout and Design
  • Guide to Paperless Drywall
    Guide to Paperless Drywall
  • The Inspector Game: Decking Dos and Don'ts
    The Inspector Game: Decking Dos and Don'ts
  • 9 Design Ideas & Tips for Concrete Countertops
    9 Design Ideas & Tips for Concrete Countertops
  • Outdoor Kitchen Design Inspiration
    Outdoor Kitchen Design Inspiration
  • 10 Basement-Remodeling Tips and Techniques
    10 Basement-Remodeling Tips and Techniques
  • 2012 HOUSES Awards
    2012 HOUSES Awards
  • Roofing articles, videos, tools, and materials
    Roofing articles, videos, tools, and materials
next
Pin It

Snapping angled chalklines on sheathing

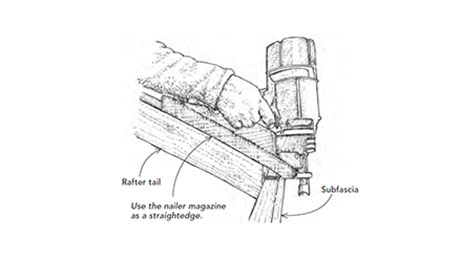
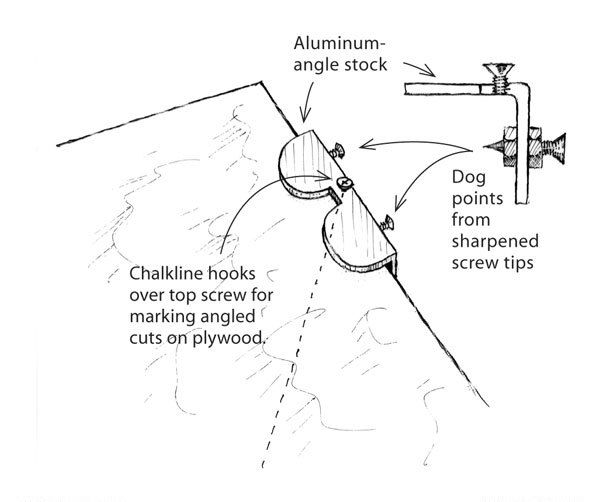
On straightforward roofs with rectangular shapes, snapping chalklines on the sheathing is easy because chalkline hooks are designed to grab at 90°. When a roof becomes more complicated, with hexagonal or octagonal shapes, it is tougher to snap the cutlines. The chalkline’s hook just can’t get a good grip on the edge of the sheathing. With the device shown in the drawing, snapping angled lines is a breeze.

Made from a short piece of aluminum-angle stock, the top of my chalkline anchor has a screw threaded into a hole drilled and tapped into the angle stock. The chalkline’s hook fits over this screw. A cutout in the top of the anchor lets me easily see the dimension marked on the sheathing’s edge as I position the anchor.

Once the anchor is in position, I push on its side, setting two dog points into the edge of the plywood. The dog points are simply sharpened screws held in place by a pair of nuts. The thickness of the nut between the anchor and the plywood serves to center the top screw directly over the dimension mark.


Bob Carli, Unionville, CT
From Fine Homebuilding 192, pp. 34 November 6, 2007