previous
  • 13 Door Design and Installation Tips
    13 Door Design and Installation Tips
  • 7 Small Bathroom Floorplan Layouts
    7 Small Bathroom Floorplan Layouts
  • Deck Design & Construction Showcase
    Deck Design & Construction Showcase
  • Energy-Smart Details
    Energy-Smart Details
  • Fine Homebuilding: The Digital Issues
    Fine Homebuilding: The Digital Issues
  • Complete Kitchen and Bath Guide
    Complete Kitchen and Bath Guide
  • Buyer's Guide to Decking
    Buyer's Guide to Decking
  • 12 Remodeling Secrets Revealed
    12 Remodeling Secrets Revealed
  • Meet the Fine Homebuilding Project House!
    Meet the Fine Homebuilding Project House!
  • Painting Ideas, Tips, and Techniques for a Professional Finish
    Painting Ideas, Tips, and Techniques for a Professional Finish
  • How it Works
    How it Works
  • 15 Coffered Ceiling Design Ideas and Tips
    15 Coffered Ceiling Design Ideas and Tips
  • 7 Solutions for Kitchen Layout and Design
    7 Solutions for Kitchen Layout and Design
  • Guide to Paperless Drywall
    Guide to Paperless Drywall
  • The Inspector Game: Decking Dos and Don'ts
    The Inspector Game: Decking Dos and Don'ts
  • 9 Design Ideas & Tips for Concrete Countertops
    9 Design Ideas & Tips for Concrete Countertops
  • Outdoor Kitchen Design Inspiration
    Outdoor Kitchen Design Inspiration
  • 10 Basement-Remodeling Tips and Techniques
    10 Basement-Remodeling Tips and Techniques
  • 2012 HOUSES Awards
    2012 HOUSES Awards
  • Roofing articles, videos, tools, and materials
    Roofing articles, videos, tools, and materials
next
Pin It

Truing a table-saw blade

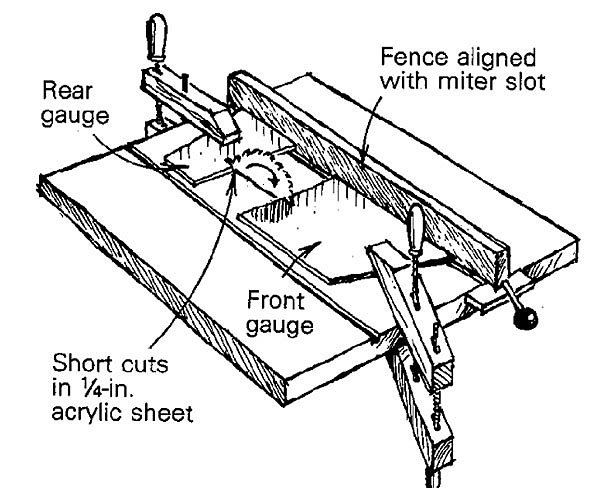
It seemed that no matter how carefully I aligned my sawblade with its fence, they wouldn't end up quite parallel. This can result in cuts that have burned edges, and even worse, the binding action of the blade against the fence can cause the workpiece to kick back. The drawing shows an easy technique I developed to align the blade with the fence.

First I lined up the edge of my fence with the miter slot to the right of my sawblade and clamped it in place. Next, with the blade in its highest position, I made short cuts in two pieces of 1/4-in. acrylic sheet for gauges (hardboard or birch plywood will also work). With the saw unplugged and the fence in the same position, I loosened the bolts that allow the saw's trunnions to be moved relative to the table. A contractor's saw typically has four bolts -- two in front and two in back. By leaving one of the forward bolts pretty tight, I can use it as a pivot point. The bolt that I leave tight will depend on whether I need to move the blade clockwise or counterclockwise.

I clamped the forward gauge to the table so that the blade was in its slot, and then lightly tapped the trunnion assembly until the blade fit correctly in the slot of the rear gauge. When the fit is right, the blade turns freely in the slots, and then I tighten the adjustment bolts. The blade should now be parallel with the miter slot in the saw's table.


Frederic E. Bishop, Farrell, PA
From Fine Homebuilding 61, pp. 26 July 1, 1990