
Build This Simple Router Jig and Mill Your Own Molding On-Site
Learn how to safely and quickly make custom molding if you have a router, but don't have a router table.
Bill Young from Berkeley, CA writes:
I needed a special molding to complete a baseboard detail, but my router table was several hundred miles away on another job. Fortunately, the situation forced me to come up with an alternative method for site-milling trim stock. I think my new method is faster, more accurate and safer than using a router table — especially if the moldings are narrow and thin.
As shown in the drawing, I used a scrap of 2x stock about 1 ft. long and about the width of my router’s base. I cut a lengthwise groove near the middle of the 2x, just a pinch larger than the depth and width of my molding stock. Then I used a hole saw to bore a 1-1/2-in.-dia. hole that is offset from the center of the groove. This hole accommodates the router bit, and it should be to the left of the groove as you face the jig. This is to ensure that the router bit, which turns clockwise, will be turning into the work as you feed the stock into it. Next, I bored a similar hole in the top of my job-site workbench to allow the wood chips an escape route.
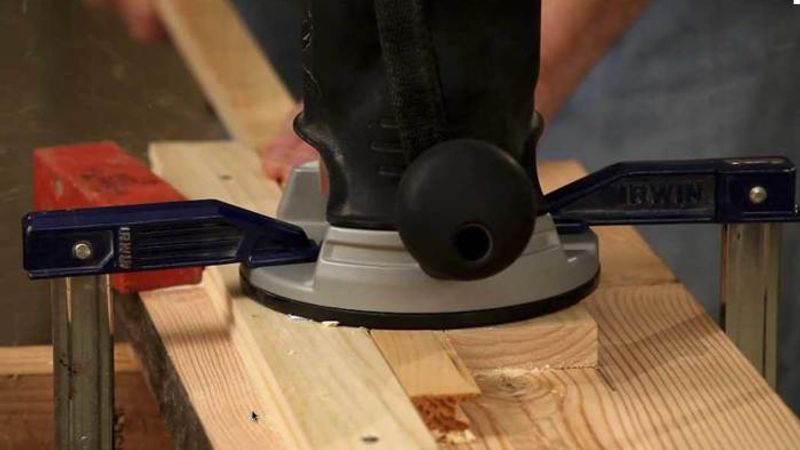
I positioned my router over the hole in the jig and anchored the router to the table with a pair of clamps. The clamps were arranged on opposite sides of the router’s base, in line with the groove in the 2x stock. By sighting down the groove I could easily adjust the router, both vertically and horizontally, until I had the bit in the exact position that I needed for the molding profile. Cutting the moldings is a simple matter of turning on the router and feeding the stock into the groove. In a few minutes I had hundreds of feet of molding. And because the stock was captured in the groove of the jig under the base of the router, my fingers never got near the cutters.

View Comments
Hi Chuck,
(too bad this site is attracting scam spam like the above)
I came up with almost the exact same solution back in '96 or '97 before I had my router table or my Williams and Hussey molder.
I had a Radial Arm saw on the jobsite and drilled the waste hole like you have there in the outer corner of that table, then screwed guide lumber down. I made several hundred feet of smaller moldings with it on that job.
One thing I did differently though that I think is an improvement, was that I used 5/4 for the guide blocks and then freehand routed a dado drop the size of the router base. This let me position it more securely and accurately time after time.
Your series here is one of the things I enjoy at the new FHB site
PFN
PFN
Hey Piffin,
thanks for that refinement--good idea. Lacking the 5/4 stock a similar quick-registration situation could be fashioned with some tacked-down blocks affixed to the guide strips.
yeah, the spam problem. We're working on it--there's always something...
I use the same basic set-up, but I attach my edge guide to the router first. There are holes in the guide for attaching an auxillary fence which I use to attach the router to the guide board. My router fence has a micrometer knob on it so I have the very fine in/out adjustment. Combined with the up/down micrometer knob on the router provides me with nearly the same precision as a router table.
http://www.b2cshop.us ----
Christmas comes love shopping friend-Welcome to my web site please
patiently watchwill have your favorite items: ----
http://www.b2cshop.us ----
approaching like shopping friend can come to my website to buy the
things you like cheap will make you satisfied thanks !!!
( http://www.b2cshop.us ) Here are the most
popular, most stylish and avant-garde
shoes,handbags,Tshirts, jacket,Tracksuit w
,R4,NZ,OZ,T1-TL3) $35HANDBGAS(COACH,L V, DG, ED
HARDY) $35TSHIRTS (POLO ,ED HARDY, LACOSTE) $16
--- NHL Jersey Woman $ 30 ---**** NFL Jersey $20
--- NBA Jersey $ 18 ---**** MLB Jersey $ 30
--- Jordan Six Ring_m $30 ---**** Air Yeezy_m $ 45
--- T-Shirt_m $ 15 ---**** Jacket_m $ 30
--- Hoody_m $ 30 ---**** Manicure Set $ 20
as long as the new and old customers to buy the corresponding
product on this site, both a gift, so stay tuned! !
( http://www.b2cshop.us )
( http://www.b2cshop.us )