
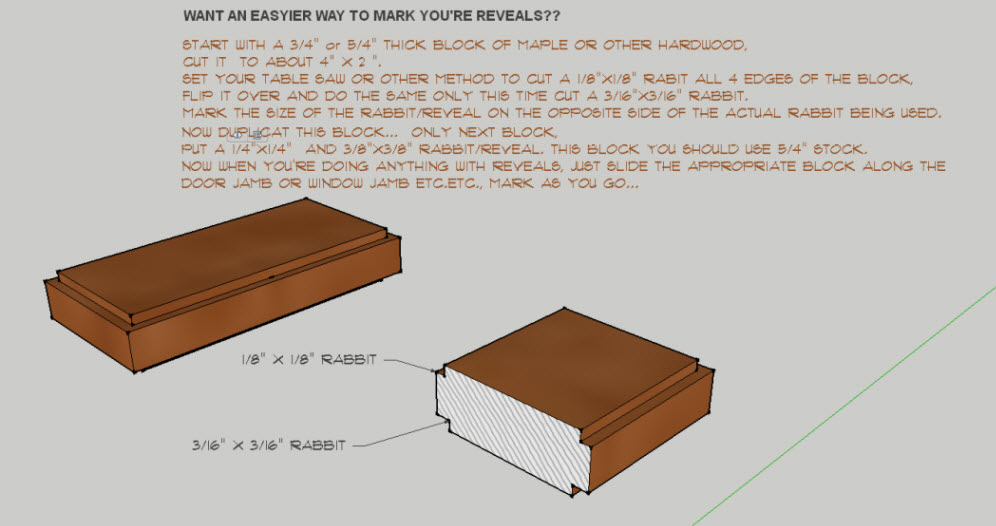
A simple to make guide for marking you’re reveals.
Start with a 3″ x 4″ x 3/4″ or 5/4″ hardwood block, route or dado a 1/8″ x 1/8″ rabbit around the perimeter of one side of the block, on the other side do the same but with a 3/16″ x 3/16″ rabbit, mark the rabbit size on the opposite side of the block so when you use it you can easily see what size you’re using, do the same on another block using a 1/4″x1/4″ & 3/8″x 3/8″ rabbit, this block I suggest using 5/4″ thick. Once done, run the block up a door or window jamb while marking you’re reveal. Adjust sizes to you’re needs…
Hope you find it as useful as I do.
I tried making it bigger for you to see more clearly, but there are limitations with posting. If you want a more clear picture, contact me.


View Comments
Great idea, Doug! I'm makin' a set of these next time I'm working in the shop... finally, a purpose for those walnut cut-offs that were much to nice to just throw in the wood stove.
Matt
The Timber Tailor
Doug,
Just to follow up, I made a set of reveal blocks using your idea. While I was at it I made 3 blocks:
1/8 and 1/4
3/16 and 3/8
5/16 and 1/2
figuring they should cover all the bases (well, except for 7/16). I drilled two 1" holes in each for easier handling. I'll attach a picture of the blocks if I can figure out how.