
Nifty Drywall Patch
Use a hole saw to easily make an access hole for wiring, and then add some self-adhesive mesh tape and compound to patch it back up.
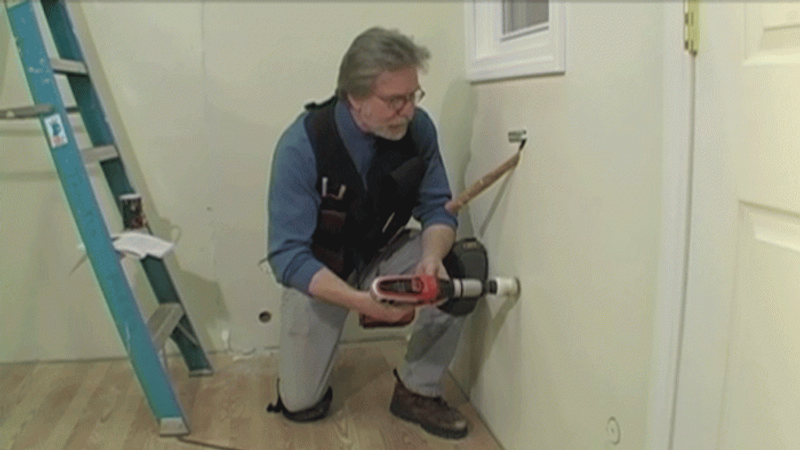
Chuck Miller combines two reader-submitted tips in one, in this episode of There’s a Better Way.
1. A quick way to make an access hole in a wall
Carl Lizio from South Boston, Massachusetts offered a slick way to make clean cuts in plaster. First, carefully drill just through the plaster with a large hole saw, then penetrate the lath with a smaller hole-saw. Try to save the resulting plaster disc—or cut a similar piece of drywall with the same large holesaw—and adhere it to the lip of lath with some joint compound. If the wall is covered in drywall with no lath behind it, use the following method to put things back together.
2. An ingenious way to close it back up
Online member local_yokel showed a simple way to fasten a drywall patch with nothing more that self-adhesive mesh tape, joint compound, and normal taping tools. First, span the hole by several inches on all sides with an X of mesh tape. Then, gently place the scrap of drywall over the tape, and push it into the hole. Once the drywall patch is flush with the wall, finish it off with another layer of mesh tape and a coat of compound.

View Comments
To Local_yokel:
Very clever, my young padawan.
Until now, I would avoid access holes whenever possible! This takes less than 15 minutes to open and close! If you are painting, no sweat! Part of the trick is the round hole, it seems to me. Thank you!
Problem with a hole saw is first trying to find one large enough, second trying to remove the plug without chipping or breaking it.
Much better to use an adjustable hole cutter. I use the Hole Pro model X-230 which I can adjust to make any size hole from 2" to 9" in diameter. As only two blades are involved it takes zero effort to remove the cut plug and have it perfectly intact.
With sheetrock I found another trick with the Hole Pro adjustable hole cutters. If I adjust the cutter blades by 2 marks on the measure bar it moves them out just enough that I can cut a perfect patch from a piece of scrap drywall before I even start. I can then make a holes for access to inspect, repair, pull wire, or just repair a ding, and push the perfect patches into place - the fit is so tight I can just apply some mud and they are good to go. And they meet fire code. The whole process takes less time to do than it took me to type this into the computer.
Chuck,
Great tip... I have used a variation of this for a few years. An 'oldtimer' taught me this; I wish I could remember his name to give him credit.
1. Use a larger hole saw for the hole...
2. On a scrap piece of sheetrock use the same hole saw from the back but do not cut all the way through leave the face paper on.
3. Scribe the back side from the cut outward.
4."peel" the plaster from the face paper, make sure it is pretty clean, trim the flaps to be about an inch...
5. back butter the flaps with thin compound
6. push the patch into place use a large knife to draw the compound out to flatten the flaps.
7. after it dries a little top off with compound and finish.
You can also modify this for a larger rectangular patch
Another easy sheetrock cavity access and repair can be done with just a sheetrock saw. Also size of hole doesn't matter. It is simply when you cut your square hole, instead of holding the blade perpendicular to the wall cant the saw to the inside of your square so the edge of your cutout is beveled. Use this same piece to repair hole. Push it in till bevel on the cutout seats itself back in to beveled edge left in wall. It can't fall in because of bevels and it's an automatic perfect fit. Tape and finish.
Great tip, tried it last week with several insulation holes - worked great =)!
Just a note that you should not coat a setting compound (hot mud) until it full dries. It can be recoated after it sets with another coat of compound to smooth the finish, but needs to thoroughly dry (24 hours) before sanding or prime/painting.