How to Remove an Old Kitchen Sink That Won't Sit Flat on Your Countertop
Sometimes you have to completely remove a sink to put it back together right

Sometimes you have to completely remove a sink to put it back together right
We’re here to eliminate the bow on the side of this kitchen sink. The bow creates a gap, leaving room for standing water and bacteria under the lip. We have to remove the sink so that we can get at the cabinet itself. When we have the sink out, we’ll also be replacing the faucet. Then we’ll put the sink back in, properly secure it, caulk it, and connect the water and waste lines, and we’ll be done.
Get the pipes and hoses out of the way
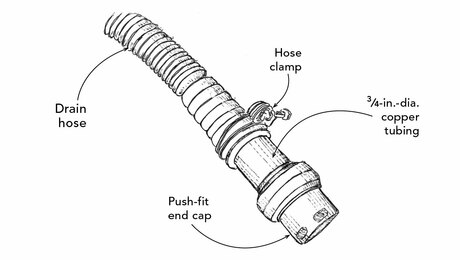
We’ll start out by disconnecting the waste pipe. It’s a good idea to have a container underneath to collect any water that’s still in the pipe. Loosen the nut that secures the pipe to the sink drain, and loosen the fitting connecting it to the pipe leading to your sewer or septic system; this can often be done by hand, but there’s a chance that you’ll need a pair of channel-lock pliers. We also have to remove the hose clamp securing the dishwasher drain tube. Just as with the main drain pipe, there will probably be some water in this hose — use a small container to catch the water. Turn the water valves off and then disconnect the water supply lines.
Unscrew, cut, and pry (gently)
Next, use a Phillips head screwdriver to remove the clips that secure the sink. Then use a razor knife to carefully cut the caulk around the upper lip of the sink to break it free from the countertop. The sink may not come right up, so you may need to pry it off; use a wide, flat pry bar, and some thin scraps of wood or cardboard to avoid bending the lip of the sink or scratching the countertop. We’re going to use a razor knife to remove all of the old caulk that would prevent the sink from laying flat on the countertop when we re-install it.
Expect the unexpected
When removing this particular sink, we found that one of the channels that we were hoping to use to pull the sink tighter to the countertop is rotted away. Therefore, we don’t have anything solid to secure this sink with. so, it’s time for a new sink.
We continue with the installation of the new sink in the next Building Skills video.