previous
  • Buyer's Guide to Decking
    Buyer's Guide to Decking
  • 9 Design Ideas & Tips for Concrete Countertops
    9 Design Ideas & Tips for Concrete Countertops
  • Deck Design & Construction Showcase
    Deck Design & Construction Showcase
  • Outdoor Kitchen Design Inspiration
    Outdoor Kitchen Design Inspiration
  • Meet the Fine Homebuilding Project House!
    Meet the Fine Homebuilding Project House!
  • The Inspector Game: Decking Dos and Don'ts
    The Inspector Game: Decking Dos and Don'ts
  • 13 Door Design and Installation Tips
    13 Door Design and Installation Tips
  • 15 Coffered Ceiling Design Ideas and Tips
    15 Coffered Ceiling Design Ideas and Tips
  • Fine Homebuilding: The Digital Issues
    Fine Homebuilding: The Digital Issues
  • 10 Basement-Remodeling Tips and Techniques
    10 Basement-Remodeling Tips and Techniques
  • Roofing articles, videos, tools, and materials
    Roofing articles, videos, tools, and materials
  • 12 Remodeling Secrets Revealed
    12 Remodeling Secrets Revealed
  • Complete Kitchen and Bath Guide
    Complete Kitchen and Bath Guide
  • 2012 HOUSES Awards
    2012 HOUSES Awards
  • Energy-Smart Details
    Energy-Smart Details
  • How it Works
    How it Works
  • Painting Ideas, Tips, and Techniques for a Professional Finish
    Painting Ideas, Tips, and Techniques for a Professional Finish
  • Guide to Paperless Drywall
    Guide to Paperless Drywall
  • 7 Solutions for Kitchen Layout and Design
    7 Solutions for Kitchen Layout and Design
  • 7 Small Bathroom Floorplan Layouts
    7 Small Bathroom Floorplan Layouts
next


Replacing garage-door panels

comments (0) January 31st, 2011 in Project Gallery        
6 users recommend

Click the thumbs up button above to vote for this tip. Help us choose Fine Homebuildings top-10 window and door tips. Click To Enlarge

Click the "thumbs up" button above to vote for this tip. Help us choose Fine Homebuilding's top-10 window and door tips

Photo: Drawing by Chuck Miller

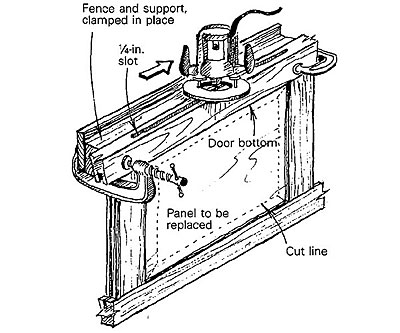
My frame-and-panel garage door had a nasty gouge in one of the bottom panels. My job was to figure out a way to remove the 1/4-in. thick panel without ruining the rest of the door. To do so, I turned to my router.

After removing the door and placing the damaged panel upside-down, I clamped a 2x support adjacent to the bottom frame, as shown in the drawing. Next I used a plunge router fitted with a 1/4-in. straight-flute bit to make a slot in the door bottom. I had to make the slot about 1 in. deep to get to the panel, and I made my passes in 1/4-in. deep increments to avoid overloading the router or straining the bit. Slot cut, I ran my jigsaw around the perimeter of the damaged panel, cutting it into easily removable pieces. To finish the job, I slid the new panel in place through the slot in the bottom of the door. Then I filled the slot with a glued-in-place piece of 1/4-in. stock.


Elliot Eisenberg, Conyngham, PA 

From Fine Homebuilding 53, pp. 28


posted in: Project Gallery, doors, garage

Comments (0)

You must be logged in to post comments. Click here to login.