previous
  • How it Works
    How it Works
  • Energy-Smart Details
    Energy-Smart Details
  • 9 Design Ideas & Tips for Concrete Countertops
    9 Design Ideas & Tips for Concrete Countertops
  • Outdoor Kitchen Design Inspiration
    Outdoor Kitchen Design Inspiration
  • Roofing articles, videos, tools, and materials
    Roofing articles, videos, tools, and materials
  • Painting Ideas, Tips, and Techniques for a Professional Finish
    Painting Ideas, Tips, and Techniques for a Professional Finish
  • Complete Kitchen and Bath Guide
    Complete Kitchen and Bath Guide
  • Fine Homebuilding: The Digital Issues
    Fine Homebuilding: The Digital Issues
  • Buyer's Guide to Decking
    Buyer's Guide to Decking
  • Guide to Paperless Drywall
    Guide to Paperless Drywall
  • 15 Coffered Ceiling Design Ideas and Tips
    15 Coffered Ceiling Design Ideas and Tips
  • Meet the Fine Homebuilding Project House!
    Meet the Fine Homebuilding Project House!
  • 2012 HOUSES Awards
    2012 HOUSES Awards
  • 12 Remodeling Secrets Revealed
    12 Remodeling Secrets Revealed
  • 10 Basement-Remodeling Tips and Techniques
    10 Basement-Remodeling Tips and Techniques
  • 7 Small Bathroom Floorplan Layouts
    7 Small Bathroom Floorplan Layouts
  • 7 Solutions for Kitchen Layout and Design
    7 Solutions for Kitchen Layout and Design
  • Deck Design & Construction Showcase
    Deck Design & Construction Showcase
  • The Inspector Game: Decking Dos and Don'ts
    The Inspector Game: Decking Dos and Don'ts
  • 13 Door Design and Installation Tips
    13 Door Design and Installation Tips
next


Drying rack

comments (2) January 31st, 2011 in Project Gallery        
13 users recommend

Click the thumbs up button above to vote for this tip. Help us choose Fine Homebuildings top-10 window and door tips. Click To Enlarge

Click the "thumbs up" button above to vote for this tip. Help us choose Fine Homebuilding's top-10 window and door tips

Photo: Drawing by Chuck Miller

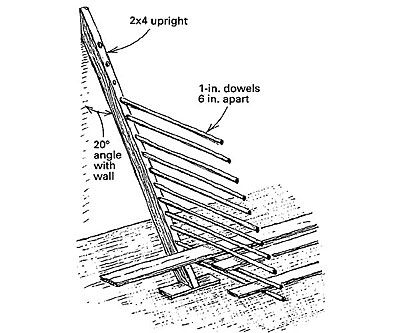
We preprime and varnish a lot of the trim we install in houses, and finding a good place to let the material dry without getting in the way used to be difficult. To solve the problem I came up with the drying rack shown in the drawing. I make the brackets out of standard 2x dimension lumber. Using a drill press, I drill 1-in. dia. holes 6 in. apart for 3-ft. long, 1-in. dowels. As shown in the drawing, the brackets lean against the wall at a 20° angle, and the holes are oriented at a 70° angle so that the dowels end up level while the racks are in use.

I space the racks about 6 ft. apart and start loading
them from the bottom up. It's amazing how
much material they will hold and how strong
they are. I've even used them to hold freshly
painted doors.


Daniel E. Perry, Vineyard Haven, MA 


posted in: Project Gallery, windows, doors

Comments (2)

HandymanDIY HandymanDIY writes: This is a great idea! I've been looking for a quick, low cost trim drying rack. I'll give this a try.

Bill
Posted: 4:34 am on February 10th

olefredrickson olefredrickson writes: I attached these 2 x4 to the ceiling of my shop and when not in use I clamp them to the ceiling.
Posted: 6:10 pm on February 8th

You must be logged in to post comments. Click here to login.