previous
  • 13 Door Design and Installation Tips
    13 Door Design and Installation Tips
  • 9 Design Ideas & Tips for Concrete Countertops
    9 Design Ideas & Tips for Concrete Countertops
  • Complete Kitchen and Bath Guide
    Complete Kitchen and Bath Guide
  • The Inspector Game: Decking Dos and Don'ts
    The Inspector Game: Decking Dos and Don'ts
  • 2012 HOUSES Awards
    2012 HOUSES Awards
  • 10 Basement-Remodeling Tips and Techniques
    10 Basement-Remodeling Tips and Techniques
  • Painting Ideas, Tips, and Techniques for a Professional Finish
    Painting Ideas, Tips, and Techniques for a Professional Finish
  • Energy-Smart Details
    Energy-Smart Details
  • 7 Solutions for Kitchen Layout and Design
    7 Solutions for Kitchen Layout and Design
  • Meet the Fine Homebuilding Project House!
    Meet the Fine Homebuilding Project House!
  • Outdoor Kitchen Design Inspiration
    Outdoor Kitchen Design Inspiration
  • 15 Coffered Ceiling Design Ideas and Tips
    15 Coffered Ceiling Design Ideas and Tips
  • How it Works
    How it Works
  • 12 Remodeling Secrets Revealed
    12 Remodeling Secrets Revealed
  • Guide to Paperless Drywall
    Guide to Paperless Drywall
  • Buyer's Guide to Decking
    Buyer's Guide to Decking
  • Fine Homebuilding: The Digital Issues
    Fine Homebuilding: The Digital Issues
  • Roofing articles, videos, tools, and materials
    Roofing articles, videos, tools, and materials
  • Deck Design & Construction Showcase
    Deck Design & Construction Showcase
  • 7 Small Bathroom Floorplan Layouts
    7 Small Bathroom Floorplan Layouts
next


Shim gauge

comments (1) January 31st, 2011 in Project Gallery        
18 users recommend

Click the thumbs up button above to vote for this tip. Help us choose Fine Homebuildings top-10 window and door tips. Click To Enlarge

Click the "thumbs up" button above to vote for this tip. Help us choose Fine Homebuilding's top-10 window and door tips

Photo: Drawing by Chuck Miller

In home building, square, level, and plumb are admirable goals, but we sometimes fall a little short of the ideal. As a consequence, we turn to shims. They are vital for adjusting the fit of prehung doors, banks of cabinets, and custom built-ins, or for just about any other finish-carpentry task. Traditional tapered shims are nice because they can be adjusted incrementally to ensure a perfectly plumb or level installation. To me, though, this benefit is also their downfall. Because the face of the shim is tapered, the object I’m adjusting ultimately is resting on only a sliver of the shim, rather than bearing on its full surface.

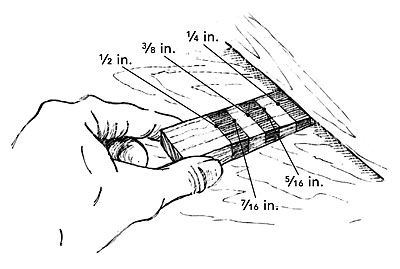
To remedy this problem, I filched an old stairbuilder’s trick by making a gauge to measure the size of the gap I’m trying to fill. As shown in the drawing, I cut a scrap of wood into the shape of a thick shim. Then I marked the points on the shim where it diminished in size by 1/16 in. with numbers and contrasting bands of color so that they are identified easily.

Now I can slide my shim gauge between a door jamb and a king stud until the prehung unit is plumb, look at the depth indicated on the gauge, and rip a flat-face piece of stock to the exact thickness I need.


Justin Fink, Glastonbury, CT 
From Fine Homebuilding 185, pp. 30


posted in: Project Gallery, windows, doors

Comments (1)

lindalan lindalan writes: Geez, How long does it take you to hang a door?!

Yes, shims are tapered. Thats why carpenters use one from each side.

I generally use about 6 shims per jamb plus 2 or 3 for the head. If you're sawing 14 or more shims, of which many or most are different, you're adding a lot of time to a 20 minute job.
Posted: 6:16 pm on March 22nd

You must be logged in to post comments. Click here to login.