previous
  • 7 Small Bathroom Floorplan Layouts
    7 Small Bathroom Floorplan Layouts
  • 10 Basement-Remodeling Tips and Techniques
    10 Basement-Remodeling Tips and Techniques
  • 7 Solutions for Kitchen Layout and Design
    7 Solutions for Kitchen Layout and Design
  • Painting Ideas, Tips, and Techniques for a Professional Finish
    Painting Ideas, Tips, and Techniques for a Professional Finish
  • Fine Homebuilding: The Digital Issues
    Fine Homebuilding: The Digital Issues
  • How it Works
    How it Works
  • The Inspector Game: Decking Dos and Don'ts
    The Inspector Game: Decking Dos and Don'ts
  • Complete Kitchen and Bath Guide
    Complete Kitchen and Bath Guide
  • 2012 HOUSES Awards
    2012 HOUSES Awards
  • Energy-Smart Details
    Energy-Smart Details
  • Deck Design & Construction Showcase
    Deck Design & Construction Showcase
  • Buyer's Guide to Decking
    Buyer's Guide to Decking
  • Guide to Paperless Drywall
    Guide to Paperless Drywall
  • 15 Coffered Ceiling Design Ideas and Tips
    15 Coffered Ceiling Design Ideas and Tips
  • Roofing articles, videos, tools, and materials
    Roofing articles, videos, tools, and materials
  • Outdoor Kitchen Design Inspiration
    Outdoor Kitchen Design Inspiration
  • 12 Remodeling Secrets Revealed
    12 Remodeling Secrets Revealed
  • 9 Design Ideas & Tips for Concrete Countertops
    9 Design Ideas & Tips for Concrete Countertops
  • Meet the Fine Homebuilding Project House!
    Meet the Fine Homebuilding Project House!
  • 13 Door Design and Installation Tips
    13 Door Design and Installation Tips
next


Better backing for doors

comments (1) January 31st, 2011 in Project Gallery        
33 users recommend

Click the thumbs up button above to vote for this tip. Help us choose Fine Homebuildings top-10 window and door tips. Click To Enlarge

Click the "thumbs up" button above to vote for this tip. Help us choose Fine Homebuilding's top-10 window and door tips

Photo: Drawing by Chuck Miller

If you think about how most doors are mounted to most jambs and visualize the relationship of hinge-to-door and hinge-to-jamb, you may see some room for improvement. Standard butt hinges, heavy-duty or not, have a hole pattern that permits two screws at best to reach the framing trimmer. The thicker the wall finish, the more tenuous is the screw's anchoring ability. When the doors are light, the holding power of the screws will most probably be adequate. But when the hinges on heavy, solid-core doors are secured to such minimal backing, the hinges can pull away from the jamb over time.

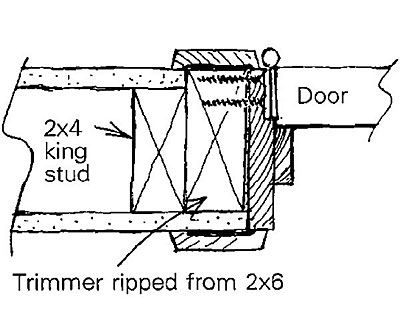
My solution to this problem is to rip a trimmer that equals the width of the king stud plus the thickness of the wall finish. As shown in the drawing, the deep trimmer allows full backing for the hinges. The wall finish abuts the edge of the trimmer, so the casings should be wide enough to conceal the joint between them.

By the way, if you choose to let the trimmer overlap on both sides of the door there are two advantages: the framing is prepared for a door to be hung on either side of the jamb; and the drywallers will be forced to cut their drywall to fit, meaning the drywall won't extend past the trimmer, which makes it a chore to install the shims.


M. F. Marti, Ridgway, CO 

From Fine Homebuilding 70, pp. 32


posted in: Project Gallery, windows, doors

Comments (1)

danman12 danman12 writes: good idea, but in the retrofit situation i do this:

cut back the drywall behind the casing and glue and staple 1 1/2" wide rips of 1/2" plywood to the hinge side of the jambs. works well
Posted: 9:39 pm on February 9th

You must be logged in to post comments. Click here to login.