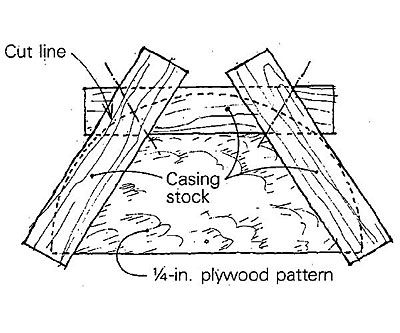
Recently, while building a half-circle window, I needed a way to make the casing and interior stops. Instead of transferring the curves from templates onto the stock and then joining these pieces, I used a bandsaw fitted with a wood table, and a circle-cutting jig.
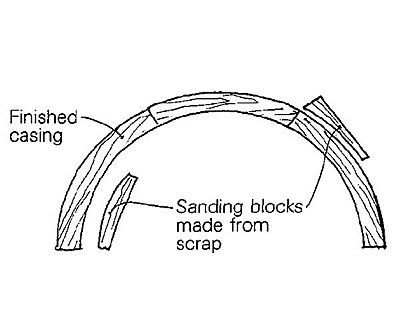
In this project, the interior face of the window jamb had a radius of 21-1/2 in. Since the exterior casing was to act as the outside stop, the inside radius of the casing needed to be 21-1/4 in., allowing 1/4-in. to overlap the window jamb. The casing was to be 2 in. wide, so the outside of the casing would, have a radius of 23-1/4 in. I cut a half-circle with a radius of 23-1/4 in. from a piece of 1/4-in. plywood by drilling a hole near its center and fitting it over a pivot riail (A in the drawing) that was attached to the wood bandsaw table in. from the blade. Oh this pattern I placed three pieces of stock, arranged to avoid short grain, and marked the necessary cuts. Once I was satisfied with the miters, I tacked them to the plywood and ran the pattern with the three pieces attached to it through the bandsaw, again from pivot A. This gave me my outside radius. I then repositioned the hole in the circle-cutting jig to pivot point B, a radius of 21-1/4 in., and ran the pattern through again. This gave me my 2-in. wide casing with the joints already fitted. I saved the waste from both cuts, and used them as sanding blocks for the inside and outside edges of the casing
Brian K. Shaw, Johnson, VT
-
Click the "thumbs up" button above to vote for this tip. Help us choose Fine Homebuilding's top-10 window and door tips.
-
-