previous
  • Painting Ideas, Tips, and Techniques for a Professional Finish
    Painting Ideas, Tips, and Techniques for a Professional Finish
  • Energy-Smart Details
    Energy-Smart Details
  • 13 Door Design and Installation Tips
    13 Door Design and Installation Tips
  • 15 Coffered Ceiling Design Ideas and Tips
    15 Coffered Ceiling Design Ideas and Tips
  • 12 Remodeling Secrets Revealed
    12 Remodeling Secrets Revealed
  • 9 Design Ideas & Tips for Concrete Countertops
    9 Design Ideas & Tips for Concrete Countertops
  • The Inspector Game: Decking Dos and Don'ts
    The Inspector Game: Decking Dos and Don'ts
  • 7 Solutions for Kitchen Layout and Design
    7 Solutions for Kitchen Layout and Design
  • Roofing articles, videos, tools, and materials
    Roofing articles, videos, tools, and materials
  • How it Works
    How it Works
  • 7 Small Bathroom Floorplan Layouts
    7 Small Bathroom Floorplan Layouts
  • 2012 HOUSES Awards
    2012 HOUSES Awards
  • Deck Design & Construction Showcase
    Deck Design & Construction Showcase
  • Guide to Paperless Drywall
    Guide to Paperless Drywall
  • Complete Kitchen and Bath Guide
    Complete Kitchen and Bath Guide
  • Outdoor Kitchen Design Inspiration
    Outdoor Kitchen Design Inspiration
  • Meet the Fine Homebuilding Project House!
    Meet the Fine Homebuilding Project House!
  • Fine Homebuilding: The Digital Issues
    Fine Homebuilding: The Digital Issues
  • Buyer's Guide to Decking
    Buyer's Guide to Decking
  • 10 Basement-Remodeling Tips and Techniques
    10 Basement-Remodeling Tips and Techniques
next

Building Skills

Building Skills


How to Sharpen A Chisel With Diamond Hones and a Honing Guide

comments (5) January 24th, 2011 in Blogs        
patrick_mccombe Patrick McCombe, Associate editor
38 users recommend

Video Length: 5:39
Produced by: Rob Wotzak, edited by Cari Delahanty


Today we're going to talk about sharpening your chisels. Getting a good edge is really about the back of the chisel, the flat plane on the bevel, and where they intersect. I'm using DMT's 3-piece diamond whetstone set and the Veritas Mk.II honing guide to do the job.

Flattening the back

On new chisels, you want to flatten about an inch up the back. If you sharpen beyond that point as your chisel wears, you will need to re-flatten it. I'm just going to do the lower part here. That's simply a matter of wetting the diamond abrasive and holding the chisel on the flat. I like to use three fingers, and just run it back and forth over the abrasive. Work through the various grits of abrasive, and keep the stones wet. As you're sharpening the chisel, you will notice this black slurry developing in the water. That's just metal particles being carried away that would otherwise clog the abrasive. Once you get to the green diamond plate, you will notice that the back of the chisel gets really reflective.


Setting up the honing guide

Once we're done flattening, we're going to put the chisel in this great honing guide from Veritas. What I like about this product compared to other honing guides is the wide roller on the back that gives you extra stability. The first thing you want to do is make sure your chisel is in the honing guide properly. There are marks for various chisel widths; ours is a one inch chisel, so I'll set the mark to one and tighten down the thumb screw. Most chisels are sharpened to a 25-degree bevel angle, so line up the tip with the 25 mark, and then tighten down the screws that secure the chisel. Once you're sure the chisel is set in the jig, you can remove the registration guide.


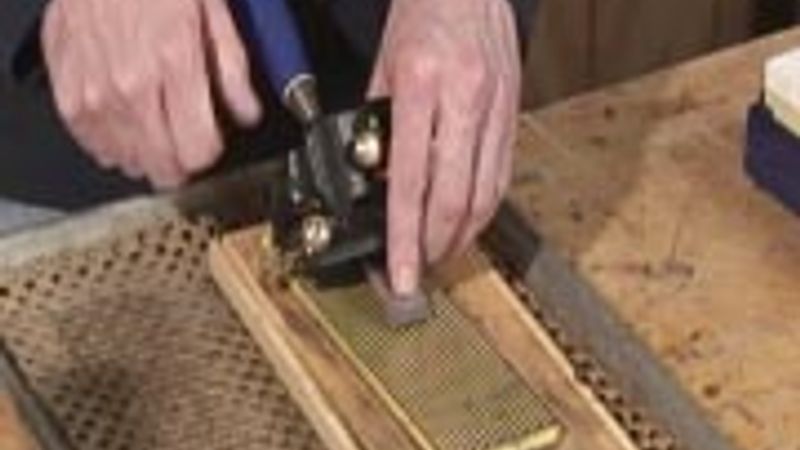
Using the Diamond Stones

I like these diamond plates from DMT because they have a great, long-lasting abrasive. I start with the black grit, which is equivalent to about a 220 grit sandpaper. With the roller of the honing guide resting firmly on the diamond plate, we're just going to run the bevel of the chisel back and forth until we have a uniform striated appearance, and all the chips and nicks are gone. If you have a really beat up chisel, this could take a while. In some cases it might make sense to use a grinding wheel and plenty of water to get large nicks out before you start with the diamond plates. This chisel took about five minutes to remove the nick on the black diamond stone. Now, we're ready to move on to the next finest abrasive.

Flip the stone over to the blue side, which is equivalent to about a 325 grit paper. It's important to make sure you use all of the stone by moving the chisel around. Occasionally I swap it end-for-end. That just prolongs the abrasive so you're not wearing it out on one portion of the stone. These things are expensive, each one is about $60,  so you will want to get the full life out of them. But, what's great is that they're very portable, very rugged, and they last a long time.

Once you notice the stone getting a little bit of a polish, move on to the red abrasive, which is equivalent to about a 600 grit paper. You will notice it gets a little more polished with every step. Next we'll move on to the green abrasive, which is equivalent to about a 1200 grit.

It's really tempting to break off the burr that develops on the edge of the chisel, but don't do it; you will ruin the edge. What you need to do is move the stone to the edge of the work surface so the guide can overhang, and just gently run the back of the chisel over the diamond plate, side-to-side, being sure to keep the chisel flat against the plate. You should find that working through all of the diamond plates produces an edge that is plenty fine for most carpentry work.


Read the companion article from our latest issue:

Building skills: Sharpening 101


Taunton's for Pros By Pros: Finish Carpentry
Tools, Tips, and Techniques for Installing Wainscots, Casings, Cornices, Baseboards, and More $17.95 more info...


posted in: Blogs, sharpening

Comments (5)

patrick_mccombe patrick_mccombe writes: Hi Benito 9,

Diamond plates do lose their adbrasive qualites as they age. In fact, the diamond plates in the Fine Woodworking shop have lost almost all their grit. My plates which are about two years old seem the same as when they were brand new. But it's true, even the coursest plates are pretty fine, so if a chisel is nicked, I first use a grinder to file away the damage. Sandpaper works fine too, but I like the plates beacuse they're so light and portable. Carrying around a piece of glass or granite seems inconvenient to me. Do you travel with your sharpening setup? Do you use a honing guide?
Posted: 8:50 am on May 12th

Benito9 Benito9 writes: Patrick,

I've largely given up on my DMT diamond plates because I've found that they just don't grind as effectively as fresh sandpaper. Of course, the sandpaper wears down quickly and needs to be replaced with a fresh sheet whereas the diamond plate doesn't wear down at all. But in terms of grinding action, I've found diamond plate a disappointment. Am I misinterpreting the grit rating system for diamond plate? Anyone else have a similar experience?
Posted: 9:19 pm on April 12th

patrick_mccombe patrick_mccombe writes: You're right, BobboMax. I should have said eccentric. And for those of you who might be wondering: it is the same word as the one used to describe somebody who's a little unusual. I just looked it up.

Thanks for the catch.
Posted: 8:58 am on February 4th

Dovetail7442 Dovetail7442 writes: having a hard time viewing this (or any) video on any FHB/FWW site lately. Is there a change in format? Is it Mac specific? Never had a problem until recently. Thanks.
Posted: 7:58 pm on February 3rd

BobboMax BobboMax writes: Patrick,

When you say "concentric" roller, I think you mean "eccentric," that is, one w/ an off-center axle, so the distance to the surface varies as you rotate it. That's what allows you to adjust the bevel for mis-sharpened chisels or add a small micro-bevel on the tip.
Posted: 4:37 pm on January 31st

You must be logged in to post comments. Click here to login.