Once you’ve measured the total rise and run, an accurate stair-stringer layout is only a few mouse clicks away.
Step one – Create the model:
For this stair scenario we begin with a “rough total rise” dimension from a hypothetical jobsite. Since the accuracy of calculations provided in this method rely totally on the accuracy of this dimension, it is essential to account for any out-of-level condition that may exist in the basement floor by measuring to a point on the concrete where the bottom step will end up. After establishing a vertical Drawing Plane, add guide lines with the Measure tool and, tracing them, draw in geometry to represent the “rough total rise” for the existing floor structure.
Add Floor Finish Dimensions
With general jobsite measurement data drawn on a Drawing Plane, draw in remaining materials that will alter the “rough total rise” and establish a “finished total rise”
SketchUp Stairmathter:
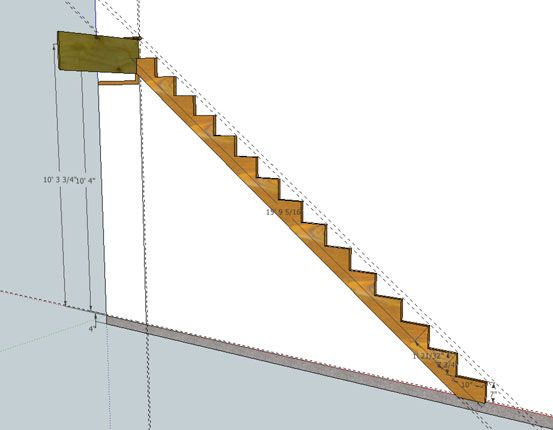
Once the model represents measurements from the jobsite including relavant floor finishes (ie: underlayment, tile, hardwood or whatever) draw a vertical line to represent the finished total rise dimension and use the Divide tool to do the math and calculate individual rise height. It is important at this point to select and lower this triangle geometry by the tread thickness, in this case 1 1/4″, since we want to establish the cut lines for a stringer, rather than the finished tread and nosings positions. Next, by converting a single rise/run/diagonal triangle into a Stringer component, the Move/Duplicate tool quickly does the layout work for a stringer. (Note: to keep this tutorial simple I use a typical 10″ run for the stair treads. Certain jobsite conditions require adjusting this dimension but since the process is basically the same I didn’t cover requirements to integrate the math for this variable)
Ready to Cut Stringer Pattern
With the Dimension tool you can measure any or every “cut” on the stringer model. Use the Protractor tool to measure any angle necessary. With access to this information you can layout accurate, code compliant stair stringers and cut with confidence.
There You Have It
In the next episode of Digital Jobsite session, I’ll embellish the model created in this video series; available here:
Download the Stairmathter SketchUp model
with components required for a complete stair model. In addition I’ll cover how to determine stairwell opening dimensions to allow for headroom and other clearances to conform to building codes as well as architectural requirements. I hope this workout session with Google’s StairMathter yields productive progress for your stair planning efforts.
Read Part 2 in my stair-building series: Steps in the Right Direction

A SketchUp model is a great way to do all the math for stair stringer layout.


View Comments
This is sooooo boring. Besides if a person can't lay out a stairway then they should take all the tools that they have and make an anchor out of them and buy fishing equipment. They don't have what it takes to build houses.
Too much needless moving of the cursor. I was getting dizzy.
Useful info for the beginners and weekend DIY'ers
Nice example. However, also a very good example of why working with a script would be a great improvement.
Very nice, but nothing one shouldn't be able to do with a tape measure, a plumb bob and a calculator. It's a stairs not a space shuttle launch!
Some of these comments read as if Matt just announced that he finally figured out the FIRST way that one can design stairs. Nooooo. He's just showing you how you can do it with another, new tool. One that can be printed, saved, emailed, and modified---all ahead of time, much easier than a pencil and paper on a job site.
Bill117 does mention a good point. Because of differing refresh rates, fast screen/cursor movements are really jerky on youtube.
It's just personal preference about the scripting. I don't mind a guy telling me what he's doing, without much of a script. So much of the stuff on TV is too highly scripted. Matt is just like a guy who is sitting next to my computer showing me what to do.
If you already know how to do this, your computer has an "I'm bored" button. It's that little x in the corner of the browser window. Maybe that should be the next video in the series.
Good job Matt. I built a new house last year and used a very similar method in sketchup to build my stringers. takes all the guesswork out of it by being able to account for all your constraints. no reason for that first and last step to have different rise than the rest!
keep reading the tips and tricks on sketchup (like holding shift when using the rotate or protractor tool to lock onto a plane).
Cheers,
Nathan
i like to studi good expiriens
It's encouraging to read the growing list of comments posted here. I'm glad to see the content is beneficial, at least to some: Nathan, mykolapok and shirazj for example ((shirazj, can I hire you as a publicist? :-)) although its apparent I've yet to convince others of the benefits SketchUp provides.
It's my intent to use comments, both positive and negative, as direction to develop content at the Digital Jobsite to advance the proficiency of carpenters of all skill levels. For me, the carpentry part comes easy but the video/blog/writing/production part is obviously a work in progress.
I hope you all will stop by the Digital Jobsite from time to time to check on my progress and possibly pick up a few ideas on how to use SketchUp to your benefit.
Matt
aka The Timber Tailor
Matt,
thanks for taking the time to make this tutorial. I have downloaded and deleted sketchup more times than i can count. I know using it to do stair layout will be better than drawing it on some plywood onsite, so using your videos I will finally learn how to use sketchup for this very practical application. Like any other tool, the better you get at using it the more efficient it is to use it. I am sure if you were not narrating the whole time you can whip this stuff out. And I am sure when dealing with multiple landings etc that this can definitely save some time onsite.
I look forward to reading more of your stuff.
Cheers,
Dan
dsconstructiontahoe.com
hello everyone,im wholesale supplier online
Welcome to our website
===== http://www.goodshopping.us/ =======
accept paypal or credit card and free shipping
We need your support and trust!!!
Dear friends, please temporarily stop your footsteps
To our website Walk around A look at
Maybe you'll find happiness in your sight shopping heaven and earth
You'll find our price is more suitable for you.
=== http://www.goodshopping.us/ =====
TahoeContractor,
Creating the videos has been a challenging and (usually) rewarding undertaking. If they are an inspiration for you to tackle SketchUp, you're certainly welcome! I too approached this "new" technology in fits-and-starts and found, like you will, that it gets easier and more beneficial over time.
Feel free to post here or contact me if you encounter any specific challenges. I will try to help out if I can. Any time I've run into a frustrating problem, learning how to work around it has always increased my productivity and decreased my frustration.
Matt
aka The Timber Tailor
right on Matt. I found your profile on Google, so I will check out some of that stuff too. I like the pencil house, and aim thinkin' of using sketchup for a logo maybe.
thanks again.
Dan