
Model and Measure Part Two: Hip Roof Framing Demystified by Modeling in SketchUp
Learn the tricks Matt Jackson uses to create a hip roof framing model.
Previously in Model and Measure:
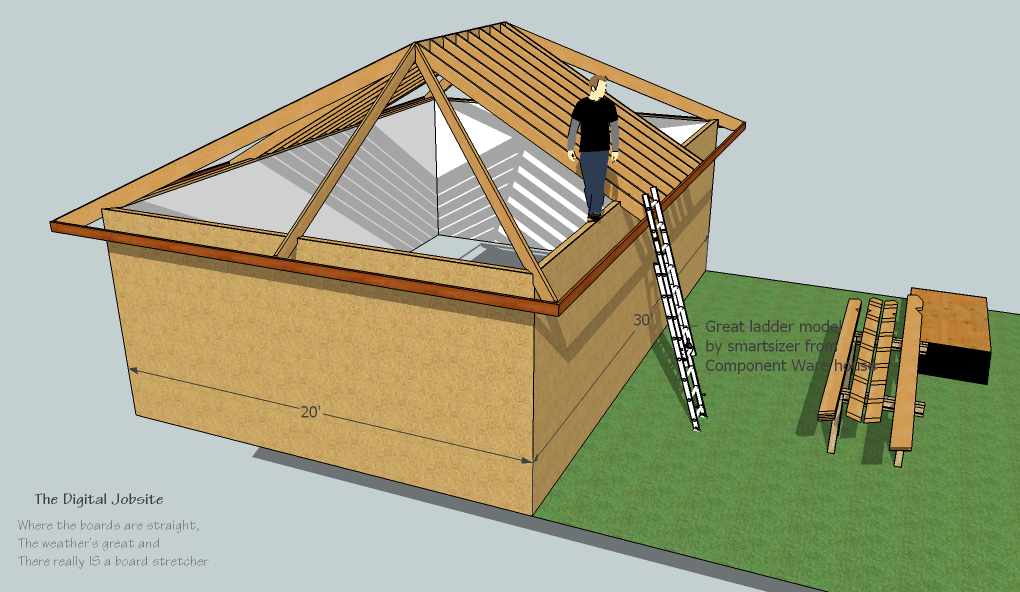
In Part One of this 3-part Model and Measure series I gave an overview of some important aspects of hip roof framing geometry. To explore that geometry I created a SketchUp model that includes every rafter needed for a complete 7:12 pitch framed hip roof. The challenge of modeling all those pieces and parts in SketchUp is not unlike the challenge of cutting and building a hip roof on a real world jobsite. In either case a handful of tricks will make the process manageable and a whole lot quicker. Here in Part Two I demonstrate the tricks I use to create a hip roof framing model.
First Things First:
This first of two videos shows the process I use to model a hip rafter. It’s important to keep in mind that this is modeling on a “Digital Job Site” where we’re not restricted to the physics of working with real-world job site materials. Adapting this mindset speeds up the modeling process by allowing non-conventional techniques for drawing. You’ll (hopefully) see what I mean as you watch a hip rafter materialize by watching this:
Modeling your first hip rafter will take longer than your second one, and with a little practice you’ll be amazed at how quickly it goes.
Exponential Effort:
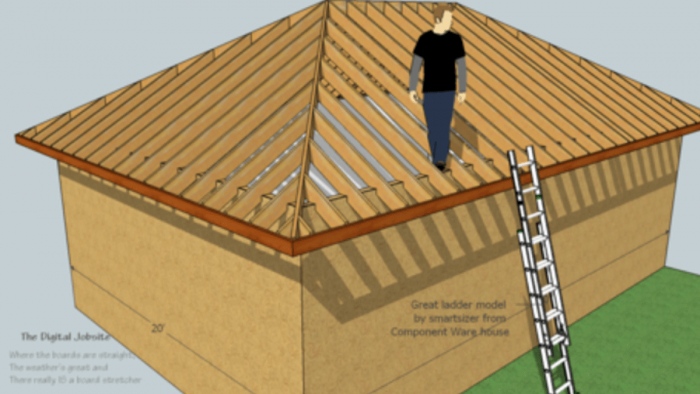
Now that we have a hip rafter to work with, modeling jack rafters is the next step. With so many lines and faces for each jack rafter (34ea. x 8 jacks = 272 jacks x 8 sets = 2,176 lines and faces total) it would be a daunting task indeed to build this model line by line… UGH!! By using the Move/Copy and Rotate/Copy tools however, we can create 8 jacks with less effort than creating one common rafter and 64 jacks with less effort than creating the first 8. I think it’s fair to say that the effort expended yields exponential results when modeling this way:
To Be Continued…
Model and Measure Part Three: Hip Roof Framing De-Mystified by Measuring in SketchUp will cover the aspect of this process I find most beneficial: measuring modeled parts for layout angles and dimensions. I’ll attempt to show how to gather dimensions from the modeled parts and apply them for actual rafter pattern layout.
-
Rafters ready for sheathing
-
Rafter Ready Hip


View Comments
Matt, I have to compliment you for going through all of this for us. I am totally blown away at how well you know the Sketchup program......and how easy it is to draw something so complicated as far as drawing goes. At least it looks easy.....and that is because you know what you're doing ! I studied this tutorial last night when I should have been sleeping....but it just woke me up with how dang mind blowing it was. I can't say enough about how helpful this video is. Maximum respect to you sir !!!! I look forward to any post you make.....they're all eye openers !
donluke
Donluke,
Thanks for your positive comments... it helps make the time spent posting more rewarding.
If this tutorial helps you along the road towards more efficient (and thereby more productive)modeling in SketchUp then I'll consider it a success.
Part Three of this series is forthcoming and after that I have yet to determine.