
Kickout Flashing: How to Flash Troublesome Roof-to-Wall Intersections
Mike Guertin demonstrates how he uses redundant layers of flashing and kickout flashing to prevent roof water from slipping behind the gutter, causing damage.
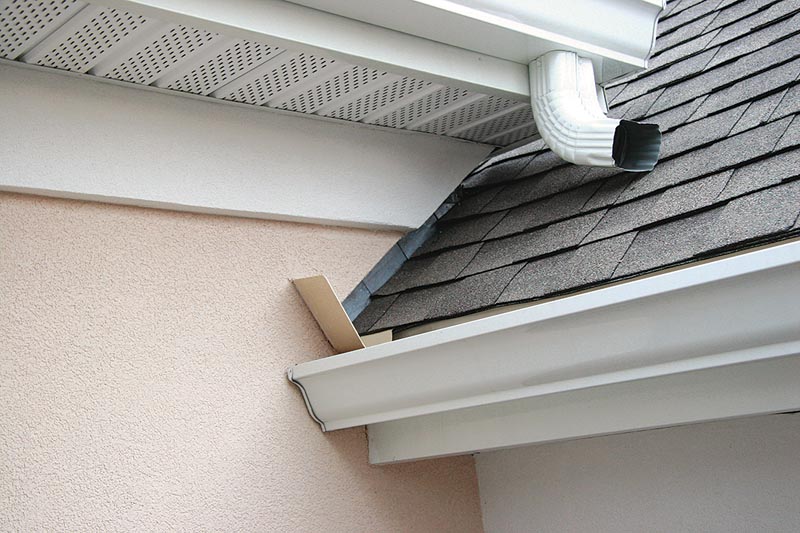
The exterior of a house presents plenty of opportunity for leaks. A common problem area is the point where a gutter dies into an adjoining wall, as the photo below illustrates. Unless you’re careful, step flashing can allow water from the roof to slip behind the gutter and get behind the siding and even the housewrap.
A key part of my approach is using a special piece of flashing at this vulnerable intersection called kickout flashing or kickout diverter. They are available in several colors and in both plastic and metal. This simple but important precaution is required by the International Residential Code.
I use redundant layers of flashing integrated into the housewrap to keep water from getting behind exterior cladding. Kickout flashing directs water into the gutter. The process might seem overcomplicated at first, but the minor expense in time is much better than having to tackle rot repairs down the road.
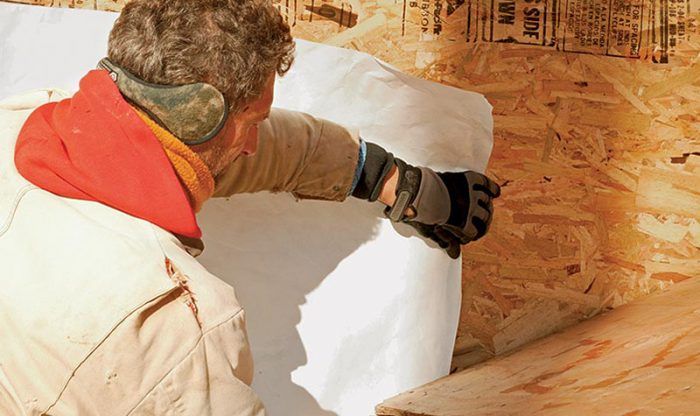
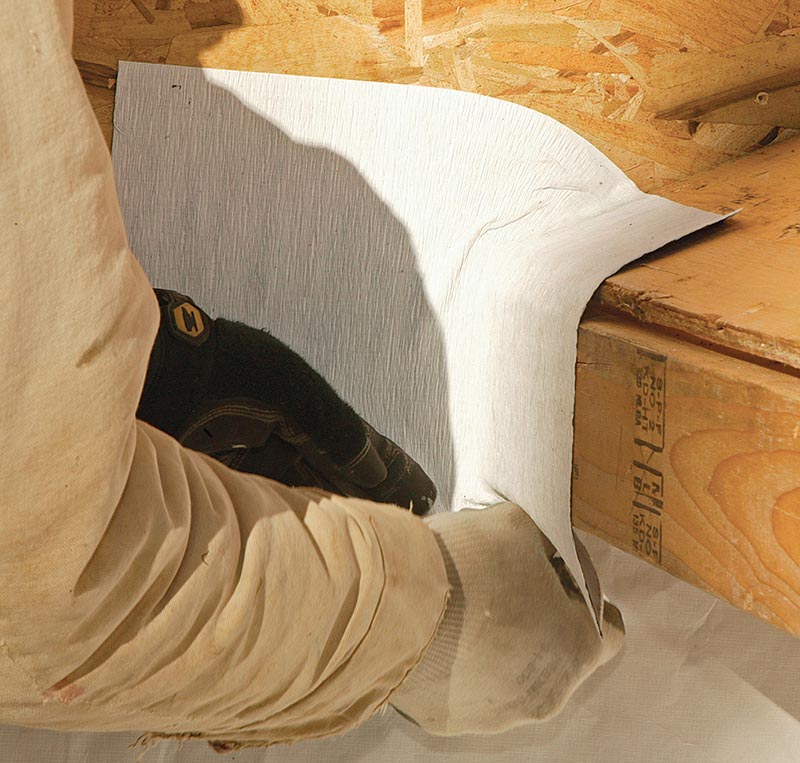
1. Housewrap creates the foundation. Ideally, I like to start by installing a 3-ft. by 3-ft. sheet of housewrap (or even better, a piece of self-adhering roof underlayment) to the wall before the first truss or roof rafter is placed against it. The sheet acts as a backup at a vulnerable junction. When I can’t place the sheet ahead of time, I sometimes can sneak a piece of housewrap in after prying the truss or rafter back just 1⁄16 in. and pulling any nails that might be in the way.
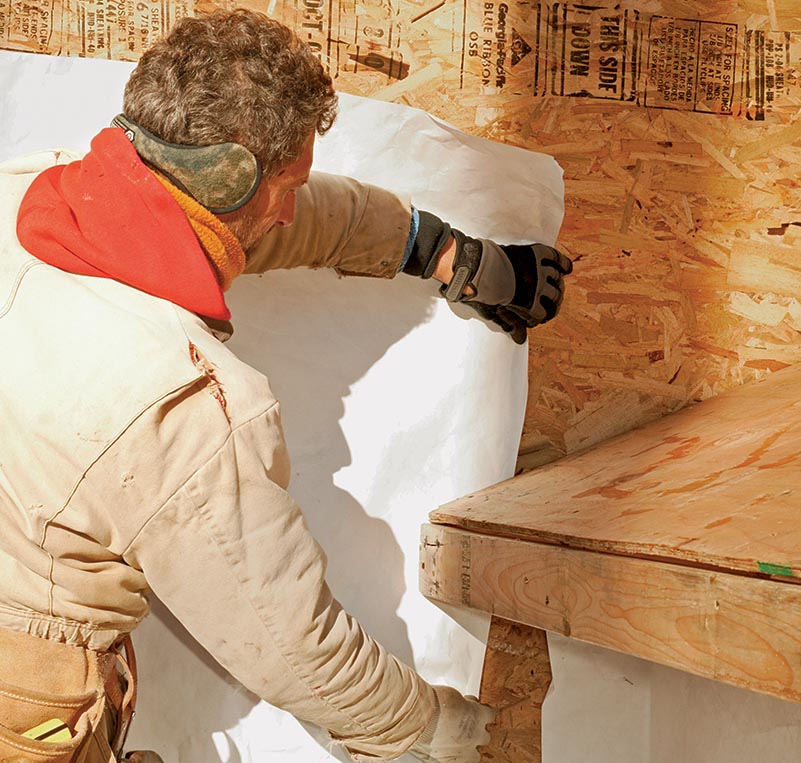
2. If I can’t get some sort of weather barrier against the wall at the end of the eave, I apply a piece of housewrap that runs vertically from just below the soffit to at least 3 ft. down the wall, 6 in. horizontally around the inside corner, and at least a foot beyond the end of the eave.
3. Flexible flashing tape seals the eave to the wall. I use a wide piece of flexible flashing tape to protect the area between the subfascia and the wall. I cut the tape so that it laps onto the housewrap above and 3 in. above the roof sheathing.
4. Once the flexible flashing is set, I apply a piece of housewrap along the wall where the fascia meets it. This piece isn’t absolutely necessary. But later, it becomes easier to cover the wall completely with a final sheet of housewrap.
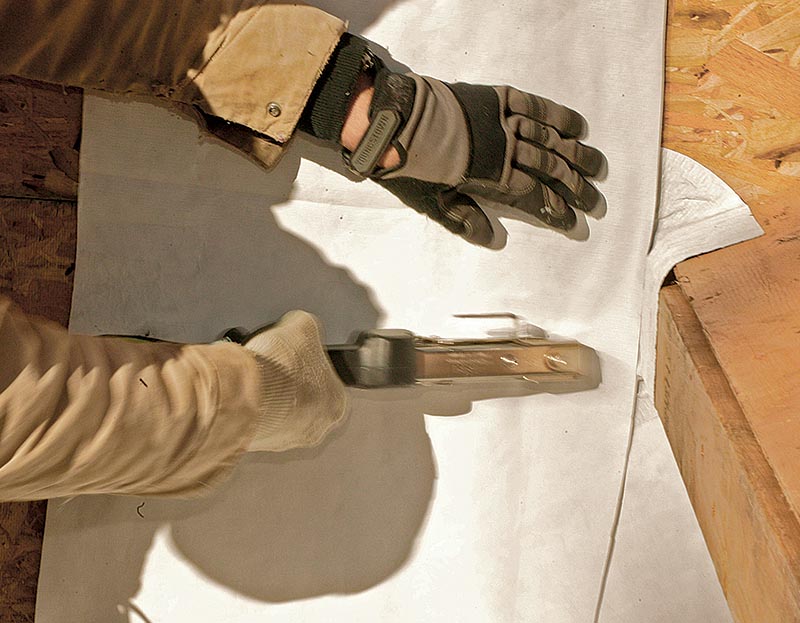
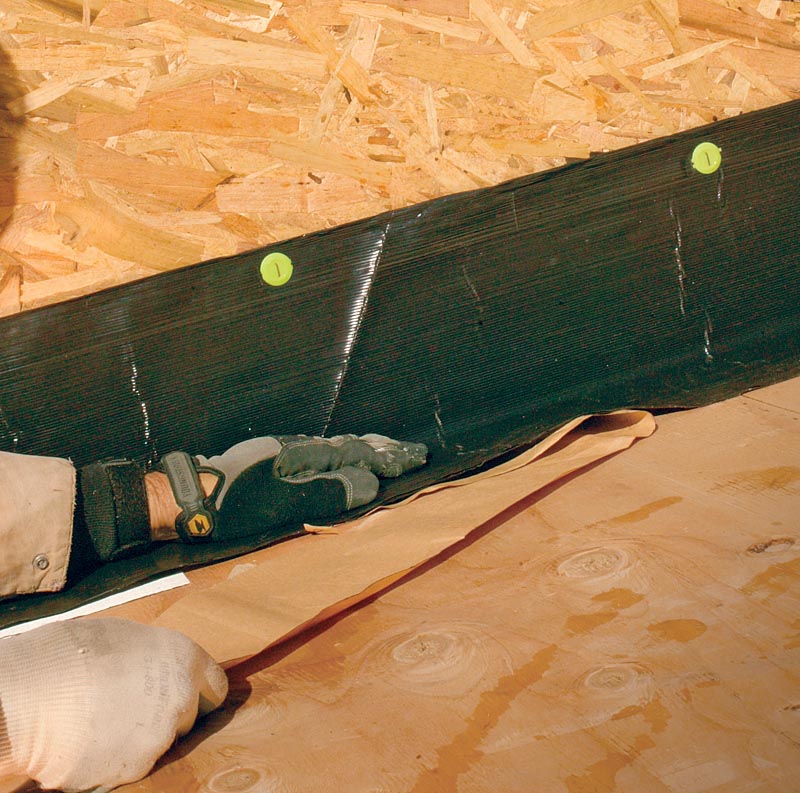
5/6. Protect the flashing tape. Although flexible flashing tape is pretty durable, it’s best to protect it with metal flashing and to treat it as a backup for water leaks. I fold a piece of metal flashing for the inside corner between the subfascia and the wall. A vertical cut about 2 in. to 3 in. long helps it to fold onto the roof sheathing. I then add a second piece of flexible flashing tape to cover the open corner of the metal flashing, and I fold it down onto the subfascia.
 |
 |
7. There’s optional backup protection, too. I build in 110-mph to 120-mph hurricane zones, so if I install a membrane beneath the step flashing and underlayment, it’s cheap insurance against a catastrophic event. I run a 12-in.- or 18-in.-wide strip of plastic-surfaced membrane from eave edge to ridge.
Trick of the Trade: The first piece of flashing should be a kickout diverter
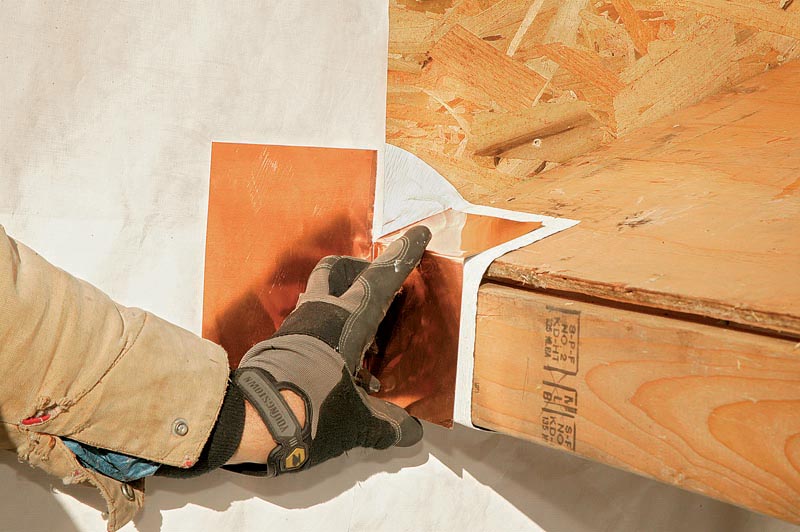
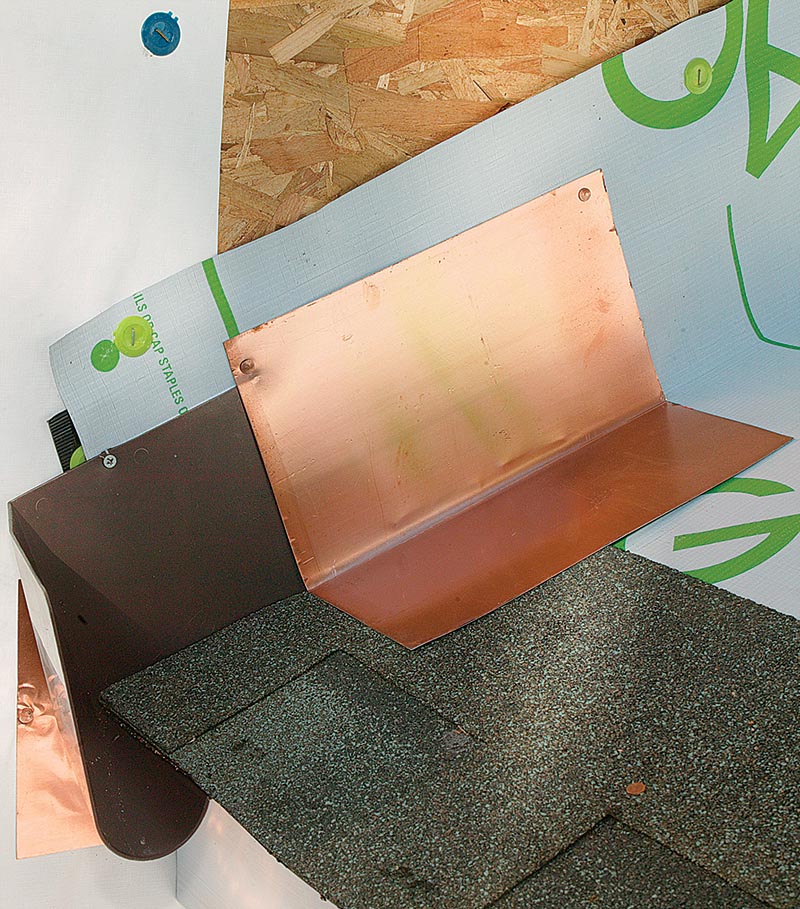
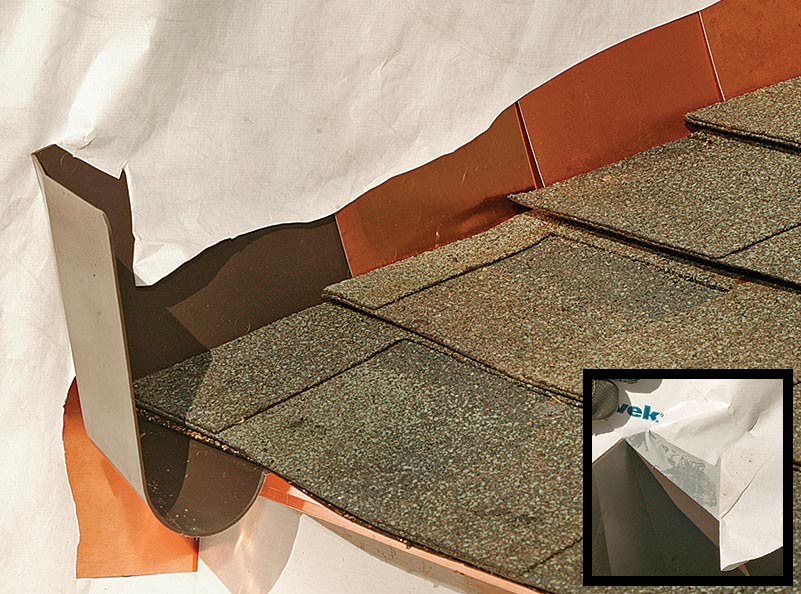
8. After lapping the first piece of roof underlayment up onto the wall by about a foot, I install a kickout diverter flashing that redirects water into the gutter so that it won’t channel behind the siding.
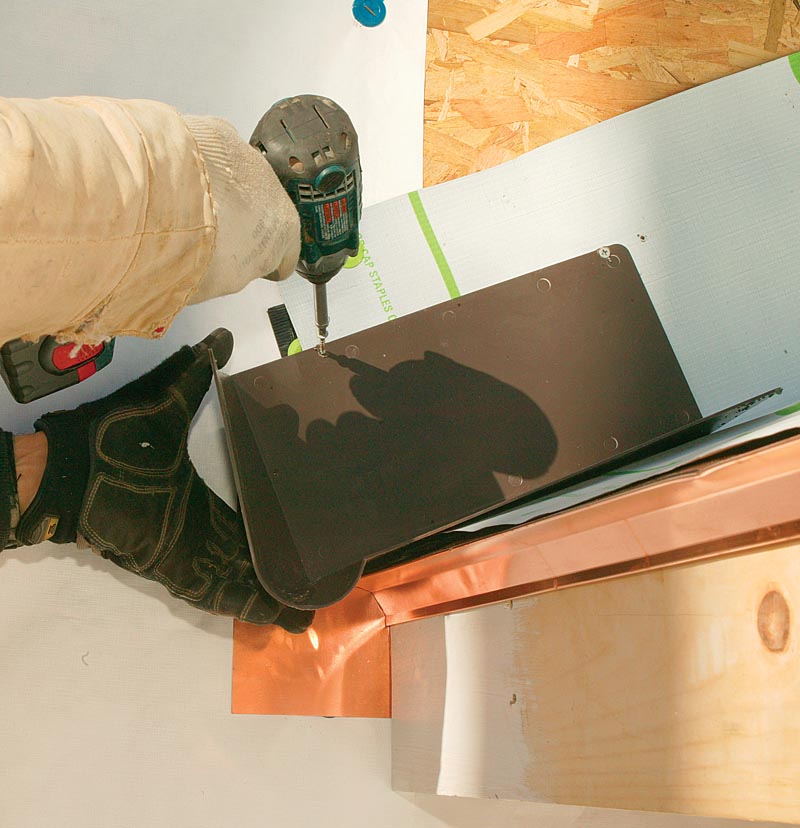
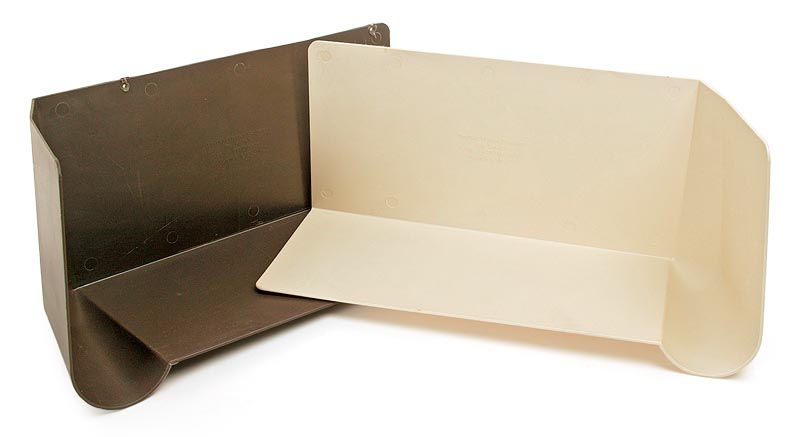
The model I’m using is made by DryFlekt (www.dryflekt.com); it costs about $11 and is available in right- or left-hand models in white, ivory, or brown plastic. (Prefabricated copper versions are on the market, too, and cost about three times as much.) I line up the inside corner of the diverter 1⁄2 in. to 3/4 in. lower than the edge of the drip edge-essentially equal to the distance you overhang the first course of shingles.
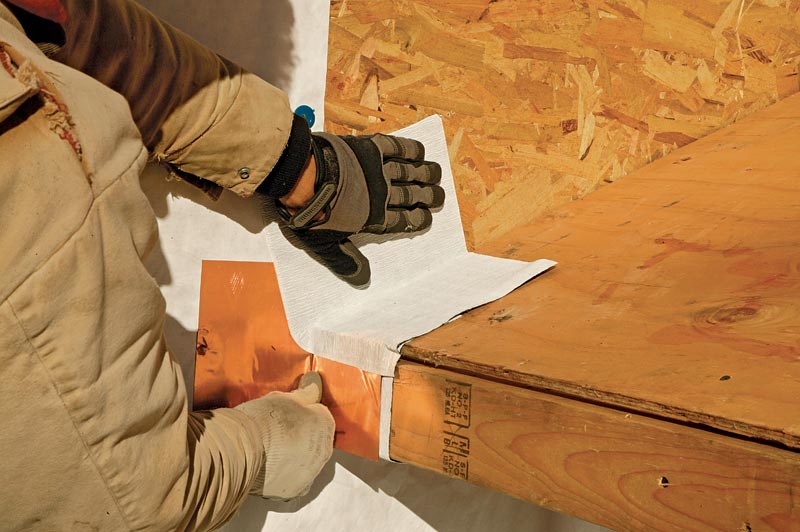
9. Bigger step flashing is better. I recommend 12-in.-wide step flashings bent for a 5-in. roof leg and a 7-in. wall leg. The narrower step flashing just isn’t wide enough to protect the intersection fully.
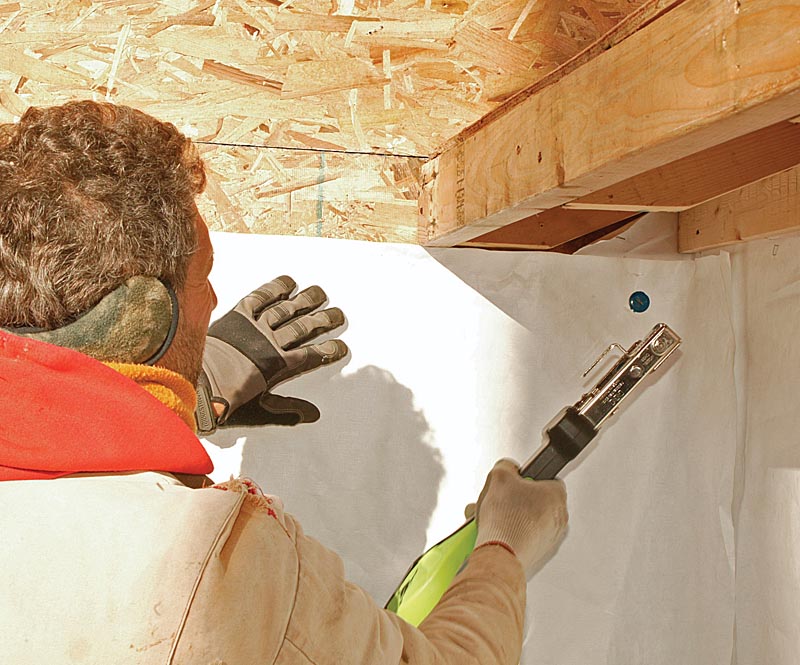
10. Finish with tape. Finally, the housewrap can be laid up on the wall to cover the top of the kickout diverter and step flashings. I cut the wrap at the turnout in the diverter and seal the top of the cut with housewrap tape. The tape adhesive might not last the life of the cladding, but it’s a good precaution. Remember that there’s a layer of housewrap underneath that will keep the water from getting to the sheathing.
Watch the video:
Direct Water Into Gutters with a Kickout Flashing Diverter
-Contributing editor Mike Guertin is a remodeling contractor and consultant in East Greenwich, R.I. His Web site is www.mikeguertin.com.
More on flashing:
Installing Step Flashing to Prevent Roof Leaks – Step flashing spans the joint between roof shingles and an adjacent side wall. Here’s how to install it correctly.
Vent Flashing Done Right – To prevent leaks, back up roof vent boots with flashing, counterflashing, and proper shingling. EPDM flashing tape with a butyl adhesive backing will help.
Waterproof Your Windows With Liquid Flashing – Learn how to install liquid-applied flashing to seal the rough opening while leaving a path for water to escape.
Flashing for Old Windows – Old windows don’t have an integral flange, so getting a weathertight seal calls for some special techniques. Mike Guertin explains how.
Window Head Trim and Drip Cap – Here’s one approach to detailing the head of a window to direct water safely away.
Rain Diverter Protects an Uncovered Exterior Entryway – A simple metal strip fastened under asphalt shingles diverts rainwater toward a gutter.

View Comments
Mike - Where can the peel and stick flashing be purchased - need a product name, manufacturer etc?
Karl
Mike, great video! I would also like to know more details about the peel and stick flashing as well as the plastic-surfaced membrane...product name, manufacturer etc.
Thanks,
Nate
IABuilder and KarlJF have asked fore specifics on the material used in this outstanding video. I echo there thoughts but I don't see any answer. Were they answered? If so, please send it to me or post it. I have an emergency.
Bob
I would highly recommend this window flashing tape. It costs a little more than other tapes, but it is the hands down the best sticking peel and stick flashing I have ever used.
Sorry link didn't post...the peel and stick flashing I use all the time is the Reese 4" roof and window flashing. You can find it at amazon...just do a search for reese flexible flashing at amazon.com and you will see it.
How would you finish this is you were dealing with vinyl or some type of lap siding?
Peel and stick materials are:
FlexWrap (DuPont Tyvek) - flexible white stuff
York HomeSeal - the straight runs where flexibility not needed. Any plastic surfaced self-adhered membrane will work (Grace Ice and Water Shield, IKO GoldShield Ice & Water Protector, Owens Corning WeatherLock Flex.
Finishing with vinyl - I just J channel 1 in. off roof surface. The ugly part is channeling around the kickout wing. For any lap or shingle siding, the process isn't a problem. You just use a jigsaw to cut a notch in the siding for the kickout. With fibercement, you have to leave 2 inches to the roof surface and for wood you should leave about 1 inch.
2 1/2 years after your article/video, I find myself in need of more information. Am a homeowner, not contractor, but have subscribed to Fine Homebuilding since its inception. Do a lot of my own work - but not roofs. Had roof redone about 7 yrs ago. Had major leak last year and roofer "thought" he found source. Irene just hit. More leakage. Now he says I need kickout diverter. Two problems: your video is for new construction, where you can add all the tyvek, waterproofing membranes, flashings, etc. Mine is existing roof. How do you retrofit this diverter without both removing all the siding and then tearing up the whole valley where roof meets siding to add all these additional elements. Second, your video shows the process up to the addition of siding. Your comment to another "commentor" says for horizontal siding just jigsaw the contour. But would that not leave you with another gap (between siding edge and backside of diverter contour) where rain could ingress? Sounds like for horizontal siding your are perhaps solving one problem and creating another. Thanks for any help you can offer.
Phil
To Phoobs,
I retrofit kickouts all the time. Doing so involves removing the siding in the area and perhaps going further to remove some roofing and some of the housewrap in order to get laps for positive drainage.
On a retrofit you may not be able to get the large lapping pieces of housewrap onto the wall but you can layer in a couple pieces even if you only pull 3 or 4 siding laps off. It's a process that's next to impossible to convey with words and unfortunately I don't have retrofit photos. But your question does prompt me to photo my next kickout retrofit and post it when I do.
Perhaps this description will help - Remove the siding at the end of the eave edge from the bottom of the facia and up to 3 courses above the drip edge line. Apply housewrap tape over all nail holes. Place the kickout flashing at the eave edge and draw the outline on the houswrap for reference. Then 4 in. above the top of the kickout flashing outline, make a horizontal cut in the housewrap about a foot to the left and right of the kickout wing position. Cut a 2 ft wide by 3 ft tall piece of housewrap and slip one edge into the cut and up at least 5 in. Fold the piece up along the cut line and apply a piece of housewrap tape (this undertapes the piece of housewrap).
The bottom edge of the housewrap piece should be long enough to lay over the top lap of a siding course below. This is your fail-safe backup to any leak at the kickout wing. Any water that may pass through the small hole where the siding is trimmed around the wing will be drained back out onto the face of the siding.
Now Install the kickout flashing and step flashings up the roof as needed. The wall leg of the kickout should be applied OVER the housewrap Cut a 2 ft square piece of housewrap and tuck one edge into the horizontal cut (the same one the first piece of housewrap was slipped into) and up under the housewrap on the wall by at least 5 in. Tape over the cut in the housewrap with housewrap tape. Trim the housewrap piece around the wing of the kickout flashing and along the roof-line. Then tape the sides of the housewrap piece down.
Since the kickout wall leg is applied over the housewrap beneath, any water that may leak by the cut will be redirected out onto the siding surface through the lap you placed the 2 ft x 3 ft piece of housewrap over.
Even though you end up cutting into the siding at the vertical wing of a kickout, it is still the best solution. The alternative is common practice and will often end up causing leaks because the end the step flashing ends up behind the siding. This only dumps water directly behind the housewrap and/or siding.
Mike
Mike, I've got a brick front with a window sill (brick) that is 2 inches away from the top of the garage roofline. The problem is it leaks and the original roofing company that did the work came out and extended some type of black flashing up and around the window but it still leaks. Any suggestions? I have a photo showing the area if that helps.
Thanks,
Bill