previous
  • 7 Solutions for Kitchen Layout and Design
    7 Solutions for Kitchen Layout and Design
  • Outdoor Kitchen Design Inspiration
    Outdoor Kitchen Design Inspiration
  • 7 Small Bathroom Floorplan Layouts
    7 Small Bathroom Floorplan Layouts
  • Guide to Paperless Drywall
    Guide to Paperless Drywall
  • Roofing articles, videos, tools, and materials
    Roofing articles, videos, tools, and materials
  • 12 Remodeling Secrets Revealed
    12 Remodeling Secrets Revealed
  • 9 Design Ideas & Tips for Concrete Countertops
    9 Design Ideas & Tips for Concrete Countertops
  • Painting Ideas, Tips, and Techniques for a Professional Finish
    Painting Ideas, Tips, and Techniques for a Professional Finish
  • Complete Kitchen and Bath Guide
    Complete Kitchen and Bath Guide
  • Meet the Fine Homebuilding Project House!
    Meet the Fine Homebuilding Project House!
  • Deck Design & Construction Showcase
    Deck Design & Construction Showcase
  • Energy-Smart Details
    Energy-Smart Details
  • 2012 HOUSES Awards
    2012 HOUSES Awards
  • How it Works
    How it Works
  • The Inspector Game: Decking Dos and Don'ts
    The Inspector Game: Decking Dos and Don'ts
  • 15 Coffered Ceiling Design Ideas and Tips
    15 Coffered Ceiling Design Ideas and Tips
  • 13 Door Design and Installation Tips
    13 Door Design and Installation Tips
  • Fine Homebuilding: The Digital Issues
    Fine Homebuilding: The Digital Issues
  • Buyer's Guide to Decking
    Buyer's Guide to Decking
  • 10 Basement-Remodeling Tips and Techniques
    10 Basement-Remodeling Tips and Techniques
next
Theres a Better Way


Fitting Coped Crown Molding

comments (4) July 16th, 2009 in Blogs        
cmiller Chuck Miller, special-issues editor
67 users recommend

Video Length: 1:27


This tip comes to us from Colin Siddall of St. Paul, Alta., Canada:

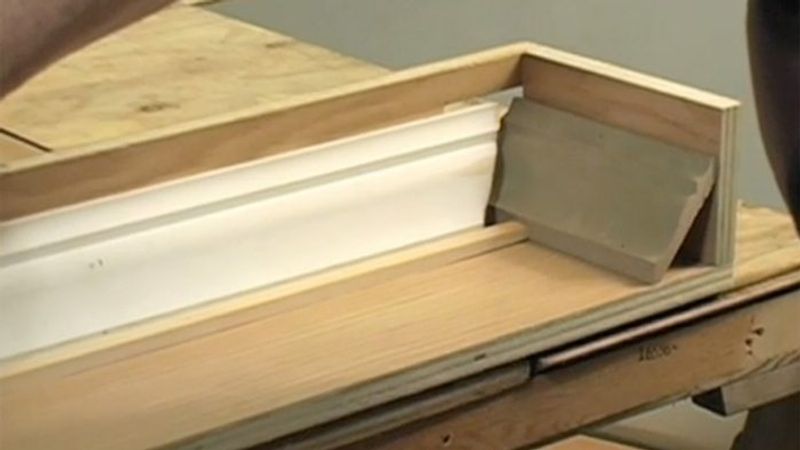
Before I made this jig, I checked the fit of my coped crown molding the conventional way by climbing the ladder and holding the coped piece in place against the installed section. This method told me that it was either a good fit or that there was a gap, but it failed to tell me where to remove the material to eliminate a gap. All I knew was that there was a high spot or spots somewhere on the hidden coped surface. I then had to locate the high spots and remove them by trial and error, while chanting those special words carefully selected by carpenters to reflect their degree of frustration.

With this fixture, I am able to check my coping without climbing a ladder, and if it is not a good fit, I am able to see exactly where and how much material needs to be removed. I simply slide my coped section into the fixture until it engages the sample piece of crown, as shown in the drawing. If a gap exists between their front faces, I view the hidden coped face through the viewing window. This enables me to identify where and how much more fitting is required by the amount and position of the light shining through the gap. (High spots allow no light to show through.) I usually get all the high spots on the first go. The fit is confirmed by a quick recheck on the fixture, and it’s up the ladder for installation.

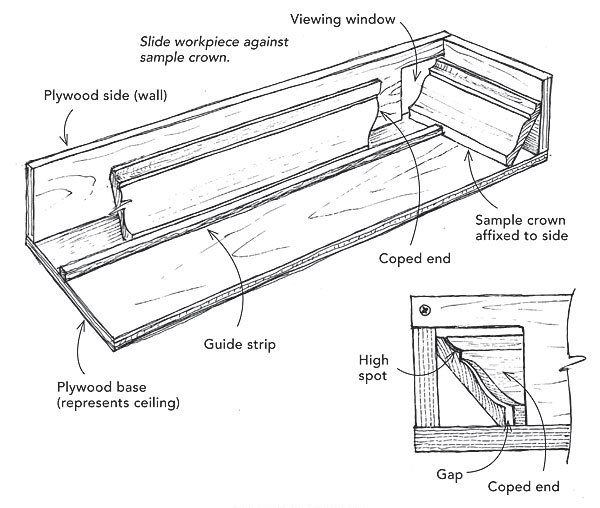
The installed sample and the guide position can be changed to suit the particular crown molding being
installed. Although I use separate left and right jigs, they can be modified easily to check both left- and right-hand coping by duplicating the window component—representing a wall and made of plywood—and attaching it to the front edge of the base together with the installation of a second guide.

Need more help on your crown molding project? Let Tucker Windover take you through the process in a Video Workshop by Fine Homebuilding.


Trim Complete
Trim Complete
Expert advice on a wide array of trim and molding projects $21.95 more info...


posted in: Blogs, finish carpentry, crown-molding

Comments (4)

haley haley writes: The reason that most people cope is because the coped joint will compensate for any of the corners being out of square. If you cope you don't have to cut the moldings on 44.5 or 45.5, you cut them all on 45 even if the corners are out of square. If you are having problems with the cope joint not fitting and you know that you've taken enough off the back side, then you probably don't have the molding bedded correctly. There are some jigs (EasyCoper) on the market that will let you use a jigsaw and give you a uniform undercut every time.
Posted: 11:25 am on October 29th

maryOO maryOO writes: I think that this is a great idea for anyone installing crown molding. Although it may take some time to create box, the payoff will be well worth the additional time it takes. It's important when you are installing crown molding to take your time. Don't rush the job.

Remember to get well acquainted with the process and installation of the crown molding. This will help you better understand how to install the molding. You may even want to watch some "how-to" videos as well.

It's important to take your time and follow the golden rule of molding, measure twice and cut onces.

Good luck!

- Mary

Posted: 2:47 pm on August 21st

fullenco fullenco writes: I believe that anyone that installs a bunch of crown would be pretty good at coping and the time you took to do this would be wasted.
Posted: 12:27 pm on August 7th

rchampag rchampag writes: I like the jig mostly because it is cool to see the backside of the cope, but dont really think it addresses the problem of fitting crown properly for inside corners, same could be said for outsides, one could make a similar jig for that as well.

This jig seems mostly to addresses bad coping techniques, such as not enough angle being held on the coping saw to take out more of the bellies of the profile. The biggest problem with using this jig for fitting to walls is that it assumes that all your corners are a perfect 90 degrees. We all know that rarely happens. For fitting into the other 90% of the corners that one would see in the field, take the extra time to make a series of 24" test pieces with good copes that ranges from a 44.5 degree cut to a 45.5 degree cut, that is a decent range for most out of square corners. use some 18 gauge finish nails set at the spring point or snap lines at spring points with super fine chalk. Hold your straight piece up, then bring in your coped pieces to see which is the best fit. move them above or below the spring line to get your best fit, but not more than 1/8" in either direction or it will show looking down the wall lengthwise.
The best fit is your angle of cut and cope. When cutting the final pieces, cut it a full 1/16 of an inch long and snap it into place to get a super tight fit.

You still have to go up and down the ladder, but hopefully at least a couple of trips less cause you only cut your final piece once. Try a small rolling scaffold instead of the ladder as well, gives more working surface and easy to roll if on subflooring still.
Posted: 6:52 am on August 3rd

You must be logged in to post comments. Click here to login.