
Small Drywall Patch
Here's a simple way to repair a small hole in drywall without using tape.
Geoff Parkinson of Vancouver, B.C., writes–
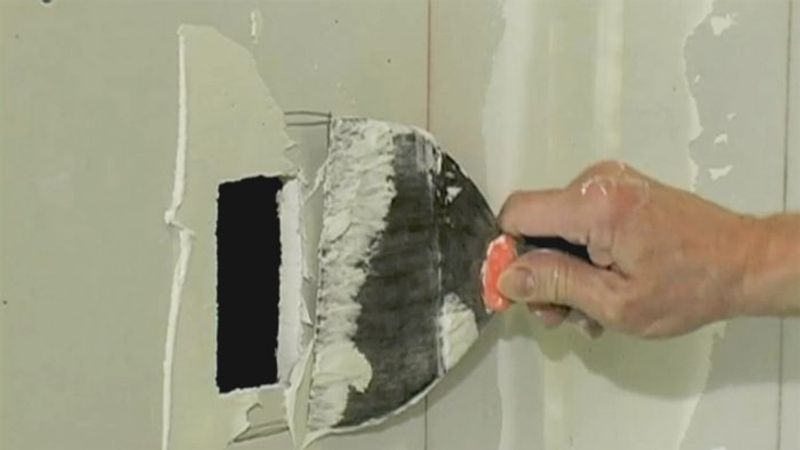
A simple and effective way of patching small holes in drywall or plaster is done without tape. First, cut out the hole until you’ve got a rectangle. Then cut a piece of drywall of any thickness to the size of the hole plus 2 in. in both length and width. On the back of this patch, score and break the board to the exact dimensions of the hole. Then peel away the paper and the gypsum from the front layer of paper. You will be left with a solid piece of drywall the size of the hole, with 1-in. strips of face paper on all four sides.
Now apply taping compound to the edges of the hole, and press the patch into the hole until it’s flush with the rest of the wall. The face paper acts like tape, and you finish as you would any other drywall joint. If you cut the patch for a tight fit, you can use this technique on the ceiling.

View Comments
Hey, these oldies do get recycled, don't they? IIRC, I first saw this one in an old Time-Life home repair volume! Here's the step-by-step as a companion to the video:
http://www.diyonline.com/servlet/GIB_BaseT/diylib_article.html?session.docid=1673
Careful not to use this one where you think anything might be hung from a hook in the wall or ceiling!
I have been using this approach to drywall patching for decades. In my humble opinion, you have omitted an important aspect of the patch. Before inserting the patch you should add joint compound to either the sides of the holes in the wall or the patch itself so the patch bonds with the wall. Otherwise you see the shadow of that old lightswitch hole.
Ugh. . . sorry better way guy, but the crucial tip that you missed is to create negatives. The border that you drew around the hole should have been pealed as well. This lets the patch seat into the wall. . . especially if it has already been textured an painted. Waiting for 3 applications of joint compound is not very fast. I'm sorry but this is neither a fast or best way to patch a hole.
Been doing this technique for years and years, we call it a "blow patch". It's good to bring up once in a while so others can pass it on.
The reason I posted comment?...You guessed it. You need to mud the four sides of the sheet rock patch so the compound squeezes in to seal and glue the joint between the cut wall and the patch. Otherwise the only strength around the patch is the thin paper and what little compound was applied.
I see some posters beat me to the point, but it's an important one. The patch will give way otherwise, I've seen it happen from this very mistake.
I don't recommend this technique be used for patches much bigger than what you show, even though I have done it in the past. Bigger holes should be backed up with wood or metal cleats inside the wall covering both edges of the seams.
I also have been using this patch for years. It is very good and easy for small holes. Down here in New Orleans we call this a bandage patch. Been in construction for over 30yrs and still believe in reading about my trade. I have every issue of Fine Home Building except for the ones after Hurricane Katrina. Enjoy watching your videos. Thanks-Jimzki
That is the first thing I noticed too... no mud on the edge of the patch or hole, to cement everything together.
While I enjoy 'better way', I have to ask how did an incomplete tip like this get through?
Makes you wonder what may be missing in other tips.
well, I've learned some new terms like "blow patch" bandage patch, and I'll add the term I learned from god knows where..."hot patch"
I've done this using plaster of paris to set the patch in place, mixing it with weldbond for adhesion, but better be real quick. Spritzing the edges of the cut out with water gives you a few more seconds to set the patch
Once set up, coat with a quickset 20, go for a coffee, cover with finishing compound, point a heater at it, get another coffee, (don't leave the heater unattended). sand, prime and paint. It works.
but recently, I acquired a bag of vario mud for the tapeless drywall system.
http://www.edp-inc.net/
been patching drywall with it for the past few months, without tape and the associated feathering. Costs around 80 CDN a bag, but theres no tape joint to feather out, ergo no bulge in the wall no flash out. It's got it's characteristics, but so far good results.
If anyone is interested, I just patched a wall for a window replacement and can post photos.
Dry time to recoat is maybe 35min-1 hr, As calgary is so dry, it's on the quick side here in the summer, maybe longer on an exterior wall in the winter, but still OK in my books.
It does shrink a tad, and is hard to sand, but anyone who's trowelled stuff before puts in on so as to not have to sand.
Eric in Calgary
http://www.mybuildingpro.com
I saw your posting of how to fix a clogged caulking tube. I rehab houses for a living and use to always run into that problem until.... I found using some duct tape works wonders.
After using caulk I take a 4 inch piece of tape and lay it starting at the base of the tube folding it over the tip leaving 1-2 inches overlapping the tip and folding it over to the base of the tube. Then I seal both sides then squeezing the gun forcing caulk in to the tape until it balloons out at the tip. When I need to use the tube even weeks later I just pull off the tape and it is ready to go. The only caulk I have a problem with is a silicone caulk, latex seems to work every time though
Dan
Based on the comments the video should definitely be updated.
Yes, I'm with the other posters here, its a weak repair unless there is some bond around the hole and patch edges.
For myself I glue some smaller strips on the back of the board (with Gripfill/No Nails) and clamp if necessary (the strips sometimes fall off inside the framing void if too large/heavy for the glue), then glue the patch in place so its supported by the strips of board.
The patch needs a gap of 1/8" all round and chamfer off the paper around joint edges with a knife.
Here in the UK we often use PVA diluted 1:3 as a 'size' when skimming drywall or any absorbent surface and I'd brush some of this around the chamfered edge gap to ensure the board joint compound really sticks the patch in place.
I also agree that the paper flap creates too much of a 'witness' in the final finish which requires too large area of skim to feather out. Nice to see a different way of doing this though, thanks.
actually, you can use this method unless the patching part reoccurs constantly. when that happens, i stop being Mr. Know-It-All for my restaurant and call the commercial drywall installation in Calgary
actually, you can use this method unless the patching part reoccurs constantly. when that happens, i stop being Mr. Know-It-All for my restaurant and call
commercial drywall installation in Calgary
My husband and I bought an unfinished home a couple months ago, and this week the drywall is going in. We've never bought a house before, and we are wondering if there is such a thing as "cheap" drywall and "expensive" drywall? We'd like to have good drywall on our walls, but we don't know the difference between the two. Is there a way to tell a difference? Is there a way to prevent molding in the "drywall" phase of building?