FHB Logo Facebook LinkedIn Email Pinterest Twitter Instagram Plus Icon Close Icon Navigation Search Icon Navigation Search Icon Arrow Down Icon Video Guide Icon Article Guide Icon Modal Close Icon Guide Search Icon Skip to content
Subscribe

In every issue you'll find...

  • Expert insights on techniques and principles
  • Unbiased tool reviews
  • Step-by-step details to master the job
  • Field-tested advice and know-how
Subscribe Now!
Subscribe
  • How-To
  • Design
  • Tools & Materials
  • Videos
  • Blogs
  • Forum
  • Magazine
  • Members
  • FHB House
  • Podcast
  • Join
  • Log In
Subscribe
How-To

Railing Against the Elements

With careful detailing and proper flashing, exterior woodwork should last for decades.

By Scott McBride Issue 70

Synopsis: Called upon to rebuild so many porch railings exposed to the weather of New York’s Hudson Valley, the author examines why so many of them fail. He looks in particular at a railing system on a flat roof and offers suggestions for construction details that will preserve the structure. A sidebar explains how to space balusters evenly.

The moist climate of New York’s Hudson Valley isn’t exactly ideal for carpenters like myself. We have muggy summers, slushy winters and three months of rain in between. As we struggle through weeks of unremitting precipitation with fogged-up levels and wet chalklines, there is but one consolation: come April, a billion fungal spores will bloom, reaching into every water-logged mudsill, fascia and doorstep. That means a guaranteed crop of rot-repair jobs in the coming season.

Of all the woodwork exposed to the elements, none is so vulnerable as the white pine porch railing. With the right combination of faulty detailing and wind-driven rain, a railing can be reduced to shredded wheat in about eight years. I typically rebuild several of these railings each year. In this article I’ll describe one such project.

Getting organized

A railing around the flat roof of a garage had rotted out, and the owner asked me to build a new one. This wasn’t a deck that was used, so the railing was decorative rather than functional, and one of my worries was installing the new railing without making the roof leak (more about that later). On a house across town, my customer had spotted a railing that he liked and asked if I could reproduce it. I said I could and took down the address.

Before leaving the job site, I made a list of the rail sections I would be replacing, their lengths and the number of posts I would need. Later that afternoon I found the house with the railing my customer liked, strolled up the walk and began jotting down measurements. The family dog objected strenuously to my presence, but no one called the police.

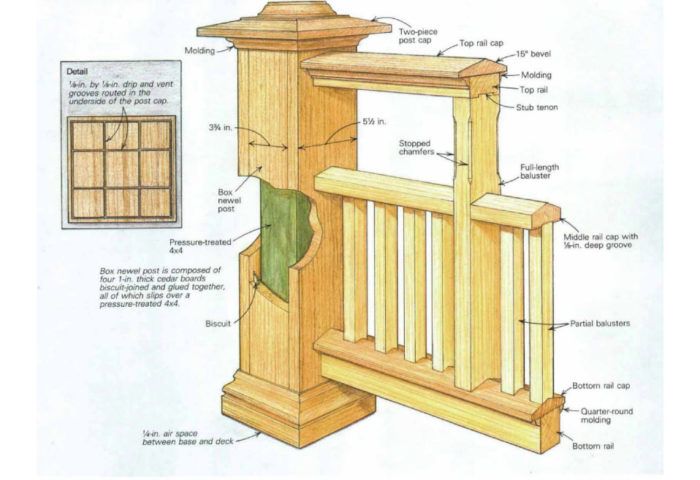
Back at the shop I drew a full-scale section of the railing and a partial elevation showing the repeating elements. The next bit of work was to make layout sticks (or rods) showing the baluster spacing for the different rail sections. This would tell me the exact number of partial- and full-length balusters that I would need.

The right wood

I’m fortunate to have a good supplier who specializes in boat lumber. He carries premium grades of redwood, cedar, cypress and Honduras mahogany, all of which resist decay well. I used cypress for the rails and balusters because it’s less expensive and because the rough stock is a little thicker than the others. Cypress is mostly flatsawn from small trees, though, and the grain tends to lift if the wood isn’t painted immediately.

Much of the Western red cedar at this yard is vertical grain — the annual rings run perpendicular to the face — and hence inherently stable. I typically use it for wider pieces where cupping could be a problem. Square caps on posts fit this description because they are so short in length. They should always be made from vertical-grain material or they’ll curl in the sun like potato chips.

For this job I bought 2-in. thick cypress for the rails and balusters, 5/4 red cedar for the rail caps and post caps, and 1-in. cedar boards for the box newel posts.

For more photos, drawings, and details, click the View PDF button below:

Sign up for eletters today and get the latest how-to from Fine Homebuilding, plus special offers.

Sign Up

Get home building tips, offers, and expert advice in your inbox

×
This site is protected by reCAPTCHA and the Google Privacy Policy and Terms of Service apply.
View PDF

New Feature

Fine Homebuilding Forums

Ask questions, offer advice, and share your work

Log in or create an account to post a comment.

Sign up Log in

Become a member and get full access to FineHomebuilding.com

Up Next

Video Shorts

Featured Story

Considerations for Building a Successful Staircase

Watch award-winning architect Duo Dickinson take an in-depth look at designing and building a beautiful, successful staircase in this webinar.

Featured Video

SawStop's Portable Tablesaw is Bigger and Better Than Before

The 10-in. Jobsite Saw PRO has a wider table, a new dust-control port, and a more versatile fence, along with the same reliable safety mechanism included in all SawStop tablesaws.

Related Stories

  • How to Frame an I-Joist Roof
  • Hose Management
  • Detailed Assemblies for an Airtight Small Home
  • Keeping Cathedral-Ceiling Walls From Bowing

Discussion Forum

Recent Posts and Replies

  • |
  • |
  • |
  • |
  • |
  • |
View More Create Post

Highlights

Fine Homebuilding All Access
Justin Fink Deck Building Course announcement
Tool Tech
Plus, get an extra 20% off with code GIFT20

"I have learned so much thanks to the searchable articles on the FHB website. I can confidently say that I expect to be a life-long subscriber." - M.K.

Get home building tips, offers, and expert advice in your inbox

Sign Up See all newsletters

Video

View All
  • Removing Lead Paint: DIY or Hire a Contractor?
  • Podcast 401: PRO TALK With Mr. Cedar
  • Vinyl Siding over Failing Cedar
  • Installing Exterior PVC Window and Door Trim
View All

Trimwork

View All Trimwork Articles
  • Rabbeted Baseboards and Cap for Beadboard
    Rabbeted Baseboards and Top Rails for Beadboard Wainscot
  • Installing siding
    Adjusting Siding Exposures
  • Making Mitered Window Casing
    Making Mitered Window Casing
  • grout bag
    Grout Bag to Fill Gaps
View All Trimwork Articles

BOOKS, DVDs, & MERCH

Shop the Store
  • Code Check Building 4th Edition
    Buy Now
  • Outdoor Projects
    Buy Now
  • 2021 Fine Homebuilding Archive
    Buy Now
Shop the Store

Fine Homebuilding Magazine

  • Issue 307 - June 2022
    • How to Raise a Post-Frame Home
    • Trimming Deck Stairs
    • Evolving an Energy-Efficient Envelope
  • Issue 306 - April/May 2022
    • Framing Stairs to an Out-of-Level Landing
    • Building a Zero-Energy Home for Less
    • Good-Looking and Long-Lasting Traditional Gutters
  • Issue 305 - Feb/March 2022
    • The Steady Surge in Residential Solar
    • The Fine Homebuilding Interview: William B. Rose
    • How Good Is Your Air Barrier?
  • Issue 304 - Dec 2021/Jan 2022
    • Why You Need Blower-Door Testing
    • Passive-House Standards for Everyone
    • Window Replacement With a Side of Rot Repair
  • Issue 303 - November 2021
    • Compact Cordless Miter Saws
    • Maximize Space with Thoughtful Built-Ins
    • 10 Essentials for Quality Trim Carpentry

Fine Homebuilding

Follow

  • twitter
  • facebook
  • instagram
  • pinterest

Newsletter

Get home building tips, offers, and expert advice in your inbox

Sign Up
This site is protected by reCAPTCHA and the Google Privacy Policy and Terms of Service apply.
See all newsletters

Membership & Magazine

  • Online Archive
  • Start Free Trial
  • Magazine Subscription
  • Magazine Renewal
  • Gift a Subscription
  • Customer Support
  • Privacy Preferences

Taunton Network

  • Green Building Advisor
  • Fine Woodworking
  • Fine Gardening
  • Threads
  • About
  • Contact
  • Advertise
  • Careers
  • Copyright
  • Terms of Use
  • Site Map
  • Do not sell my information
  • Privacy Policy
  • Accessibility
  • California Privacy Rights

© 2022 The Taunton Press, Inc. All rights reserved.

X
X
This is a dialog window which overlays the main content of the page. The modal window is a 'site map' of the most critical areas of the site. Pressing the Escape (ESC) button will close the modal and bring you back to where you were on the page.

Main Menu

  • How-To
  • Design
  • Tools & Materials
  • Video
  • Blogs
  • Forum
  • Reader Projects
  • Magazine
  • Members
  • FHB House

Podcasts

  • FHB Podcast
  • ProTalk

Webinars

  • Upcoming and On-Demand

Account

  • Log In
  • Join

Podcasts

  • FHB Podcast
  • ProTalk

Webinars

  • Upcoming and On-Demand

Popular Topics

  • Kitchens
  • Business
  • Bedrooms
  • Roofs
  • Architecture and Design
  • Green Building
  • Decks
  • Framing
  • Safety
  • Remodeling
  • Bathrooms
  • Windows
  • Tilework
  • Ceilings
  • HVAC

Magazine

  • Current Issue
  • Past Issues
  • Magazine Index
  • Subscribe
  • Online Archive
  • Author Guidelines

All Access

  • Member Home
  • Start Free Trial
  • Gift Membership

Shop the Store

  • Books
  • DVDs
  • Taunton Workshops

More

  • FHB Ambassadors
  • Reader Projects
  • Podcast
  • Customer Support

Account

  • Log In
  • Join

Newsletter

Get home building tips, offers, and expert advice in your inbox

Sign Up See all newsletters

Follow

  • twitter
  • facebook
  • instagram
  • pinterest

Join All Access

Become a member and get instant access to thousands of videos, how-tos, tool reviews, and design features.

Start Your Free Trial

Subscribe

FHB Magazine

Start your subscription today and save up to set_percent%

Subscribe

We hope you’ve enjoyed your free articles. To keep reading, become a member today.

Get complete site access to expert advice, how-to videos, Code Check, and more, plus the print magazine.

Start your FREE trial

Already a member? Log in