Rules for Finish Carpentry
A veteran builder and teacher shares the rules that shape his work.
Synopsis: Highly useful tips for saving time, money, and materials on finish carpentry while getting a first-rate job. These suggestions will help experienced trim carpenters as well as novice owner-builders.
My first construction job was as a trim carpenter’s helper during school summer vacation. My boss had always worked solo, but as he got on in years (I’m older now than he was then), he wanted help moving his tools and materials. All I did that first summer was fetch and carry; I wasn’t allowed to measure, cut or nail. I was told to observe. In doing so, I learned that finish carpentry is essentially a visual exercise.
What is Finish Carpentry?
Before I launch into my advice, I want to clarify any misconceptions about what finish carpentry is. Although it evokes the idea of “finishing touches,” finish carpentry is a lot more than interior trim. It includes all the work done on a home after building, insulation, wiring, and plumbing are complete. That includes interior and exterior doors, stairs, window casings, wainscoting, ceiling coffers, joinery, cabinetry, furniture, and, of course, baseboards. Unlike rough carpenters (or “form carpenters”) who work on the early stages of construction, finish carpenters are generally considered artisans. They may work directly inside the home as well as in a workshop, since some finish carpentry requires stationary tools. Rough carpenters evolve into finish carpenters by learning how to measure, mark and cut more accurately. With practice, splitting the pencil line with a sawcut and working to closer tolerances become second nature.
Finish carpentry makes the eye work hard and skip over imperfections. At this point, the framing carpenter has made the house plumb, level and square. Or not. A good framer can ease the finish carpenter’s job by providing plumb walls and plenty of blocking for nailers for attaching trim. Or not. But even if the framer couldn’t read a level and even if he added no more blocking than was absolutely necessary, the finish carpenter’s job is to make the doors, windows and cabinets work, and to make the house look good.
Perfect miters are only part of finish carpentry. Finish carpenters must develop an eye for proportion and detail. They must learn to visualize the steps that lead to the finished product. I teach these skills to novice carpenters at the Heartwood School in Massachusetts. To make learning them easier, I’ve organized the following ten rules of thumb.
1. Avoid using numbers
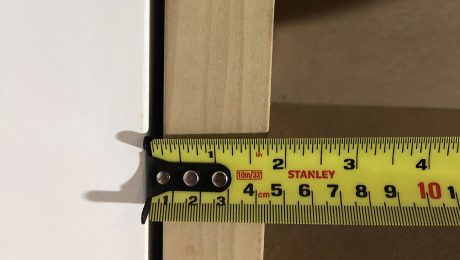
It is usually more accurate to hold a board in place to mark its length rather than to use a tape and involve numbers. Sometimes, using a ruler or tape is unavoidable. I’ll use a tape measure on a long piece that’s too difficult to mark in place, but generally I don’t like tapes. A tape can flex and change shape, and the movable end hook bends easily, affecting accuracy.
A rigid rule is better than a tape for measuring lengths under 6 ft; hence, the 6-ft. folding wooden rule takes over during trim and cabinet work. The best folding rules come with a sliding brass extension that makes taking inside measurements easy. Open the rule to the greatest length that fits between the points to be measured, and slide out the brass extension the rest of the distance. Hold it at that length, and carry it to the board to be cut. No need for numbers. Just mark the board from the extended ruler. A combination square or a wood block of known dimension is the best way to lay out the small measurements needed for reveals and other spacings. Learn what dimensions are built in to the tools you use. A carpenter’s pencil is 1/4 in. thick; you can use it as a spacer for decking. The pencil lead is 1/16 in. from the edge of the pencil, so it can scribe 1/16 in. increments. The body of a folding rule is 5/8 in. wide. The blade of the standard combination square is 1 in. wide, and its body is 3/4 in. thick.
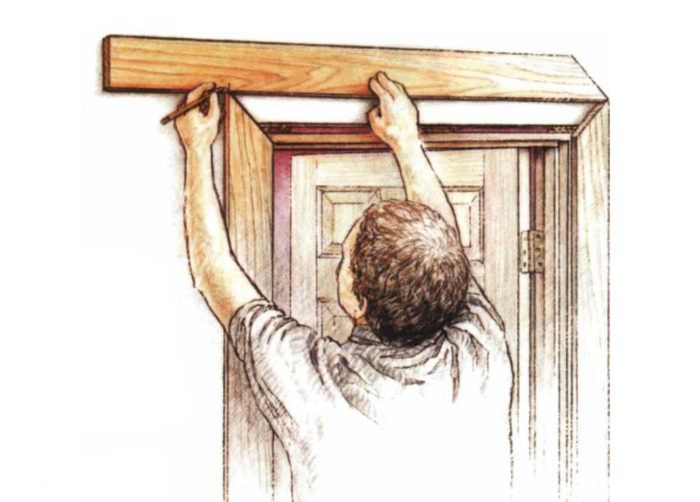
A door or window should be cased without the use of a tape. Lightly mark the reveal on the jamb with a pencil. Square-cut the bottoms of the casing legs, hold them up to the jamb, and mark the top cuts from the reveal lines. Cut the legs and tack them in place. Miter one end of the head, and holding it upside down over its final position, mark the other end to length.
For more photos and rules on finish carpentry, click the View PDF button below.