Installing Synthetic Crown Molding
You can't cope polyurethane molding, but a template, a simple jig and a little bit of luck make it possible to preassemble perfect miter joints.

Synopsis: This is a guide to using crown molding made from polyurethane. Unlike wood trim, this crown molding can’t be coped for inside corners, but the author describes a jig used to make miters and shows how trim can be pre-assembled before installation. He includes sources for synthetic trim.
No one has ever accused me of being state of the art. I’m a seasoned, small-town carpenter who learned his trade the old-fashioned way. I prefer to work with traditional methods and materials, but I’ve seen a lot of changes over my 25 years in the trade. I know that you’ve got to adapt and make use of the tools and materials that become available. So when one of my best clients asked me to trim out his new house with rigid polyurethane molding, I was excited by the challenge. The house was an 8,000-sq. ft. mansion he was building on Lake Wylie in York County, South Carolina, and the job would keep me and my two-man crew busy for over a year.
Because I’d never worked with this material before, I swallowed my pride and read the manufacturer’s instructions carefully before we started and throughout the process. As it turned out, installing the baseboard and casing was straightforward, but the 9-in. wide Shell and Bellflower crown molding was tricky, largely because we had to miter every corner and fasten each piece with adhesive.
Every room in this house, including the garage, was scheduled for crown molding, so the garage was the ideal place to get up to speed. With a 14-ft. ceiling, the garage offered us a chance to test our technique. It took three of us a day and a half to apply 150 linear ft. of crown and to join four inside corners, but that time allowed us to identify most of the problems we were to face and to devise an efficient plan to tackle the rest of the house.
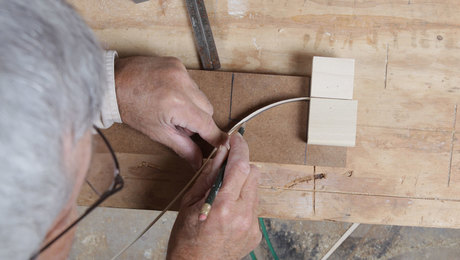
A giant site-built bevel square measures the angles
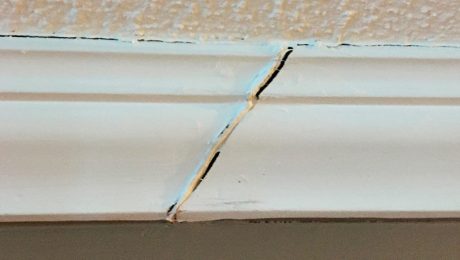
The installation instructions compelled us to miter and glue, rather than cope, the inside corners. Anyone who’s ever tried to assemble an inside crown miter in place knows it can’t be done. Even if the corner is perfectly square, which is rare, the joint always tends to open while you nail it, especially when the molding is 9 in. wide. With this material, we were also instructed to maintain pressure on the joint while the adhesive set up. After a day and a half practicing in the garage, I concluded that the only way to achieve an acceptable level of quality was to preassemble the miter joints.
Preassembling miters meant we’d end up with more seams in the field, but this would not be a serious problem. The instructions required us to make field seams with butt joints rather than scarf cuts, and we discovered that with this synthetic material, it was easy to make seams disappear.
A more significant problem was that preassembling miter joints would allow no possibility for fitting and trimming to fine-tune cuts during installation. We solved this problem by creating a template and a setup jig that enabled us to replicate the exact angle and dimensions of each inside corner on our worktable.
For more photos and details, click the View PDF button below: