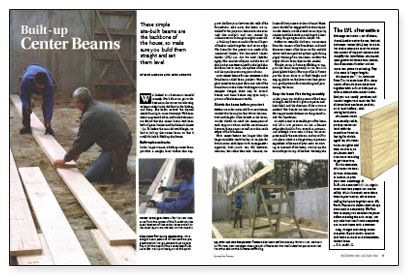
Built-up Center Beams
These simple site-built beams are the backbone of the house, so make sure you build them straight and set them level.
Synopsis: The authors describe their method of building up foundation-level support beams with layers of standard dimensional lumber. They include tips on how to cut and install steel support columns.
We looked at a basement remodel recently. But before we got to the basement, the owner was showing us large cracks in the tile floor in the kitchen and entry. She hadn’t noticed the drywall cracks forming in some doorways. We’d seen these symptoms before, and in the basement, we found that the center beam had been built of green lumber and had shrunk. So before the remodel could begin, we had to jack up that center beam so that it could do its job: Hold up the house.
Built-up beam basics
In the simplest terms, a built-up center beam provides a straight, level surface that supports the floor joists between the walls of the foundation. Like most, the beam we installed for the project in this article was even with the mudsills and was carried by columns set on footings at regular intervals.
A built-up beam is made of several layers of lumber nailed together and set on edge. The beam for this project was made of dimensional lumber, but laminated veneer lumber (LVL) can also be used. The number of layers and the size of the lumber are determined by the load that the beam has to carry, the species of lumber, and the span between support columns.
Most center beams fit into recesses in the foundation called beam pockets. The simplest center beam spans from one side of the foundation to the other. With larger or more complex designs, there may be several beams, and some beams may span only a portion of the basement width.
Sketch the beam before you start
Before we order materials for a new house, we sketch a beam plan that shows the numbers and lengths of the boards in the beam. On the sketch we mark the centerpoint of each support column and the measurement between those points as well as to the inside edges of the foundation.
Most center beams are longer than the longest available stock lumber, so we plan for butt joints in each layer. With an engineer’s approval, butt joints can fall between columns, but rather than take chances, we locate all butt joints over the columns. These joints should be staggered between layers. On the sketch, we label each beam layer by number and the boards in each layer by letter to keep things organized on the job site.
Before we assemble the beam, we measure from the corners of the foundation and mark the exact center of the beam on the mudsills above the beam pockets. Working from the center, we draw the edges of each beam layer on the mudsill.
We also set up A-frame scaffolding to support the beam temporarily as we set it in place. The tops of the A-frames put the beam close to its final height, and staging planks on the lower cross bars put us in a good position for assembling and positioning the beam.
For more photos and details, click the View PDF button below: