
Vinyl Siding Done Right
If vinyl’s final, you’d best get the details right. A veteran builder shows how to make it water-resistant and attractive.
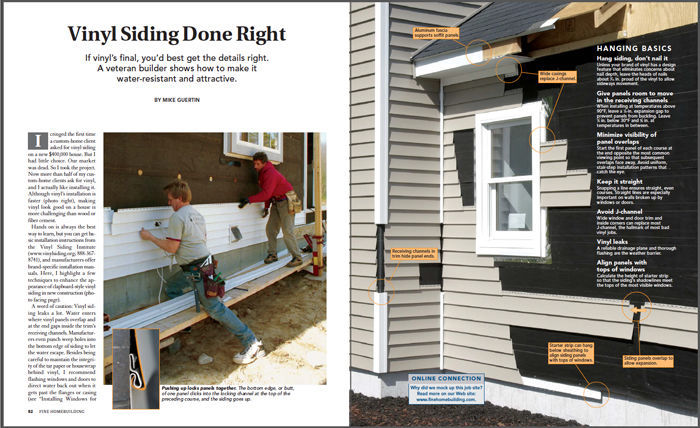
I cringed the first time a custom-home client asked for vinyl siding on a new $400,000 house. But I had little choice. Our market was dead. So I took the project. Now more than half of my custom-home clients ask for vinyl, and I actually like installing it. Although vinyl’s installation is faster, making vinyl look good on a house is more challenging than wood or fiber cement.
Hands on is always the best way to learn, but you can get basic installation instructions from the Vinyl Siding Institute (www.vinylsiding.org; 888-367-8741), and manufacturers offer brand-specific installation manuals. Here, I highlight a few techniques to enhance the appearance of clapboard-style vinyl siding in new construction (see Hanging basics).
A word of caution: Vinyl siding leaks a lot. Water enters where vinyl panels overlap and at the end gaps inside the trim’s receiving channels. Manufacturers even punch weep holes into the bottom edge of siding to let the water escape. Besides being careful to maintain the integrity of the tar paper or housewrap behind vinyl, I recommend flashing windows and doors to direct water back out when it gets past the flanges or casing.
Hanging Basics
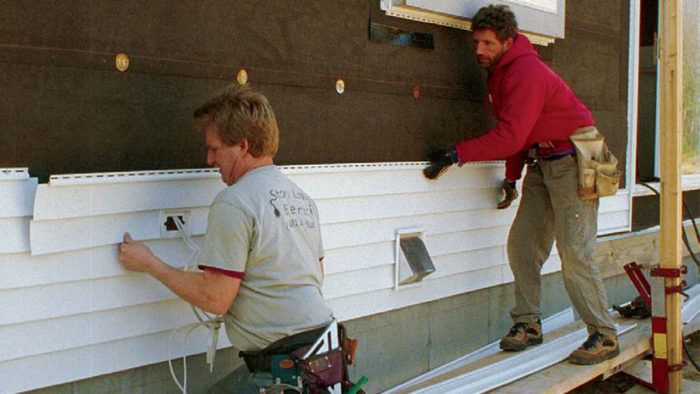
Hang siding, don’t nail it
Unless your brand of vinyl has a design feature that eliminates concerns about nail depth, leave the heads of nails about 1/16 in. proud of the vinyl to allow sideways movement.
Give panels room to move in the receiving channels
When installing at temperatures above 90°F, leave a 1/4-in. expansion gap to prevent panels from buckling. Leave 1/2 in. below 30°F and 3/8 in. at temperatures in between.
Minimize visibility of panel overlaps
Start the first panel of each course at the end opposite the most common viewing point so that subsequent overlaps face away. Avoid uniform, stair-step installation patterns that catch the eye.
Keep it straight
Snapping a line ensures straight, even courses. Straight lines are especially important on walls broken up by windows or doors.
Avoid J-channel
Wide window and door trim and inside corners can replace most J-channel, the hallmark of most bad vinyl jobs.
Vinyl leaks
A reliable drainage plane and thorough flashing are the weather barrier.
Align panels with tops of windows
Calculate the height of starter strip so that the siding’s shadowlines meet the tops of the most visible windows.
Begin with the Trim
Vinyl siding depends on a few special trim pieces that either hold everything together or hide the edges and ends of the panels. Undersill trim, for instance, is installed under windowsills or other horizontal projections and grasps the top edge of the siding panel below it (see Installing window trim). J-channel receives the ends of siding panels where they abut windows, doors or other walls. Most pieces of vinyl trim, though, go by the same names as their wood-siding counterparts: soffits, fascia and corner boards.
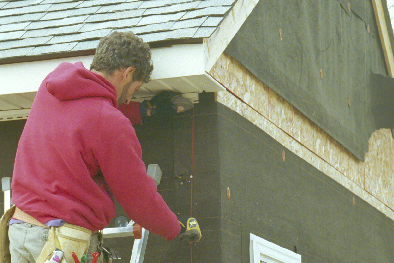
I start by installing the high trim (rakes, soffits and fascias). For rakes, I usually bend aluminum coil stock on a sheet-metal brake to wrap the face and bottom edge of a 1x rake board. Manufacturers also offer vinyl-coated aluminum and all-vinyl trim stock that are bendable and give excellent results. The rake board is furred out with a board narrower than the rake to create a space for the siding ends–sort of a site-made J-channel. Prep for soffit installation begins as I frame the house. Along the tails of the rafters or trusses, I install a 2x subfascia, then hang the soffit panels and fascia on that. Where soffit panels meet the wall of the house, they are supported by J-channel, undersill trim or window casing.
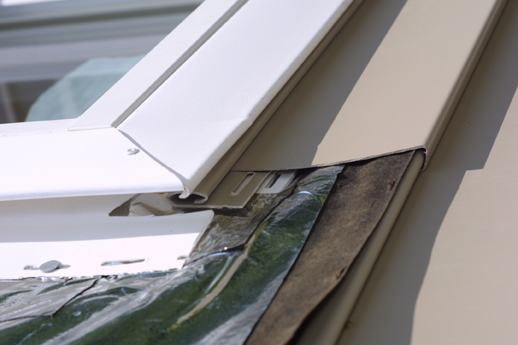
Installing Window Trim
 |
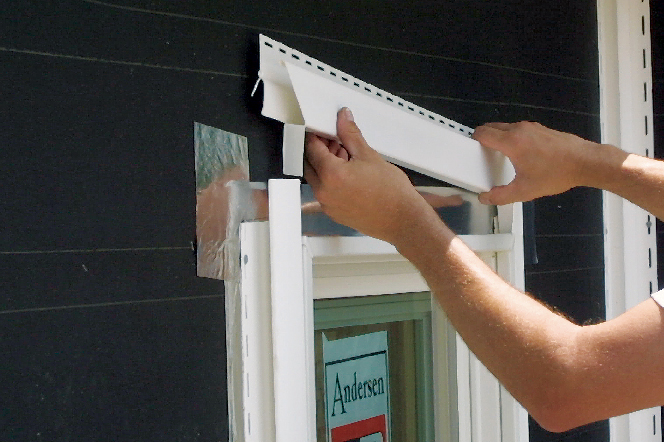 |
| Behind the window casing, undersill trim secures the cut vinyl panel under a window. To push water to the outside, builder’s felt and flashing membrane direct water past the nailing hem of the first full panel below the window. | Whether it’s J-channel or a wider piece of casing, a tab cut in the top piece of window trim wraps over the side to divert water. Additionally, the metal head flashing tucks behind the tar paper and over the window top, or flashing tape is used to seal tar paper to the window’s nailing fin. |
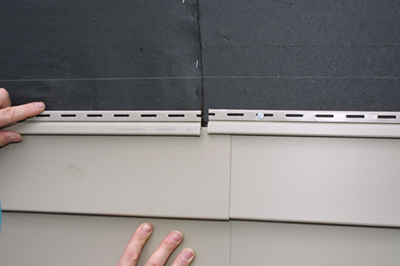
Snapping a Line Keeps Corner Boards Straight
After the rakes and soffits are finished, I install the corner boards. Because corner boards are hollow and flexible, nailing them up straight can be difficult. Snapping chalklines on both sides of the corner ensures that the corner board goes on straight. I use short corner-board sections as templates to mark the wall for the chalkline.
I begin nailing the corner board at the top and use sheet-metal snips to cut the flange back where it abuts the already installed soffit trim. The top two nails (one on each side of the corner) are placed at the top edge of the nail slots and are set tightly. These nails lock the corner-board top in place so that it expands downward rather than upward into the soffit. I drive the rest of the nails (spaced about 12 in. apart) in the middle of the slots to permit that expansion, leaving the head about 1/16 in. proud of the nailing flange so that the vinyl can move.
 |
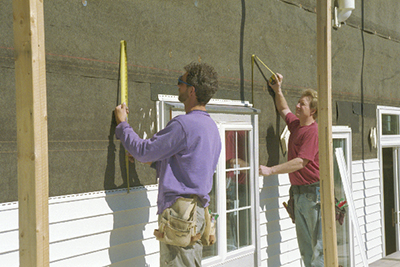 |
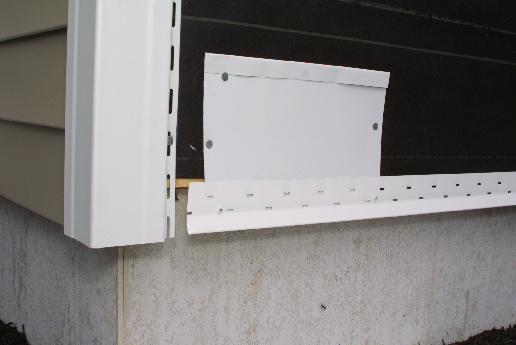 |
| Snapping chalklines for corner boards (left) and siding panels (right) ensures that the flexible vinyl stays straight. | Checking overall siding height frequently allows installers to make small adjustments and avoid accumulated error. | Here, the starter strip has been dropped below the sheathing by pop-riveting it to pieces of coil stock. |
After determining exactly where at the bottom of the wall the starter course will begin, I trim all the corner boards just below the bottom of the starter strip (1/4 in. in winter, 1/2 in. in summer) and finish nailing them in place. Except for window trim, most of the prep work is now done.
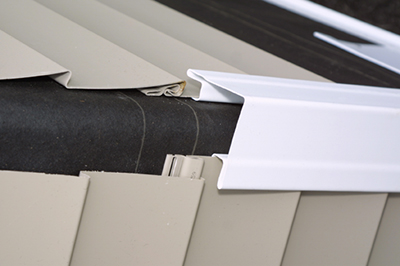
Accommodating Thermal Expansion
Vinyl-siding manufacturers try hard to make their panels look like real wood. Although the manufacturers are getting better, vinyl installs, behaves and performs much differently than the natural material it mimics. Whereas wood moves in response to moisture content, vinyl moves in response to temperature changes. And it can move a lot through expansion and contraction, especially along the length of the clapboard-style panels. To compensate for this movement, adjacent siding panels are overlapped so that they can slide sideways past each other without buckling or creating gaps (see Nailing details and expansion gaps). Nails are left proud of the surface to allow for this movement. Where panels meet windows, doors or corner boards, they are cut short, and receiving channels on the trim conceal the expansion gap. Trim along roof slopes should be set 1/2 in. above hot asphalt shingles.
Nailing Details and Expansion Gaps
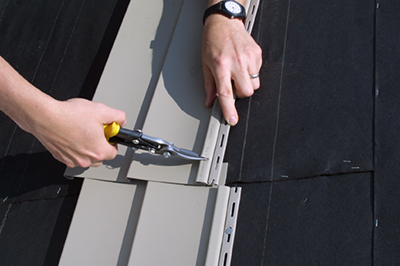
Panels overlap so that they can slide past each other as the panels expand and contract with temperature changes. To allow this movement, panels are made with the nailing hems notched at the end. This notch must be duplicated on field-cut panels. Most nail heads are left high to avoid trapping panels.
 |
 |
 |
 |
| Where panels overlap, factory-notched nailing hems keep adjacent panels from buckling. New notches must be made where panels have been cut. | Face overlaps away from the most common viewing point to minimize their visibility. | Butting a panel too tightly into the trim’s receiver channels can cause buckling when the temperature climbs. | Fixing the center of a panel with two nails ensures that thermal expansion happens equally at each end. |
Minimize J-Channel Around Openings
Windows and doors need to be surrounded with a receiver channel to accept the ends of the siding. This process usually means wrapping them all with J-channel, one of the dead giveaways that a house is covered in vinyl. Minimizing J-channel takes planning and creativity. When I know a house will be sided in vinyl, I select windows that have either an integral J-channel or a slot to receive an applied cap that creates a receiver channel. Alternatively, I use vinyl window and door casing, which is essentially a 2-1/2-in. wide J-channel. The greater width can enhance the window rather than detract from it as a narrow band of standard J-channel does.
Around doors, I use a couple of other tricks to build receiver channel. Using either a preformed foam plastic or a custom wood door surround is the easiest. I simply apply a 1×3 wood spacer over the door jamb and exterior sheathing. Then I fasten the decorative trim over the spacer to create a 3/4-in. wide pocket that receives the ends of the siding. Alternatively, I can trim the door with furring and bend aluminum coil stock around it.
When my bag of tricks runs out and I’m forced to wrap an opening with J-channel, I try to make it look as clean as possible. You can’t count on the leg of the J-channel at the top of a window or door to serve as head flashing. When using J-channel, I always install drip cap that slips beneath the housewrap and laps over the window or door. The J-channel goes over the flashing.
Align Siding Panels with Window Tops and Intersecting Roofs
Perhaps the most fundamental trick to making vinyl look good begins well before installation. One of my goals when planning wood siding is to have the bottom edges of the clapboards line up with the tops and bottoms of windows and doors whenever possible. This alignment unites the exterior look of the building. Alignment is difficult with vinyl because the course exposure isn’t adjustable. And this lack of alignment is one of vinyl’s telltale signs.
To minimize this problem, I begin planning the vinyl course layout before the foundation of the house is poured. Because the limiting factor is the vinyl itself, I choose the siding for the house first. The three most common vinyl-siding patterns are double four, triple three and double five. That is, vinyl panels are made to look like two 4-in. clapboards, three 3-in. clapboards or two 5-in. clapboards. Their total exposures are fixed: 8 in., 9 in. and 10 in.
Knowing the exposure allows me to plan at least some of the rest of the house around it. I plan foundation drops, those spots where the foundation steps up or down to keep pace with the grade, on increments to match the siding height. It’s easy to position the window rough openings so that the tops of windows match a siding course. The bottoms of windows are hit or miss unless I’m using custom-built vinyl windows and can specify window height.
Trimming around outlets, light fixtures, electric-meter sockets and ventilation exhaust ports can be accomplished easily with preformed J-boxes. Several manufacturers make special accessory boxes with integral J-channels or snap-on J-surrounds to make trimming the penetration faster, more weather-resistant and more attractive than something that can be fabricated on site. Whenever possible, I roughly locate the J-boxes on the wall but don’t attach them until the siding goes up. This way, I can achieve a cleaner look by precisely locating the top of each box against the bottom of the panel above it.
When I have to notch panels at the bottom of windows and at J-boxes, I make sure the notch isn’t at a joint between panels both because it’s easier to cut one notch than two and because it looks better. I leave a 1/4-in. space both on the rip beneath the opening and on each side of the window or box to allow for expansion space. I can’t adjust the height of doors, but the width of the surrounding trim can be tweaked to align with the bottom of a siding panel if it’s within 1 in. or so.
When porch, garage or other intersecting roofs interrupt siding, I have to install J-channel to start the panels. But by adjusting the roof pitch just a little so that the butt line matches the roof/wall intersection, I get a clean look. The same goes for the height of a deck. It may seem excessive to plan exterior building elevations to match the siding, but the results are worth the effort.
For a related story on the the mock job site built for the photo shoots that illustrate this feature, see “No Carpenters Were Harmed in the Making of This Article.”
Contributing editor Mike Guertin is a builder in East Greenwich, Rhode Island.
Photos: Tom O’Brien and David Ericson
For more photos, drawings, and details, click the View PDF button below:

View Comments
Vinyl Siding Done Right: Use Real Wood or Fiber Cement Instead
;-)
Great designing.