Waterproofing a Basement From the Inside Can Be a Challenge
Though it's best to address foundation waterproofing from the outside, there are some measures you can take to deal with leaks from the interior.
Q:
I have a house with a block foundation. On wet days, water leaks through the blocks in the corners and on some of the walls. I don’t know what the exterior belowgrade drainage details are, but I’d like to waterproof the basement from the inside so that when we finish the basement, we won’t have a moisture problem. What waterproofing material should I use?
Todd Cory, via email
A:
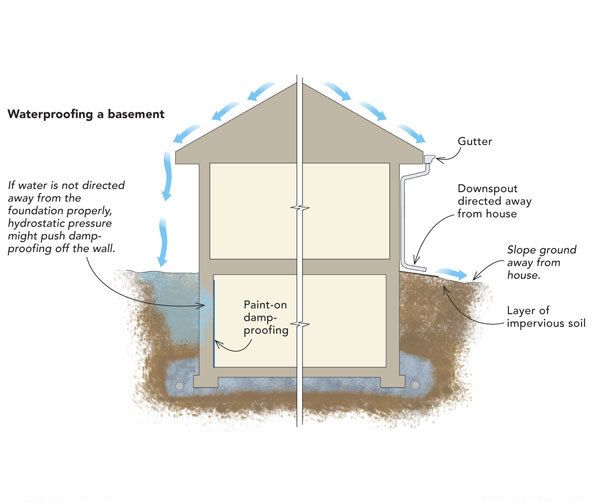
Paul Fisette, director of building materials and wood technology at the University of Massachusetts in Amherst, replies: The best waterproofing methods are those that address water leakage at exterior surfaces of the foundation. Ideally, moisture protection is achieved through the combination of controlled surface runoff, applied foundation damp-proofing, effective subsurface soil drainage, and the installation of an effective perimeter drainage system. The bad news is that you don’t know what has been done on the outside of the foundation below grade; and re-excavating the perimeter of the foundation to inspect and/or install the appropriate moistureproofing and drainage would be costly. The good news is that you still can take some steps to improve your chances of having a dry finished basement.
On the outside, start by installing roof gutters connected to downspouts and leaders that direct water at least 10 ft. away from the house. Install a layer of clay around the perimeter of the building beneath the topsoil to limit water penetration, and then grade the soil around the perimeter of the house with a positive slope leading water away.
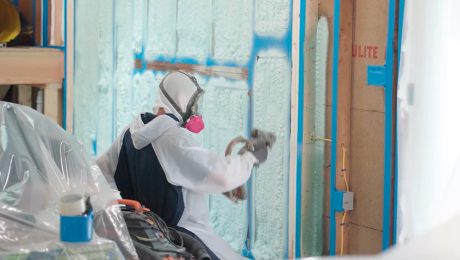
On the inside, apply damp-proofing to the surface of the foundation wall. Products like Sto Watertight Coat (www.stocorp.com) can provide an important layer of moisture protection. I’ve had good luck with the Sto Watertight Coat. It has a low permeance, or perm, rating (about 1.2) and a good track record for holding back liquid water in commercial applications. Be sure that the coating you choose is low perm (around 1 perm). This product will minimize diffusion from the soil through the foundation.
The problem with applying moistureproofing coatings on the inside, though, is that the damp-proofing product will be under negative pressure. Any water trying to leak in literally will be pushing the coating off the wall (damp-proofing applied to the exterior is on the positive pressure side). The success of the product depends on how well it adheres to the wall. Remember that these coatings are not elastic. They also are unable to bridge any cracks that develop in the foundation walls.
If you want to finish the basement to create living space, you can attach a layer of foam insulation directly to the inside surface of the foundation (after the interior damp-proofing is applied and cured). Tape the seams of the insulation, and seal all edges of the foam panels to prevent air from reaching the cold foundation, which will cause condensation. Then build an uninsulated wood-frame wall spaced away from the foundation. It will be simple to run the plumbing and electrical lines through an uninsulated wall, and the frame should remain above dew-point temperature, reducing the likelihood that condensation will form in the wall.


View Comments
Interior waterproofing solutions have limited effectiveness and are seldom recommended for a long-term solution when trying to stop water intrusion resulting from a substantial hydraulic head.
Further, the surface preparation instructions:
"Remove loose and deteriorated material by high pressure (> 3000 psi [20.7 MPa]) waterblasting, sand-blasting.
Make sure surfaces are sound, clean, dry, and free of all bond-inhibiting materials including oil, dust, dirt, laitance and standing water."
can be impractical in most basements. Walls exhibiting extensive efflorescence with be problematic and likely to lift the coating off the wall.
Water intrusion issues are best and most effectively addressed from the exterior of a foundation wall.
Dear Paul: I agree with your recommendations -- particularly starting with directing rainwater away from the foundation as Step 1. In addition to painting the walls and floor with a coating that resists water / moisture diffusion, e.g. Sto Watertight Coat or DryLok, you should fill cracks and holes with a good sealant, e.g. SikaFlex Crack Flex Concrete Sealant. Press the sealant into cracks with a putty knife.
If water is leaking through seams, e.g. in the corners or along the junction between the concrete block wall and the slab, these leaks can often be sealed with a one-component water reactive polyurethane, injected into 1/2" holes drilled into the slab, and adjoining concrete blocks in corners. Foundation Armor sells a kit that a homeowner can use, along with a good impact drill. I sealed leaks similar to the ones that Todd Cory described, using a Foundation Armor kit.
Finally, after every step has been taked to redirect water, seal leaks and block moisture, installing at least 1" thick XPS foam board on the walls is a very good idea as you noted -- to reduce moisture and improve insulation. Apply a thick bead of Loctite PL 300 glue around the perimeter of each sheet of foam board, then press it against the wall. You can lean a 2x against the sheet to hold it in place until the glue sets. Then seal all of the joints to block moisture leaks. DAP 230 or HVAC mastic work well for joints and small gaps. Use the 'Window and Door' version of Great Stuff spray foam for larger gaps. This version remains flexible to avoid cracks as things expand and contract.
Then build your new 2x walls in front of the foam board. Install a piece of 3/4" x 3 1/2" cellular PVC trim board under the sole plate at the bottom of the wall. This will lift the wood off the damp concrete; even PT wood (particularly the newer version) will rot with constant exposure to moisture. Leave a few slots in the PVC board for water to trickle through if there is a leak -- under the DriCore panels noted below. Fasten the PVC and sole plate with a Ramset; we also use expansion bolts in areas of stress, e.g. around doors, stairs and pony walls.
For the floor, install DriCore panels which have a rubber surface on the bottom to block moisture, with channels for water to trickle through if there is a leak. Make sure you have drains for water to run to, linked to a sump pump or dry well. DriCore panels will also help you level the floor if there are any dips in the surface of the concrete slab. Then seal all of the joints and perimeter to block moisture leaks. Again, DAP 230 or HVAC mastic work will for the joints, with the 'Window and Door' version of Great Stuff for larger gaps around the perimeter.
If you have enough ceiling height, install 1" thick panels of Foamular 250 on top of the DriCore panels. (Only the "250" version which provides 25 PSI of 'compressive strength', which is ideal over and under residential concrete slabs and floors.) Again, seal all of the joints and perimeter to block air and moisture leaks. Then install 3/4" outdoor-rated plywood on top of the foam board (or DriCore panels) as the subfloor, and seal the joints and perimeter to block moisture leaks. Note: DriCore says that you can install flooring directly on top of their panels -- but we found that the flexible rubber surface and joints are not ideal for a smooth and solid subfloor. Adding 3/4" plywood is a good idea.
I installed DriCore panels in the basement of our new beach house -- even though the basement was dry, with no leaks. A window leaked during an unexpected downpour. The DriCore panels saved the new flooring. That brings up another tip: only 'engineered' wood should be installed in a basement -- not solid wood.
I hope all of these details are helpful.
Mark Hays