FHB Logo Facebook LinkedIn Email Pinterest Twitter Instagram Plus Icon Close Icon Navigation Search Icon Arrow Down Icon Video Guide Icon Article Guide Icon Modal Close Icon Guide Search Icon Skip to content
Main Menu
Subscribe

In every issue you'll find...

  • Expert insights on techniques and principles
  • Unbiased tool reviews
  • Step-by-step details to master the job
  • Field-tested advice and know-how
Subscribe Now!
Subscribe
  • How-To
  • Design
  • Tools & Materials
  • Videos
  • Blogs
  • Forum
  • Magazine
  • Members
  • FHB House
  • Podcast
  • Join
  • Log In
Main Menu Subscribe
How-To

Jigs for Jambs (and Other Door-Hanging Devices)

Measuring and cutting jigs make for fast, accurate, sturdy door-hanging.

By Jim Chestnut Issue 201

There seem to be as many ways to hang a door as there are carpenters to hang them, so after many years of running a trim crew, I came up with a few of my own ways to make the work easier and the results better.

When it comes to hanging doors, I believe that the jamb legs should bear fully on the subfloor. Nails alone (especially the light-gauge nails used these days) won’t support the weight of the jamb and door over time. Trimming the jamb legs to closer tolerances requires accurate measuring and cutting techniques. Instead of marking a level line and then measuring each side to determine the length of the jamb legs, I came up with a jig that holds my level and almost immediately tells me the difference in length between the two legs. Of course, this jig works well if I’m installing doors on a finished floor, too.

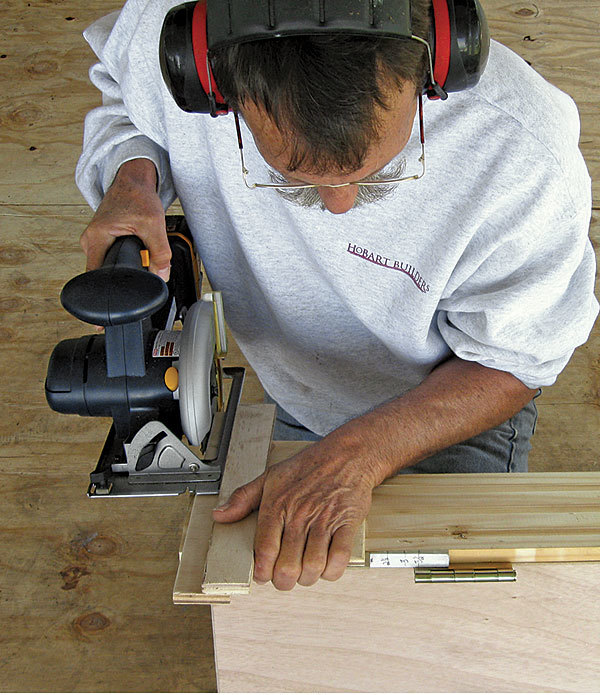
When the time comes to cut the jambs, I adjust my technique depending on the project. If I’m removing the doors from the jambs before installation, I tack a spreader across the legs to maintain the opening, and I cut with a chopsaw paired with an outfeed stand to support the jamb. More often, I keep the doors and jambs intact, mark the jamb lengths, and cut them with a circular saw and a crosscut jig.

Here’s a look at my jamb-measuring and cutting jigs and some other ideas for fast, accurate, sturdy door-hanging.

A convenient way to measure jamb legs

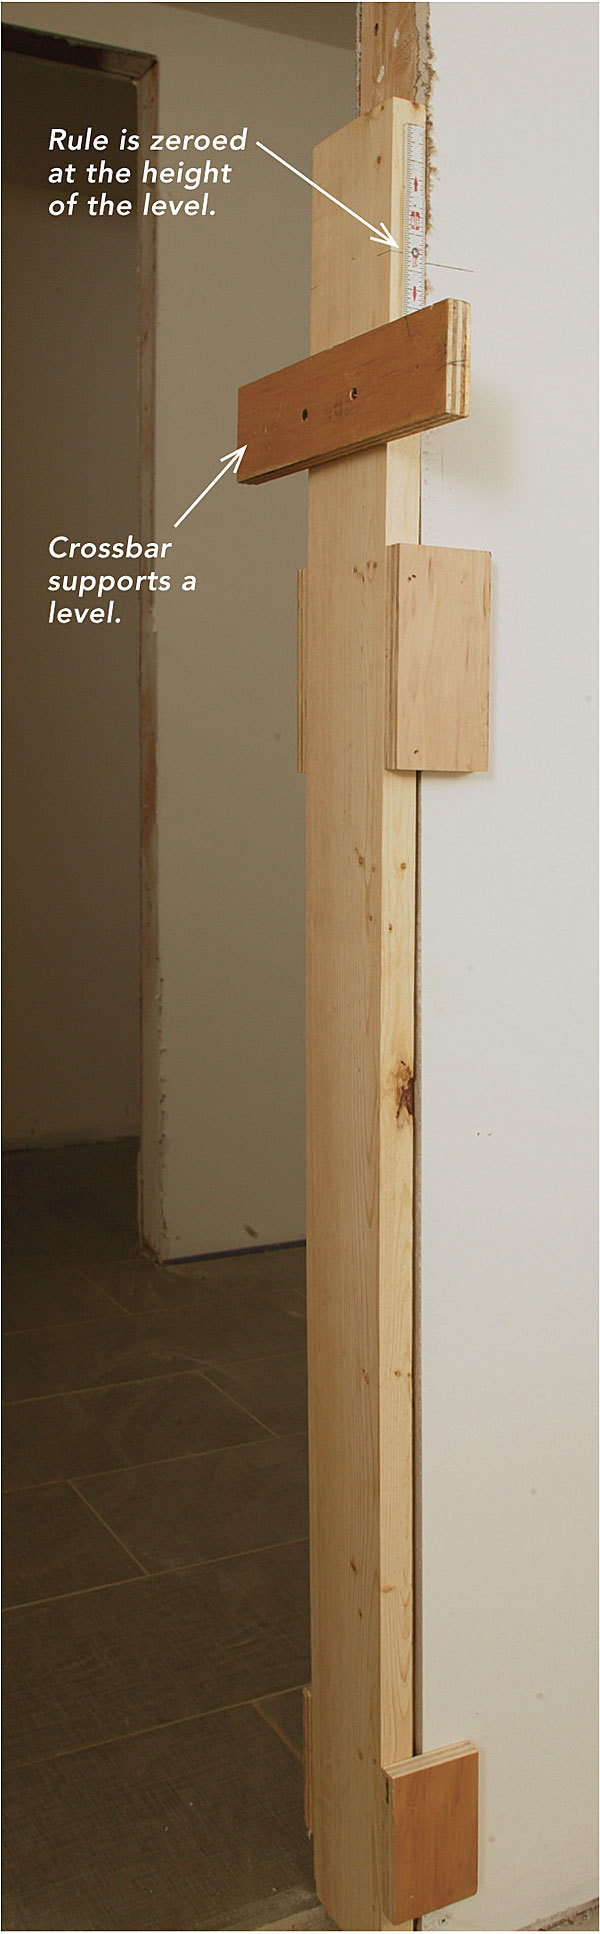
I make a jig from 5/4×6 stock that I rip to about 4 5/8 in. I nail a crossbar 48 in. from the bottom, which is a comfortable height. Then I take apart a broken folding rule, paint over the numbers to avoid confusing myself, and tack a 6-in. length to each side of the stick so that the rule’s center (marked with a zero) is equal to the top of a level sitting on the crossbar. Having rules on both sides lets me use the jig for both left- and right-hand doors.

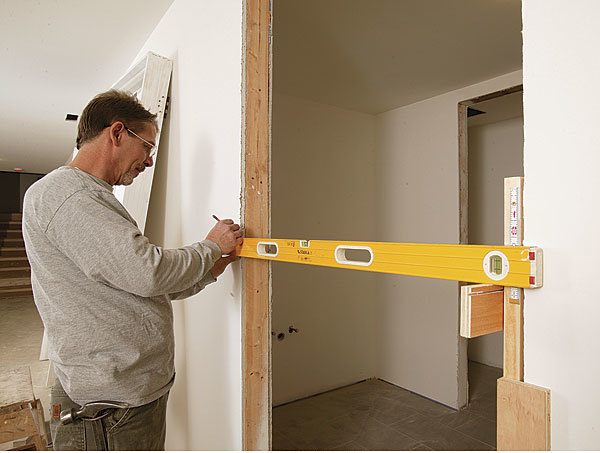
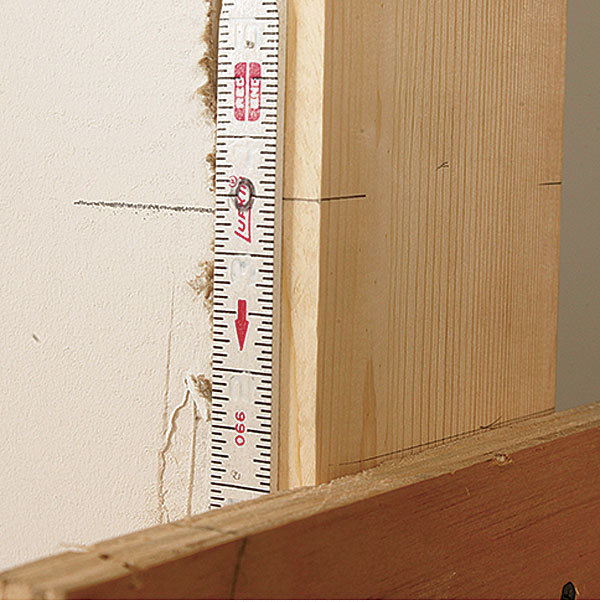
I begin measuring with a reference jamb length.let’s say 80 5/8 in. (80 in. for the door, 1/2 in. for the clearance to the floor, and 1/8 in. for the gap at the head). I register the jig against the hinge side, level across, and mark the strike side (photo below left). Then I fit the jig onto the strike side, where I can see any difference in height between the hinge and the strike side of the jamb (photo below right). I write the measurement in 16ths as shown on the rule—minus 2, for instance—and subtract it from the reference length. The strike-side length becomes 80 1/2 in. After the legs are cut, I know the jamb head will be square when the door is installed.


Gauge the gap, gauge the cut

On most jobs, I send my apprentice Hearty around with a jamb jig and graduated shims to check thresholds for level. (A large part of an apprentice’s life should involve crawling around on the floor.) If the floor slopes, the jamb needs to be cut slightly off-square to match. Hearty shoves a graduated shim (photo below left) into any gaps beneath the jig and measures the gap created by the angle. He then marks the measurement on the drywall next to the rough opening. The carpenter responsible for cutting the jambs adds or subtracts that amount from the target length.
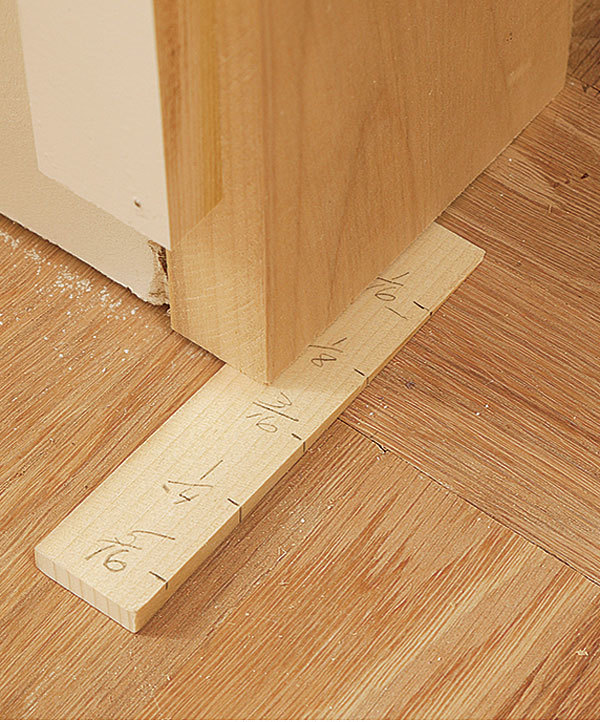
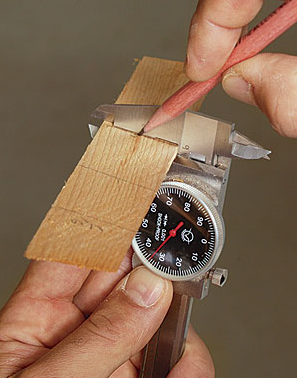
Guesstimate no more. To determine the width of a small gap quickly, I grab some shims, then graduate their tapers in 1/16-in. increments. I use a set of dial calipers; all I have to do is lock the jaws at the desired thickness, shove in the shim until it is snug, and mark it. You can buy accurate calipers for less than $20. The best thing is that as long as the marks are measured with the same calipers, the marks are identical from one shim to the next, regardless of the length or the taper of the shim. An apprentice can use one to measure, a carpenter can use a different one to cut, and the jamb will bear equally on the floor.

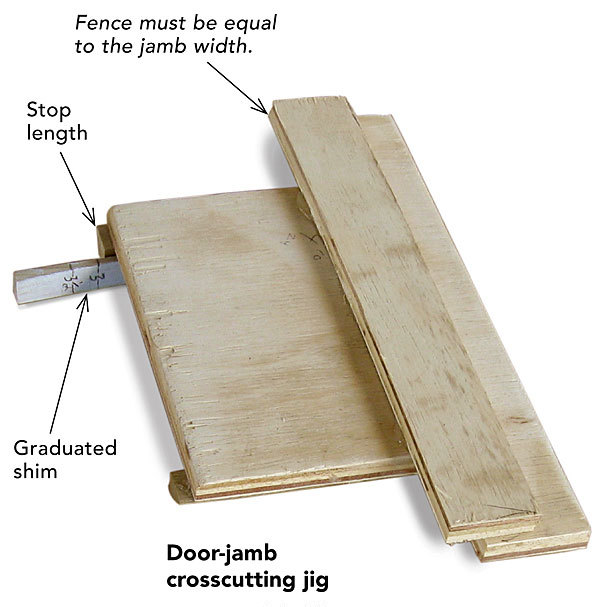
By inserting his own graduated shim to the mark indicated for that door between the jamb edge and the plywood crosscut jig’s stop, the carpenter reproduces the angle of the threshold, and his cut matches the floor.

Jim Chestnut

Jim Chestnut

Trick of the Trade: Slick techniques for fastening doors

Upper jamb first

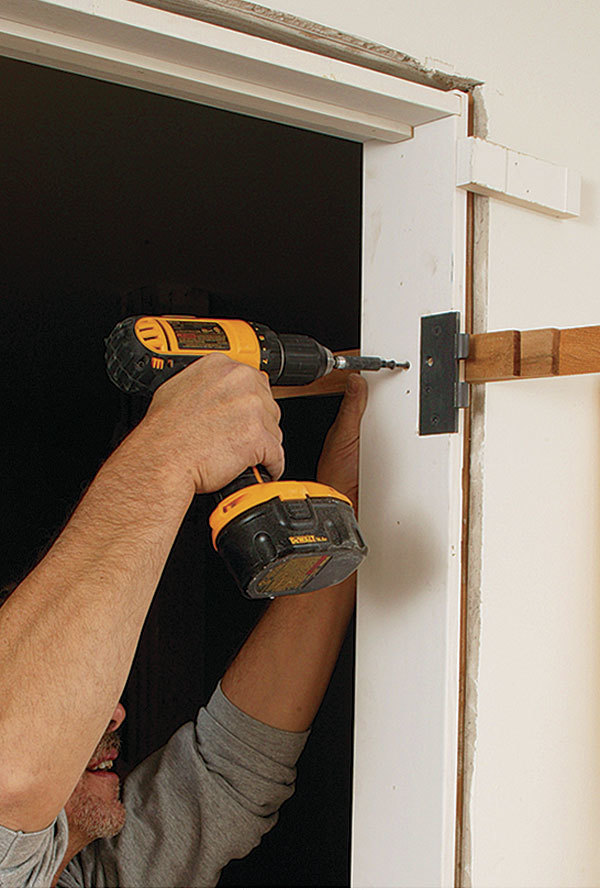
For stronger door assemblies, I prefer 3-in. screws instead of nails. (Nails are great to locate the door, but screws hold better.) I remove the side stop and drive a screw through the shims. When reapplied, the stops hide the screw heads. Alternatively, I drive a long screw into the hinge, as long as I can match that screw to the existing screw heads.
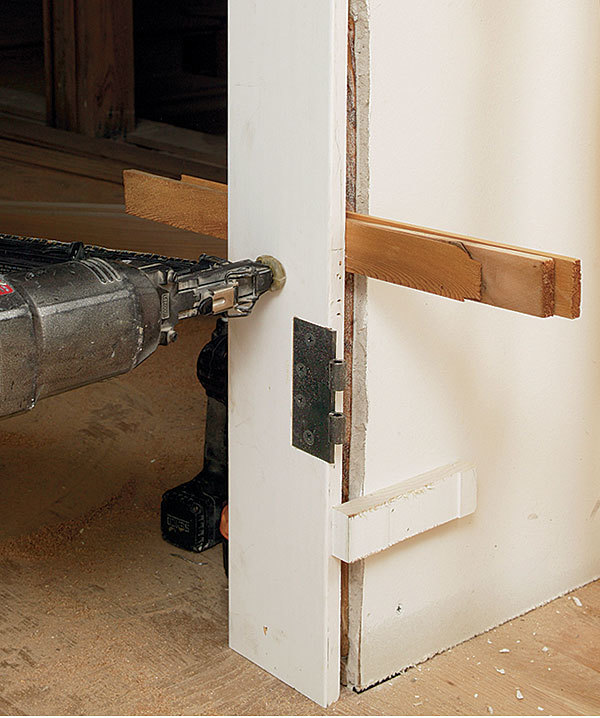
Lower jamb adjustments

When shimming the jamb plumb, I find it easier to adjust the shims if I nail above and below the shims. Once the jamb is where I want it, I drive a screw through the shim. Small blocks tacked to the drywall register the jamb’s hinge side to the drywall’s face.

Magazine extra: Watch a video of Jim using his jig to measure a door’s jamb legs accurately, ensuring a level head jamb.

Photos by: Charles Bickford, except where noted

Sign up for eletters today and get the latest how-to from Fine Homebuilding, plus special offers.

Sign Up

Get home building tips, offers, and expert advice in your inbox

×
X
X

New Feature

Fine Homebuilding Forums

Ask questions, offer advice, and share your work

Log in or create an account to post a comment.

Sign up Log in

Become a member and get full access to FineHomebuilding.com

Up Next

Featured Story

How to design small, smart homes

How to Design Small, Smart Homes

Watch award-winning architect Tina Govan share practical advice for creating more comfortable and efficient houses.

Featured Video

How to Install Exterior Window Trim

In this episode of Shop Class, learn how to measure, cut, and build window casing made of cellular PVC, solid wood, poly-ash boards, or any common molding material. Plus, get tips for a clean and solid installation.

Related Stories

  • Making a Wall a Focal Point With Stone Veneer

  • Installing a Range Hood

  • Installing a Bathroom Fan

  • Installing a Ceiling Fan

Discussion Forum

Recent Posts and Replies

  • |
  • |
  • |
  • |
  • |
  • |
View More Create Post

Highlights

  • Fine Homebuilding All Access
  • Fine Homebuilding Podcast
  • Tool Tech

    Plus, get an extra 20% off with code GIFT20

  • "I have learned so much thanks to the searchable articles on the FHB website. I can confidently say that I expect to be a life-long subscriber." - M.K.

    Get home building tips, offers, and expert advice in your inbox

    Sign Up See all newsletters

Video

View All
  • Podcast 193: Understanding Permeability, Insulating Behind Fiberboard Sheathing, and Building a Patio Door

  • How to Frame an Arched Doorway

  • How to Test Paint Stripper for Your Next Refinishing Project

  • Video: Build a Dutch Door

View All

Window and Door Installation

View All
  • Replacing a Basement Door

  • Flangeless Windows Done Right

  • Window-Flashing Demos on the Prove It Tour Stage: Zip System™ Flashing Tape

  • Fitting New Windows in a Crooked Old House

View All

BOOKS, DVDs, & MERCH

Shop the Store
  • Fine Homebuilding Magazine Slipcase

    Buy Now
  • Musings of an Energy Nerd

    Buy Now
  • Code Check Building 4th Edition

    Buy Now
  • 2020 Fine Homebuilding Archive

    Buy Now
  • Shop the Store

Fine Homebuilding Magazine

  • Issue 297 - Feb/Mar 2021

    • Foundations for Success
    • Staircase Renovation
    • Ditch the Hose
  • Issue 296 - Dec 2020/Jan 2021

    • Insulating Glass Keeps Getting Better
    • Simple Way to Make Old Walls Straight and Plumb
    • Making Sense of Minisplits
  • Issue 295 - Kitchens & Baths

    • Condo Kitchen Reimagined
    • Row-House Remodel
    • Rise of the IAQ Monitor
  • Issue 294 - Oct/Nov 2020

    • Schoolhouse Reimagined
    • Tool Test: Folding Sawhorses
    • A Better Way to Build Tall Walls
  • Issue 293 - Aug/Sept 2020

    • A Practical Guide to Fall Protection
    • Installing Frameless Cabinets
    • Make Any Tablesaw Safer

Fine Homebuilding

Follow

Newsletter

Get home building tips, offers, and expert advice in your inbox

Sign Up See all newsletters

Membership & Magazine

  • Online Archive
  • Start Free Trial
  • Magazine Subscription
  • Magazine Renewal
  • Gift a Subscription
  • Customer Support
  • Manage Preferences

Taunton Network

  • Green Building Advisor
  • Fine Woodworking
  • Fine Gardening
  • Threads
  • About
  • Contact
  • Advertise
  • Privacy Policy
  • Careers
  • Copyright
  • Terms of Use
  • Accessibility
  • CA Privacy Rights

© 2021 The Taunton Press, Inc. All rights reserved.

    Main Menu

  • How-To
  • Design
  • Tools & Materials
  • Video
  • Blogs
  • Forum
  • Reader Projects
  • Magazine
  • Members
  • FHB House
  • Podcasts

  • FHB Podcast
  • ProTalk
  • Account

  • Log In
  • Join

    Podcasts

  • FHB Podcast
  • ProTalk
  • Popular Topics

  • Kitchens
  • Business
  • Bedrooms
  • Roofs
  • Architecture and Design
  • Green Building
  • Decks
  • Framing
  • Safety
  • Remodeling
  • Bathrooms
  • Windows
  • Tilework
  • Ceilings
  • HVAC

    Magazine

  • Current Issue
  • Past Issues
  • Magazine Index
  • Subscribe
  • Online Archive
  • Author Guidelines

    All Access

  • Member Home
  • Start Free Trial
  • Gift Membership

    Shop the Store

  • Books
  • DVDs
  • Taunton Workshops

    More

  • FHB Ambassadors
  • Reader Projects
  • Podcast
  • Customer Support

    Account

  • Log In
  • Join

Newsletter

Get home building tips, offers, and expert advice in your inbox

Sign Up See all newsletters

Follow

Join All Access

Become a member and get instant access to thousands of videos, how-tos, tool reviews, and design features.

Start Your Free Trial

Subscribe

FHB Magazine

Start your subscription today and save up to 52%

Subscribe

We hope you’ve enjoyed your free articles. To keep reading, become a member today.

Get complete site access to expert advice, how-to videos, Code Check, and more, plus the print magazine.

Start your FREE trial

Already a member? Log in