FHB Logo Facebook LinkedIn Email Pinterest Twitter Instagram Plus Icon Close Icon Navigation Search Icon Navigation Search Icon Arrow Down Icon Video Guide Icon Article Guide Icon Modal Close Icon Guide Search Icon Skip to content
Subscribe

In every issue you'll find...

  • Expert insights on techniques and principles
  • Unbiased tool reviews
  • Step-by-step details to master the job
  • Field-tested advice and know-how
Subscribe Now!
Subscribe
  • How-To
  • Design
  • Tools & Materials
  • Videos
  • Blogs
  • Forum
  • Magazine
  • Members
  • FHB House
  • Podcast
  • Join
  • Log In
Subscribe
Tips & Techniques

Pickup-Truck Storage Tray

Issue 212

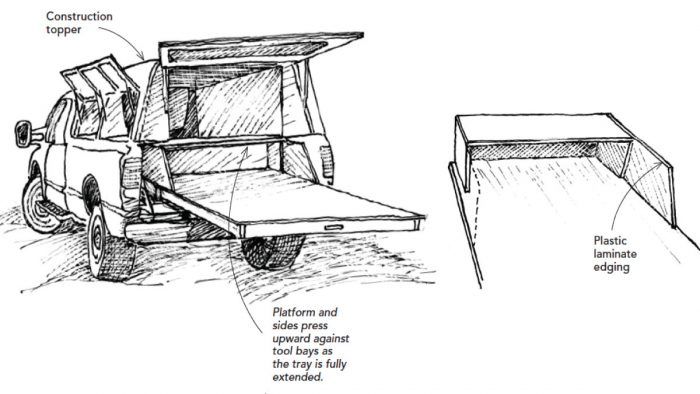
I have a construction topper on my truck, and I wanted to add an inexpensive sliding platform to the bed for easy access to assorted tools and materials. I looked into commercial slide-extension units and liked everything about them except the price, so I built my own.

As shown in the drawings, I made a 4-ft. by 8-ft. tray out of 2×4 stringers and a 3/4-in. MDF top. It’s constrained by an MDF bottom with 2×4 sides. Both tray and bottom are screwed and glued for a sturdy build.

A 1/2-in. gap on each side between the tray and the 2×4 sides limits binding. The tray rolls on 20 heavy-duty 4-in. casters spaced evenly next to each stringer and affixed with screws and construction adhesive.

I screwed a piece of 3/4-in. plywood to the top of the open tailgate to bring it into plane with the tray bottom. As the tray is extended, its upward travel is constrained by a raised platform and partial sides at the back as they bear against the underside of the topper’s tool bays. I can extend the tray a bit over 5 ft. beyond the tailgate.

I added a barrel-bolt latch to keep the tray from sliding open on an incline, but friction alone is a mighty strong force to keep the tray where I put it. In fact, the biggest drawback is that it can be tough to open or close the tray when the truck isn’t parked level.

Because the tray takes up so much room, I was not sure if I had made a mistake at first. But after several months I came up with an efficient packing system, and now I would not be without it.

Gregory Bowden, Cincinnati, OH

Edited and Illustrated by Charles Miller

From Fine Homebuilding #212

Sign up for the Fine Homebuilding Tip of the Day and get daily tips and special offers delivered to your inbox.

Signing you up...

This site is protected by reCAPTCHA and the Google Privacy Policy and Terms of Service apply.
See all newsletters
See all newsletters
×

Get home building tips, offers, and expert advice in your inbox

Signing you up...

This site is protected by reCAPTCHA and the Google Privacy Policy and Terms of Service apply.
See all newsletters
See all newsletters

New Feature

Fine Homebuilding Forums

Ask questions, offer advice, and share your work

View Comments

  1. topgunner | Jan 26, 2017 09:30pm | #1

    I have seem a similar design at http://4wheelonline.com blog, but pretty complex this is way easier to follow and understand.

  2. daniel60051 | Aug 16, 2020 07:46pm | #2

    mine is far easier & cheaper i think & sometimes i have to empty the bed of the truck to get more material in the truck. i cut 8 pieces of 3/4" PVC 2" short of tailgate. i cut 2 pieces of 1/2" MDO 2" short of tailgate by 2' wide. i screwed 4 pieces of 2x 20" long on the MDO.. i then screwed 1 piece of 2x to each end of the MDO & screwed a heavy duty handles in the top center of each piece of 2x (so it 2 makes tool trays 2' wide with the length just short of the truck bed). i set the 8 pieces of PVC spaced evenly apart on the truck bed. the 2 sleds of MDO slide easily in & out on the PVC for access to tools in the back. if i need to empty the truck, i place 2 sawhorses (4' wide) as high as the tailgate short of the length of the sleds apart with 1 sawhorse at the edge of the lowered tailgate. grabbing a handle i can slide 1 tray at a time all the way out of the bed on to the 2 sawhorses. depending on the material i am getting, i can either remove the PVC & put back in after unloading material or leave the PVC in. i unload & slide the 2 MDO sleds back on top of the PVC. however, i am going to put a taller MDO piece on the sides & each of the backs of the MDO sleds to prevent sideways tool movement on the trays.

Log in or create an account to post a comment.

Sign up Log in

Become a member and get full access to FineHomebuilding.com

More Tips & Techniques

View All
  • Cleaner Tile Demo
  • Handy Hose Holder
  • Pipe-Stand Bucket for Plumbing Jobs
  • Avoid Rotten Posts
View All

Up Next

Video Shorts

Featured Story

Steel Sheet Piling Supports This House in the Dunes

This seasonal lakehouse retreat sits on top of a bluff with a modern open plan and floor-to-ceiling windows.

Featured Video

Video: Build a Fireplace, Brick by Brick

Get an overview of the process of creating a traditional-style fireplace that burns well and meets current building codes from experienced mason Mike Mehaffey.

Related Stories

  • Podcast 485: Members-only Aftershow
  • Fine Homebuilding – Aug/Sept 2022, Issue #309
  • Keep Craft Alive Podcast: Ep.14, Ryan Shanahan, Birdsmouth Design-Build
  • Find a Female Tradesperson With Matriarchy Build

Discussion Forum

Recent Posts and Replies

  • |
  • |
  • |
  • |
  • |
  • |
View More Create Post

Highlights

Fine Homebuilding All Access
Fine Homebuilding Podcast
Tool Tech
Plus, get an extra 20% off with code GIFT20

"I have learned so much thanks to the searchable articles on the FHB website. I can confidently say that I expect to be a life-long subscriber." - M.K.

Get home building tips, offers, and expert advice in your inbox

Signing you up...

This site is protected by reCAPTCHA and the Google Privacy Policy and Terms of Service apply.
See all newsletters
See all newsletters

Video

View All
  • Podcast 485: Members-only Aftershow
  • Podcast 468: PRO TALK With Shutter Manufacturer Rick Skidmore
  • Podcast 462: PRO TALK With Construction Attorney Karalynn Cromeens
  • Podcast 461: Adding a Screened Porch, Insulating a Raised Addition, and Preventing Termites in Exterior Foam
View All

BOOKS, DVDs, & MERCH

Shop the Store
  • Outdoor Projects
    Buy Now
  • Code Check Building 4th Edition
    Buy Now
  • 2021 Fine Homebuilding Archive
    Buy Now
  • Pretty Good House
    Buy Now
  • Shop the Store

Fine Homebuilding Magazine

  • Issue 309 - Aug/Sept
    • 10 Steps to Install Crown Molding on Cabinets
    • How to Get Sturdy Walls Without OSB
    • Choosing the Right Construction Tape for the Job
  • Issue 308 - July 2022
    • Pretty Good House Book Excerpt: Copper Farmhouse
    • 10 Dos and Don'ts for Electric In-Floor Heat
    • A Sturdy Rail for Outdoor Stairs
  • Issue 307 - June 2022
    • How to Raise a Post-Frame Home
    • Trimming Deck Stairs
    • Evolving an Energy-Efficient Envelope
  • Issue 306 - April/May 2022
    • Framing Stairs to an Out-of-Level Landing
    • Building a Zero-Energy Home for Less
    • Good-Looking and Long-Lasting Traditional Gutters
  • Issue 305 - Feb/March 2022
    • The Steady Surge in Residential Solar
    • The Fine Homebuilding Interview: William B. Rose
    • How Good Is Your Air Barrier?

Fine Homebuilding

Follow

  • twitter
  • facebook
  • instagram
  • pinterest

Newsletter

Get home building tips, offers, and expert advice in your inbox

Signing you up...

This site is protected by reCAPTCHA and the Google Privacy Policy and Terms of Service apply.
See all newsletters
See all newsletters

Membership & Magazine

  • Online Archive
  • Start Free Trial
  • Magazine Subscription
  • Magazine Renewal
  • Gift a Subscription
  • Customer Support
  • Privacy Preferences

Taunton Network

  • Green Building Advisor
  • Fine Woodworking
  • Fine Gardening
  • Threads
  • About
  • Contact
  • Advertise
  • Careers
  • Copyright
  • Terms of Use
  • Site Map
  • Do not sell my information
  • Privacy Policy
  • Accessibility
  • California Privacy Rights

© 2022 The Taunton Press, Inc. All rights reserved.

X
X
This is a dialog window which overlays the main content of the page. The modal window is a 'site map' of the most critical areas of the site. Pressing the Escape (ESC) button will close the modal and bring you back to where you were on the page.

Main Menu

  • How-To
  • Design
  • Tools & Materials
  • Video
  • Blogs
  • Forum
  • Reader Projects
  • Magazine
  • Members
  • FHB House

Podcasts

  • FHB Podcast
  • ProTalk

Webinars

  • Upcoming and On-Demand

Account

  • Log In
  • Join

Podcasts

  • FHB Podcast
  • ProTalk

Webinars

  • Upcoming and On-Demand

Popular Topics

  • Kitchens
  • Business
  • Bedrooms
  • Roofs
  • Architecture and Design
  • Green Building
  • Decks
  • Framing
  • Safety
  • Remodeling
  • Bathrooms
  • Windows
  • Tilework
  • Ceilings
  • HVAC

Magazine

  • Current Issue
  • Past Issues
  • Magazine Index
  • Subscribe
  • Online Archive
  • Author Guidelines

All Access

  • Member Home
  • Start Free Trial
  • Gift Membership

Shop the Store

  • Books
  • DVDs
  • Taunton Workshops

More

  • FHB Ambassadors
  • Reader Projects
  • Podcast
  • Customer Support

Account

  • Log In
  • Join

Newsletter

Get home building tips, offers, and expert advice in your inbox

Signing you up...

This site is protected by reCAPTCHA and the Google Privacy Policy and Terms of Service apply.
See all newsletters
See all newsletters

Follow

  • twitter
  • facebook
  • instagram
  • pinterest

Join All Access

Become a member and get instant access to thousands of videos, how-tos, tool reviews, and design features.

Start Your Free Trial

Subscribe

FHB Magazine

Start your subscription today and save up to 70%

Subscribe

We hope you’ve enjoyed your free articles. To keep reading, become a member today.

Get complete site access to expert advice, how-to videos, Code Check, and more, plus the print magazine.

Start your FREE trial

Already a member? Log in