FHB Logo Facebook LinkedIn Email Pinterest Twitter Instagram Plus Icon Close Icon Navigation Search Icon Navigation Search Icon Arrow Down Icon Video Guide Icon Article Guide Icon Modal Close Icon Guide Search Icon Skip to content
Subscribe

In every issue you'll find...

  • Expert insights on techniques and principles
  • Unbiased tool reviews
  • Step-by-step details to master the job
  • Field-tested advice and know-how
Subscribe Now!
Subscribe
  • How-To
  • Design
  • Tools & Materials
  • Videos
  • Blogs
  • Forum
  • Magazine
  • Members
  • FHB House
  • Podcast
  • Join
  • Log In
Subscribe
Editor's Notepad

How to Remove a Damaged Roof Shingle

By Official Fine Homebuilding Post
1 The first step is to break the bond created by the seal-down strips below and on the two courses above the shingle you want to remove. Breaking this bond may be difficult with some newer laminated shingles. A 50-year shingle with a 110-mph wind warranty has an aggressive adhesive bond. In these cases, I cut the adhesive strip with a pry bar.

BY STEPHEN HAZLETT

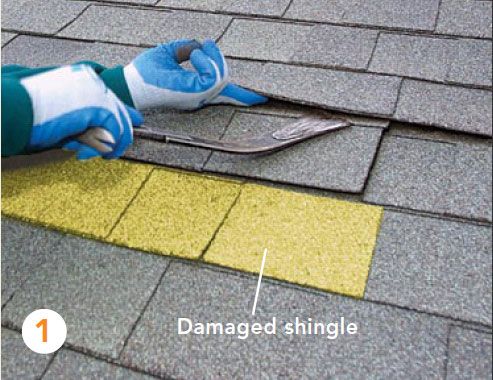
Some roof repairs—nail pops, for example—require replacing single shingles. Removing the damaged shingle without damaging the surrounding shingles is the tricky part. This process is best done while shingles are cool enough not to melt underfoot and warm enough not to crack. In the summer, I handle this part of the repair before 8 a.m. In the winter, I do only emergency repairs.

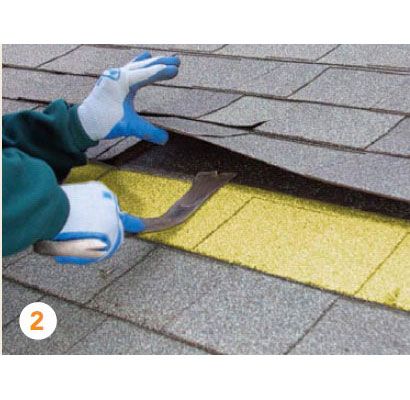
Step 1 Break the bond created by the seal-down strips below and on the two courses above the shingle you want to remove. Breaking this bond may be difficult with some newer laminated shingles. A 50-year shingle with a 110-mph wind warranty has an aggressive adhesive bond. In these cases, I cut the adhesive strip with a pry bar.

Step 2 With the bonds broken, I can remove the four nails holding the damaged shingle.

Step 3
Before I remove the shingle, though, I have to remove four more nails driven through the course above.

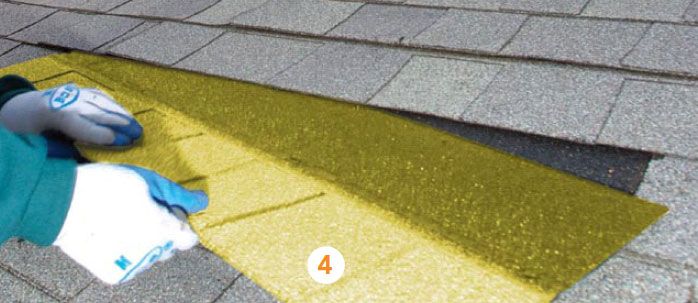
Step 4 Now I can pull out the damaged shingle, slip in a new shingle, and renail all the loosened shingles. When refastening shingles, don’t put new nails in the old nail holes; they’ll pop right out. Instead, nail next to the holes and put a dab of sealant over the old holes. While your caulk gun is handy, seal down all the loosened shingle tabs with a dab of sealant.


Excerpted from 10 Roof Goofs-and How To Fix Them


More:

Complete Guide to Roofs


Sign up for eletters today and get the latest how-to from Fine Homebuilding, plus special offers.

Signing you up...

This site is protected by reCAPTCHA and the Google Privacy Policy and Terms of Service apply.
See all newsletters
See all newsletters

1 The first step is to break the bond created by the seal-down strips below and on the two courses above the shingle you want to remove. Breaking this bond may be difficult with some newer laminated shingles. A 50-year shingle with a 110-mph wind warranty has an aggressive adhesive bond. In these cases, I cut the adhesive strip with a pry bar.

3 Before I remove the shingle, though, I have to remove four more nails driven through the course above.

4 Now I can pull out the damaged shingle, slip in a new shingle, and renail all the loosened shingles. When refastening shingles, don’t put new nails in the old nail holes; they’ll pop right out. Instead, nail next to the holes and put a dab of sealant over the old holes. While your caulk gun is handy, seal down all the loosened shingle tabs with a dab of sealant.

2 With the bonds broken, I can remove the four nails holding the damaged shingle.

×

Get home building tips, offers, and expert advice in your inbox

Signing you up...

This site is protected by reCAPTCHA and the Google Privacy Policy and Terms of Service apply.
See all newsletters
See all newsletters

New Feature

Fine Homebuilding Forums

Ask questions, offer advice, and share your work

View Comments

  1. Antstep | Sep 05, 2011 10:13am | #1

    For 3-tab shingles, the top existing shingles can be raised far enough for a hammer swing on the nails, but for composite or architectural shingles, it is frustrating to tear the next row of shingles above when trying to get a swing on a nail. The nail gun works to an acceptable degree, but for just one or two strips of shingles, or along the top section of several strips of shingles, some years ago I purchased a "roof snake" that lets me drive nails well under the existing shingles. Love it! Minimizes the opportunity to tear the existing, overlying shingles when trying to lever them up far enough to strike a hammer blow or pry in the nail gun. A guy I work with keeps borrowing mine. He's tried to purchase one online for over a year now, but it doesn't seem like anyone makes them anymore, or the manufacturer is waiting until it's profitable to run a large batch. Anyone know if "roof snakes" can still be obtained?
    Just a note, whenever I replace shingles, I inevitably seem to get the shingle that was the last one the roofer put on from a batch and drove an additional nail in one of the top corners to hold it in position for some reason. Makes me go "fishing" with the pry bar to get it out.

  2. RussMc | Sep 05, 2011 02:35pm | #2

    Couple of comments:

    1: I prefer to use a wide drywall taping knife (6" to 8") to break the seal between the shingles - less likely to damage the shingle. Just work it slowly in between the shingles.
    2. Most of the time,you have to get underneath a good shingle to pry up the nails a course above (see Step 3). With today's nail guns, the nails are usually driven too far into the shingle to get at the nail from the top. The pry bar shown will usually damage the "good" shingle" a little, so you have to be careful. I always keep a tube of roof cement to fill/fix the damaged areas. Really need a better way of doing this.

  3. SirElliott | Sep 14, 2011 03:25am | #3

    I got a "roof Snake" by PacTool at http://www.homelumbercom.com/ProductDetails.asp?ProductCode=RS501

Log in or create an account to post a comment.

Sign up Log in

Become a member and get full access to FineHomebuilding.com

More Editor's Notepad

View All
  • 9 Tips for Building a Better Deck
  • The 2017 Builders' Show Preview
  • Checking out the 2016 National Hardware Show
  • Old Tools, Old Friends
View All

Up Next

Video Shorts

Featured Story

Dress Up a Ceiling With Reclaimed Beams

Old timbers get new life as a decorative element in a cottage renovation.

Featured Video

Video: Build a Fireplace, Brick by Brick

Get an overview of the process of creating a traditional-style fireplace that burns well and meets current building codes from experienced mason Mike Mehaffey.

Related Stories

  • Insulation Project Guide
  • Podcast 531: Fixing Old Felt, Outsulation Penetrations, and Demolition by Neglect
  • Podcast 529: Cold Floors, Galvanic Corrosion, and Siding Over Board Sheathing
  • Fine Homebuilding – Feb/Mar 2023, Issue #313

Discussion Forum

Recent Posts and Replies

  • |
  • |
  • |
  • |
  • |
  • |
View More Create Post

Highlights

Fine Homebuilding All Access
Fine Homebuilding Podcast
Tool Tech
Plus, get an extra 20% off with code GIFT20

"I have learned so much thanks to the searchable articles on the FHB website. I can confidently say that I expect to be a life-long subscriber." - M.K.

Get home building tips, offers, and expert advice in your inbox

Signing you up...

This site is protected by reCAPTCHA and the Google Privacy Policy and Terms of Service apply.
See all newsletters
See all newsletters

Video

View All
  • Podcast 531: Fixing Old Felt, Outsulation Penetrations, and Demolition by Neglect
  • Podcast 529: Cold Floors, Galvanic Corrosion, and Siding Over Board Sheathing
  • Podcast 527: Members-only Aftershow – Educating new home buyers
  • Podcast 521: Missed Opportunities, Lax Airtightness Testing, and Low-Slope Roofs Under Solar
View All

BOOKS, DVDs, & MERCH

Shop the Store
  • 2022 Fine Homebuilding Archive
    Buy Now
  • Pretty Good House
    Buy Now
  • Code Check Building 4th Edition
    Buy Now
  • 2023 Tool Guide
    Buy Now
  • Shop the Store

Fine Homebuilding Magazine

  • Issue 313 - Feb/March 2023
    • Practical System for a Seismic Retrofit
    • Fine Homebuilding Issue #313 Online Highlights
    • Practical System for a Seismic Retrofit
  • Issue 312 - Dec 2022/Jan 2023
    • Tool Test: Cordless Tablesaws
    • Gray-Water System for a Sustainable Home
    • Insulate a Cape Roof to Avoid Ice Dams
  • Issue 311 - November 2022
    • 7 Steps to a Perfect Exterior Paint Job
    • Options for Smarter Home-Energy Tracking
    • The Fine Homebuilding Interview: James Metoyer
  • Issue 310 - October 2022
    • Choosing a Tile-Leveling System
    • Choosing Between HRVs and ERVs
    • Custom Built-in Cabinets Made Easy
  • Issue 309 - Aug/Sept 2022
    • 10 Steps to Install Crown Molding on Cabinets
    • How to Get Sturdy Walls Without OSB
    • Choosing the Right Construction Tape for the Job

Fine Homebuilding

Follow

  • twitter
  • facebook
  • instagram
  • pinterest

Newsletter

Get home building tips, offers, and expert advice in your inbox

Signing you up...

This site is protected by reCAPTCHA and the Google Privacy Policy and Terms of Service apply.
See all newsletters
See all newsletters

Membership & Magazine

  • Online Archive
  • Start Free Trial
  • Magazine Subscription
  • Magazine Renewal
  • Gift a Subscription
  • Customer Support
  • Privacy Preferences

Taunton Network

  • Green Building Advisor
  • Fine Woodworking
  • Fine Gardening
  • Threads
  • About
  • Contact
  • Advertise
  • Careers
  • Copyright
  • Terms of Use
  • Site Map
  • Do not sell or share my information
  • Privacy Policy
  • Accessibility
  • California Privacy Rights

© 2023 The Taunton Press, Inc. All rights reserved.

X
X
This is a dialog window which overlays the main content of the page. The modal window is a 'site map' of the most critical areas of the site. Pressing the Escape (ESC) button will close the modal and bring you back to where you were on the page.

Main Menu

  • How-To
  • Design
  • Tools & Materials
  • Video
  • Blogs
  • Forum
  • Reader Projects
  • Magazine
  • Members
  • FHB House

Podcasts

  • FHB Podcast
  • ProTalk

Webinars

  • Upcoming and On-Demand

Account

  • Log In
  • Join

Podcasts

  • FHB Podcast
  • ProTalk

Webinars

  • Upcoming and On-Demand

Popular Topics

  • Kitchens
  • Business
  • Bedrooms
  • Roofs
  • Architecture and Design
  • Green Building
  • Decks
  • Framing
  • Safety
  • Remodeling
  • Bathrooms
  • Windows
  • Tilework
  • Ceilings
  • HVAC

Magazine

  • Current Issue
  • Past Issues
  • Magazine Index
  • Subscribe
  • Online Archive
  • Author Guidelines

All Access

  • Member Home
  • Start Free Trial
  • Gift Membership

Shop the Store

  • Books
  • DVDs
  • Taunton Workshops

More

  • FHB Ambassadors
  • Reader Projects
  • Podcast
  • Customer Support

Account

  • Log In
  • Join

Newsletter

Get home building tips, offers, and expert advice in your inbox

Signing you up...

This site is protected by reCAPTCHA and the Google Privacy Policy and Terms of Service apply.
See all newsletters
See all newsletters

Follow

  • twitter
  • facebook
  • instagram
  • pinterest

Join All Access

Become a member and get instant access to thousands of videos, how-tos, tool reviews, and design features.

Start Your Free Trial

Subscribe

FHB Magazine

Start your subscription today and save up to 70%

Subscribe

We hope you’ve enjoyed your free articles. To keep reading, become a member today.

Get complete site access to expert advice, how-to videos, Code Check, and more, plus the print magazine.

Start your FREE trial

Already a member? Log in