FHB Logo Facebook LinkedIn Email Pinterest Twitter Instagram Plus Icon Close Icon Navigation Search Icon Navigation Search Icon Arrow Down Icon Video Guide Icon Article Guide Icon Modal Close Icon Guide Search Icon Skip to content
Subscribe

In every issue you'll find...

  • Expert insights on techniques and principles
  • Unbiased tool reviews
  • Step-by-step details to master the job
  • Field-tested advice and know-how
Subscribe Now!
Subscribe
  • How-To
  • Design
  • Tools & Materials
  • Videos
  • Blogs
  • Forum
  • Magazine
  • Members
  • FHB House
  • Podcast
  • Join
  • Log In
Subscribe
How-To

How To Fit Inset Cabinet Doors

Fine Homebuilding goes on the road to learn the ins and outs of what it means to be a master carpenter

By Scott Gibson

VIDEO TRANSCRIPT

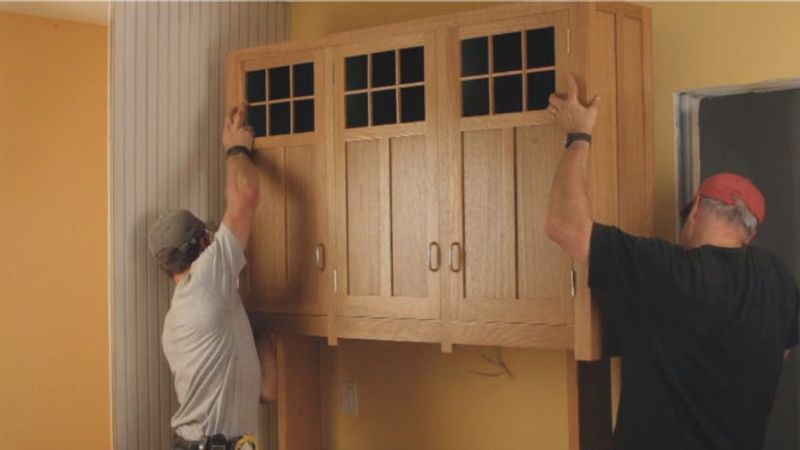
Senior editor Chuck Bickford: I first met Scott Gibson when I came to work for Fine Homebuilding. At that time he was the editor of Fine Woodworking, and he had already worked at Fine Homebuilding and was the editor-in-chief of Home Furniture. I soon found out that in addition to being a great journalist, he was a really good carpenter and woodworker—and he had a whole house full of furniture to prove it. Scott moved up to Maine in 2000 to be a freelance writer, and he built himself a really nice shop so he could keep his hands busy in between typing. I caught up with him while he was making kitchen cabinets for his son, Ben, and I asked him about the inset doors, always a tricky stage in cabinetmaking.

Scott Gibson: Most cabinet doors today are overlay. They don’t fit inside of an opening. I like doors that are set right inside the cabinet, like that; that are cut exactly all the way around—they look better to me. The way I do that is to make a door that fits the opening, exactly the same size. I set a shim at the bottom of the door. Then I fit the hinge side, the top, and then the strike side; put the mortised hinges in, hang the door, and then do the final fit. That’s it.

I glue up and build the door to match the opening. I don’t subtract anything to make the space around the edge of the door—I make the door to fill the opening. Then I remove material to make it fit perfectly. The first thing I’ve done here is cut a shim for the bottom of the door, to reveal the space I want between the bottom of the door and the cabinet. I’ve also planed the bottom of the door so it’s nice and flat, removing any inconsistencies from the glue-up.

Set the door in the opening and push it hard against the hinge side. This door fits pretty well, but needs a little taken off at the bottom. I trim that up first, so I have a square angle. I take a plane and hold it 90 degrees to the edge of the door, and just plane off that corner and taper it so that the door fits nice and snug all the way down the length of the cabinet. It’s trial and error; there’s no magic here.

After I’ve taken off some of the corner with a short plane, I really want the taper to be nice and flat all the way down, so I go back to a jointer plane. When I’m done, it won’t need sanding. It’s nice and square.

Because the door is made to the full width and height of the opening, we know one end of it will be too big. I make a mark on each side where I want the door to fit into the opening. Then I make the cut on the tablesaw.

Put the door in a crosscut sled on the tablesaw. I’ve got my two marks on top of the door, showing where I want it to go. The first thing I look at is whether those marks line up with the sawblade for a square cut. The cut marks are right on the saw kerf of the sled. If I had to make a tapered cut, at a mark lower than the one I’ve already penciled on the top of the door, I’d put that mark on the saw kerf—where the edge of the blade will be—and use a shim to hold the door steady against the fence. But with the straight cut I have to make, the door itself will be flat against the fence, to get a square cut along the top.

After I make the first cut on the tablesaw, I bring the door back to the cabinet and pop it into the opening. I want to be sure it was the right cut. I can see that the line we established was just right. Now, how much do we want to take off the door so the reveal at the bottom equals that at the top? I mark it by eye, then go back to the sled on the tablesaw and make a second cut.

I’ve made the second pass on the tablesaw and now I’m trying to get pretty close to what the opening is—and it’s pretty close. There’s a tiny bit of inconsistency. The gap on the top left is probably a little bit less than the gap on the top right of the door. Your eye really will see that. But I’m not going to fuss with the tablesaw any more. The little microadjustments I can do with a handplane.

Three sides of the door fit, so now I take a look at the strike side of the door, and down at the bottom is a tiny gap. At the top it’s a little tight. To make getting the right fit easier, I use a straightedge and make a mark right down the length of the door that needs to be trimmed. It’s a guide; I just want a rough idea of where the door should be at. The best way to do that is to remove some material with a jointer plane, put the door back in the opening, and see how it fits. Maybe it takes you two or three trips to the bench to get it right. While I’m trimming the strike side, I also put a little bevel on the edge—not much—but it’s good practice and makes the door less likely to bind in the opening.

The door fits the opening pretty well. The gap is the same at the top and between the two doors. All we have to do now is mark the locations for the hinges on the door and cut those mortises. There’s probably a little more trimming that we’ll do—when we put the hinges on and hang the door, it’ll change the door location a tiny bit. Don’t forget there’s still a shim at the bottom of the door. When we take that out and put the string on the hinges, it will still need a tiny bit of trimming, but not too much.

Using the hinge location marks you made on the cabinet, mark the door for the hinge mortises. Square them off. Use a laminate trimmer with a straight gut to remove the material on the door so that the hinges will drop right in. Place an extra piece of scrap behind the door’s edge to prevent blowout while you’re mortising the hinges. The scrap gives the router a bigger place to sit so that it’s less likely to tip.

The hinge leaf should fit nice and snug. I use a vix bit—a self-centering bit—that puts the hole for the hinge right dead center. I only do one at a time. That way if I have to adjust it later—and I might—I don’t want to have to plug all the hinge holes.

Now that the door is hung on its hinges in the opening, the reveals are not right anymore. That’s why you don’t want to make it perfect before installing the hinges, because there will be more fitting to do. I’ll pop off the door and look at the door mortises to make sure they’re set correctly. Then I’ll have to plane the door edges to correct the reveal and make it even all the way around. You can go back and forth from the bench to the door opening as much as you want—there’s no magic, just patience.


Sign up for eletters today and get the latest how-to from Fine Homebuilding, plus special offers.

Signing you up...

This site is protected by reCAPTCHA and the Google Privacy Policy and Terms of Service apply.
See all newsletters
See all newsletters
×

Get home building tips, offers, and expert advice in your inbox

Signing you up...

This site is protected by reCAPTCHA and the Google Privacy Policy and Terms of Service apply.
See all newsletters
See all newsletters

New Feature

Fine Homebuilding Forums

Ask questions, offer advice, and share your work

View Comments

  1. DMR51 | Feb 24, 2018 08:43am | #1

    My favorite door style/cabinet style .. And a great video !!! Thanks

Log in or create an account to post a comment.

Sign up Log in

Become a member and get full access to FineHomebuilding.com

Up Next

Video Shorts

Featured Story

Elements of a Good Residential Building Contract

Beyond the basics, learn what items will contribute to a good working relationship and help prevent misunderstandings or potentially expensive conflict.

Featured Video

Builder’s Advocate: An Interview With Viewrail

Learn more about affordable, modern floating stairs, from design to manufacturing to installation.

Related Stories

  • How to Install Flat-Pack Kitchen Cabinets
  • Clever Kitchen Storage Solutions
  • Track Lighting for Functional Ambiance in Busy Spaces
  • Systems and Products for an All-Electric Small Home

Discussion Forum

Recent Posts and Replies

  • |
  • |
  • |
  • |
  • |
  • |
View More Create Post

Highlights

Fine Homebuilding All Access
Fine Homebuilding Podcast
Tool Tech
Plus, get an extra 20% off with code GIFT20

"I have learned so much thanks to the searchable articles on the FHB website. I can confidently say that I expect to be a life-long subscriber." - M.K.

Get home building tips, offers, and expert advice in your inbox

Signing you up...

This site is protected by reCAPTCHA and the Google Privacy Policy and Terms of Service apply.
See all newsletters
See all newsletters

Video

View All
  • Podcast Episode 134: Painting Kitchen Cabinets
  • Podcast Episode 125 — French Doors, Kitchen Remodels, and the Gamification of Home Building.
  • Podcast Episode 118 — Inches and Feet
  • Podcast Episode 101 — Cabinet Door, Hot Water, Deck, and Wood Repair Questions
View All

Kitchen Cabinets

View All Kitchen Cabinets Articles
  • installing-stock-cabinets
    How to Hang Cabinets on a Brick Wall
  • A photo of a room with a pop up table with a microwave and other small items and appliances
    How to Live in Your House During a Kitchen Remodel
  • Cottage Camouflage
    Camouflaged Elements Maximize Home Space
  • codes for trim carpenters
    What the Code Says about Interior Trim and Cabinetry
View All Kitchen Cabinets Articles

BOOKS, DVDs, & MERCH

Shop the Store
  • Code Check Building 4th Edition
    Buy Now
  • 2022 Fine Homebuilding Archive
    Buy Now
  • 2023 Tool Guide
    Buy Now
  • Pretty Good House
    Buy Now
  • Shop the Store

Fine Homebuilding Magazine

  • Issue 313 - Feb/March 2023
    • Practical System for a Seismic Retrofit
    • Fine Homebuilding Issue #313 Online Highlights
    • Practical System for a Seismic Retrofit
  • Issue 312 - Dec 2022/Jan 2023
    • Tool Test: Cordless Tablesaws
    • Gray-Water System for a Sustainable Home
    • Insulate a Cape Roof to Avoid Ice Dams
  • Issue 311 - November 2022
    • 7 Steps to a Perfect Exterior Paint Job
    • Options for Smarter Home-Energy Tracking
    • The Fine Homebuilding Interview: James Metoyer
  • Issue 310 - October 2022
    • Choosing a Tile-Leveling System
    • Choosing Between HRVs and ERVs
    • Custom Built-in Cabinets Made Easy
  • Issue 309 - Aug/Sept 2022
    • 10 Steps to Install Crown Molding on Cabinets
    • How to Get Sturdy Walls Without OSB
    • Choosing the Right Construction Tape for the Job

Fine Homebuilding

Follow

  • twitter
  • facebook
  • instagram
  • pinterest

Newsletter

Get home building tips, offers, and expert advice in your inbox

Signing you up...

This site is protected by reCAPTCHA and the Google Privacy Policy and Terms of Service apply.
See all newsletters
See all newsletters

Membership & Magazine

  • Online Archive
  • Start Free Trial
  • Magazine Subscription
  • Magazine Renewal
  • Gift a Subscription
  • Customer Support
  • Privacy Preferences

Taunton Network

  • Green Building Advisor
  • Fine Woodworking
  • Fine Gardening
  • Threads
  • About
  • Contact
  • Advertise
  • Careers
  • Copyright
  • Terms of Use
  • Site Map
  • Do not sell or share my information
  • Privacy Policy
  • Accessibility
  • California Privacy Rights

© 2023 The Taunton Press, Inc. All rights reserved.

X
X
This is a dialog window which overlays the main content of the page. The modal window is a 'site map' of the most critical areas of the site. Pressing the Escape (ESC) button will close the modal and bring you back to where you were on the page.

Main Menu

  • How-To
  • Design
  • Tools & Materials
  • Video
  • Blogs
  • Forum
  • Reader Projects
  • Magazine
  • Members
  • FHB House

Podcasts

  • FHB Podcast
  • ProTalk

Webinars

  • Upcoming and On-Demand

Account

  • Log In
  • Join

Podcasts

  • FHB Podcast
  • ProTalk

Webinars

  • Upcoming and On-Demand

Popular Topics

  • Kitchens
  • Business
  • Bedrooms
  • Roofs
  • Architecture and Design
  • Green Building
  • Decks
  • Framing
  • Safety
  • Remodeling
  • Bathrooms
  • Windows
  • Tilework
  • Ceilings
  • HVAC

Magazine

  • Current Issue
  • Past Issues
  • Magazine Index
  • Subscribe
  • Online Archive
  • Author Guidelines

All Access

  • Member Home
  • Start Free Trial
  • Gift Membership

Shop the Store

  • Books
  • DVDs
  • Taunton Workshops

More

  • FHB Ambassadors
  • Reader Projects
  • Podcast
  • Customer Support

Account

  • Log In
  • Join

Newsletter

Get home building tips, offers, and expert advice in your inbox

Signing you up...

This site is protected by reCAPTCHA and the Google Privacy Policy and Terms of Service apply.
See all newsletters
See all newsletters

Follow

  • twitter
  • facebook
  • instagram
  • pinterest

Join All Access

Become a member and get instant access to thousands of videos, how-tos, tool reviews, and design features.

Start Your Free Trial

Subscribe

FHB Magazine

Start your subscription today and save up to 70%

Subscribe

We hope you’ve enjoyed your free articles. To keep reading, become a member today.

Get complete site access to expert advice, how-to videos, Code Check, and more, plus the print magazine.

Start your FREE trial

Already a member? Log in