Video Link Corrected:
Sorry, I inserted the wrong video link when this post first went public. The correct “Day Two” video is linked now. Talk about just enough to be dangerous… guess that applies equally to my web publishing learning curve!
Just Enough to be Dangerous:
I remember early days in my carpentry career. Someone with more experience would show some new trick or other and I’d ambitiously run off with the new knowledge. With just enough knowledge to be dangerous I’d run for a time, only to trip on the next unknown and fall flat on my face. Such is the learning curve, but time and persistance bring ability, and with enough of both I became a confident, productive carpenter. I suspect this scenario is familiar to many.
A Leg to Stand On:
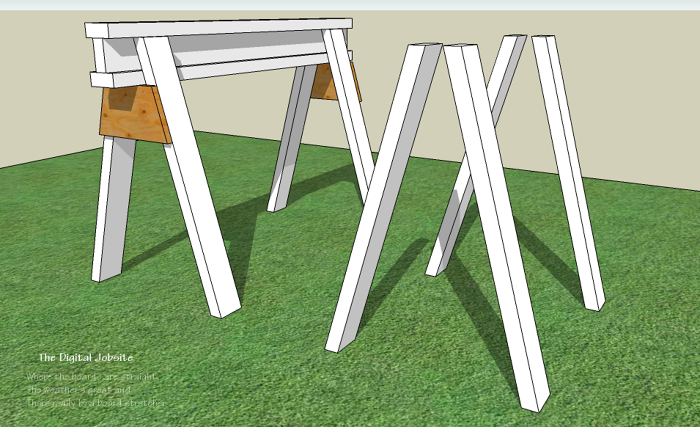
In the first segment of A Carpenter’s Introduction to 3D Modeling Day One I went through steps to create the top “beam” for a set of sturdy stackable sawhorses. In this “Day Two” tutorial I show (one of many) ways to model and multiply 2×4 legs for the horses:
Another thing time and persistance brings is knowledge of how many different ways there are to do the same thing. I got to thinking about this truth after recording the video above.
The method shown for “cutting” off the angled ends of the 2×4 legs; selecting unwanted geometry and deleting it, is not only not the quickest method, but only one of many ways to accomplish this task. A much quicker way, once lines for the beveled end are drawn in, is to use the Push/Pull tool and simply push the 1 1/2″ side face of the leg away, which works in this case because the modeled 2x4s have square corners. It wouldn’t work if the 2x4s were drawn with slightly rounded corners (like real lumber) or if you try to push the 3 1/2″ face. I demonstrated the Click, Drag and Delete process since it works in many instances where Push/Pull won’t like rounded, angled and otherwise curved pieces. Far be it from me to be the guy on the job who stubbornly insists his way is the only way… well, most times anyway.
Get it Together:
Working through all the steps to model these simple steps made for long tutorial videos so this Introduction to 3D Modeling is broken down into three segments. If you’ve watched Day One and this Day Two, stop back for the final Day Three segment where I go through steps to create 3/4″ plywood gussets. By using the Protractor Tool,Tape Measure tool followed with an introduction to the Paint Bucket (Materials) tool for adding a “plywood” look, realistic support gussets are added. Finish up your first task as a modeling apprentice by turning your single completed sawhorse into a hundred… or more!
As always, thanks for stopping by The Digital Jobsite. Please take a moment to add a Like or Comment here to benefit other visitors. If you like the videos you see here at TDJ Blog, subscribe to my Digital Jobsite Channel on YouTube for direct access to all my SketchUp tutorial videos and more.
Fine Homebuilding Recommended Products
Fine Homebuilding receives a commission for items purchased through links on this site, including Amazon Associates and other affiliate advertising programs.

Handy Heat Gun

Affordable IR Camera

8067 All-Weather Flashing Tape

Sawhorses need "a leg up" to have a leg to stand on.


View Comments
These are great. I really like the pace and the repetition; too many videos zoom through the material in non-real time leaving the viewer astray. The detail is good and the volume of material covered in each video is good too.
One suggestion. the continuous cursor movement and keyboard sounds can be distracting. I realize the keyboard is an essential part of SketchUp's control but a little less keyboard noise would be good. I'd still watch them though even with the cursor movements and the sounds.
Carver,
I know what you mean about the crazy cursor jittering and keyboard sounds! And I say "uhhmm" a lot too. I make a conscious effort to minimize unconscious habits while recording the tutorials but still need a lot of improvement. The inexpensive starter microphone I purchased for blogging is proving inadequate for the task and needs to be upgraded. I think a better mic would filter out annoying background noises.
Rest assured that improving the production quality of The Digital Jobsite Blog videos is a high priority for me. I've mastered many areas of carpentry, contracting and modeling with SketchUp but producing and publishing online content is a whole other thing!
For ongoing improvement I just upgraded to a smokin' new Win7 PC and a Space Mouse Pro 3D mouse. Next on the list is better screen capture video software and better mic. Guess all I'll need then is a production manager/editor/coach to polish my presentation poise.
In the meantime I'll try to keep the topics, pace and depth of tutorials rich enough to warrant um, putting up with, umm, the nervous tics and uh, uh, uh... noises :-)
Matt
Hey Matt - Is there a quick way to find out the angle to cut on the legs?
Cheers
hull187,
Yes, there is a way to find the cut angle for the sawhorse legs with 3 mouse clicks. In fact, its one of the great advantages of using SketchUp to model a project before building it. Whether a simple set of sawhorses or a complex framing assembly, all the information is built into the model where you can design, measure and count every feature ahead of time. Sorry, got carried away there... sounds like I'm trying to sell SketchUp or something :-)
Use the Protractor tool to find the cut angle. Select the tool and "index" it to the 1 1/2" face of a leg, then slide it until the center of the tool aligns with the long point of the leg angle cut at the bottom of the leg. Once the center of the Protractor turns to a purple dot, left click to lock it to that point. Next move your mouse to swing the dotted line to a vertical position which is indicated when the dotted line turns from black to blue. With the blue line showing click again to lock the start position for your angle measurement. Lastly, swing the dotted line (it will switch back to black when you start moving it) to the same edge of the leg that the center point is set on until a second purple dot appears. The degrees of swing from the vertical start point to the leg angle will show up in the Value Control Box in the lower right corner of your screen.
Once you get familiar with this sequence of 3 clicks it should take literally 3 seconds to measure any angle although it can be a bit frustrating starting out because the tool seems to jump about disobediently.
The angle in the sawhorse model as uploaded to the Component Warehouse shows +/- 15.9 degrees.
A few things to keep in mind:
Use the Protractor tool NOT the Rotate tool.
You can measure the complimentary angle from horizontal by using a green axis oriented dotted line to start the 2nd click
When the Protractor tool wants to jump around to any face but the one you want to index on, first hover the tool over the face you want and then hold down the Shift key. That will keep your desired orientation no matter where you move the tool.
Guess that ended up as a $50 answer to a $5 question but I hope it helps!
Have fun modeling and building...
Matt
aka The Timber Tailor
Got it! Providing the 15.9 angle was a big help. Good old process of elimination.
Thanks for the videos.