Surgical Kitchen Remodel
How to modernize a kitchen while preserving the components.
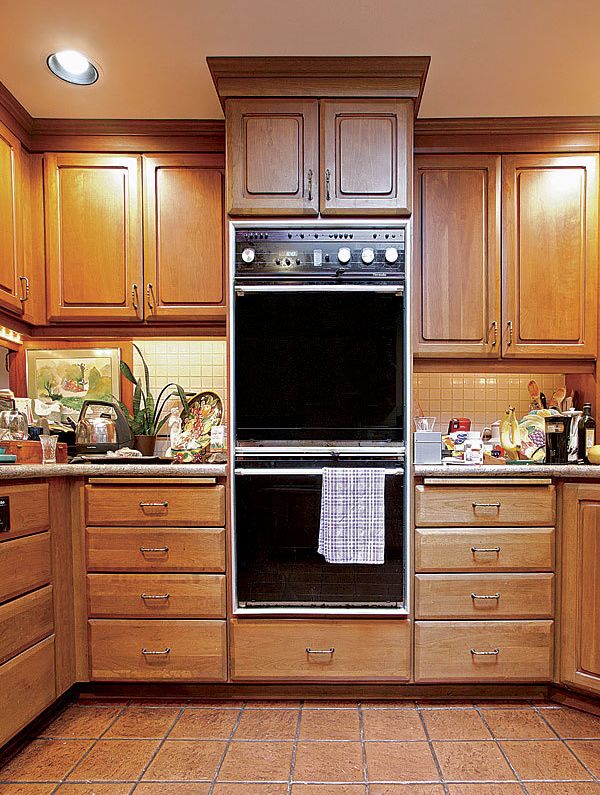
Synopsis: Most homeowners imagine a kitchen remodel as being a full-scale blowout, but they don’t necessarily have to be massive projects. In this article, Seattle builder and furniture maker David Getts describes a precise, incisive project he handled. The homeowner needed to replace a double wall oven; however, the ovens were 27 in. wide, 3 in. smaller than most wall ovens are made today. The ovens were set in a wall in the middle of a run of countertop and cabinets. Thus, Getts had to do a careful job of widening the space while not making his work obvious as the homeowner did not want to replace the entire granite countertop or all the cabinets. Getts started the project by carefully removing the old ovens and disassembling the appliance cabinet. He then removed the adjacent upper cabinet, trimmed the backsplash, and trimmed the lower cabinet face frame, back, and side. Getts hired a granite fabricator to trim the counter on site. In the shop, he resized the upper cabinet and the lower drawers. Back on site, Getts installed a new oven base and reinstalled adjacent materials. Then he installed and secured the new oven cabinet.
The key to a successful small remodelling project is to make the new work match the existing details so that no one can tell that the space was ever modified. On this job, upgrading the double ovens in an existing kitchen meant that I had to create a little more room in a run of the 20-year-old cabinets for a new, larger oven cabinet, and then make everything look as though it had been built that way. The job was complicated because I had to modify the granite counter and base cabinet in place. It was more like kitchen surgery than remodelling.
My plan was to remove the ovens and the oven cabinet, as well as the upper cabinet to the right and the drawers below it, then to resize the upper cabinet and cut 3 in. from the counter and face frame below. If I worked carefully, the new oven cabinet would fit like a glove in the newly expanded space.
Ovens out, electrical in
First, I protected the area by taping down Ram Board on the floor, setting up Zip-Wall barriers in doorways, and taping 4-mil plastic over all the cabinets. I also checked the electrical requirements before the work began. Two new circuits were needed, and fortunately, there was a subpanel in the kitchen area that I could easily tap into. This made it a one-day rough-in for the electrician. If we had needed to run the circuit from the main house panel, I would have had the electrician run it into the attic space above the kitchen before the demolition began to minimize any disruption to the homeowner.
Next, I removed the existing ovens and cut apart the cabinet to make them easier to pull out. After the electrician roughed in the new outlets, I patched and primed the drywall behind the cabinets.
Cutting a granite counter in place
If the countertop had been short, I would have pulled it out and had it cut off site. Because the countertop extended around a corner, though, I thought that removing it was too risky. If the counter broke, it would be impossible to find a slab that matched.
I hired a granite fabricator, who arrived with an angle grinder fitted with a diamond blade. I thought he would use a saw and straightedge guide, but he was more comfortable cutting the joint by hand. He drew his mark on a strip of painters’ tape and carefully cut along the line. Another method would have been to use a small circular saw and an edge guide, but the final couple of inches would still have had to be cut with an angle grinder or a similar tool.
Reducing the cabinets’ width
Of the two cabinets to be modified and reused, the upper was easier. I unscrewed it from the wall and took it back to my shop, where I used a tablesaw, a small circular saw, and a straightedge to cut it down. Because the base cabinet was supporting the countertop, I left it in place and did the modification on site.
For more photos and details, click the View PDF button below: