FHB Logo Facebook LinkedIn Email Pinterest Twitter Instagram Plus Icon Close Icon Navigation Search Icon Arrow Down Icon Video Guide Icon Article Guide Icon Modal Close Icon Guide Search Icon Skip to content
Main Menu
Subscribe

In every issue you'll find...

  • Expert insights on techniques and principles
  • Unbiased tool reviews
  • Step-by-step details to master the job
  • Field-tested advice and know-how
Subscribe Now!
Subscribe
  • How-To
  • Design
  • Tools & Materials
  • Videos
  • Blogs
  • Forum
  • Magazine
  • Members
  • FHB House
  • Podcast
  • Join
  • Log In
Main Menu Subscribe
How-To

Install Wood Flooring Series: Racking the Floor

Spread out all of your flooring in advance for an even distributions of colors and textures.

By Charles Peterson

Place all of the flooring before nailing your first board to get the most uniform look possible.

Video Transcript:

To lay the first line, pick the straightest boards you have. Use longer lengths, when possible, so you won’t have to nail down a million small boards. Take the first board and line it up right against the temporary board used as a stop. After you lay down a few boards, go back and adjust them to the line.

When looking for a board for the end, you want something that has at least a foot left over or one that only needs a couple of inches cut off—otherwise you end up wasting wood. When you mark the board for cutting, you want to keep the female groove to fit into the male. Turn the board around and cut off the clearance from the wall, and then lay it down.

Now start aligning and fastening the first row. The first nail goes at the back of the board, at the beginning by the stop, about 1 to 3 inches from the end. Then nail every 3 to 4 inches along the top of the boards. After, you’ll blind-nail from the side.

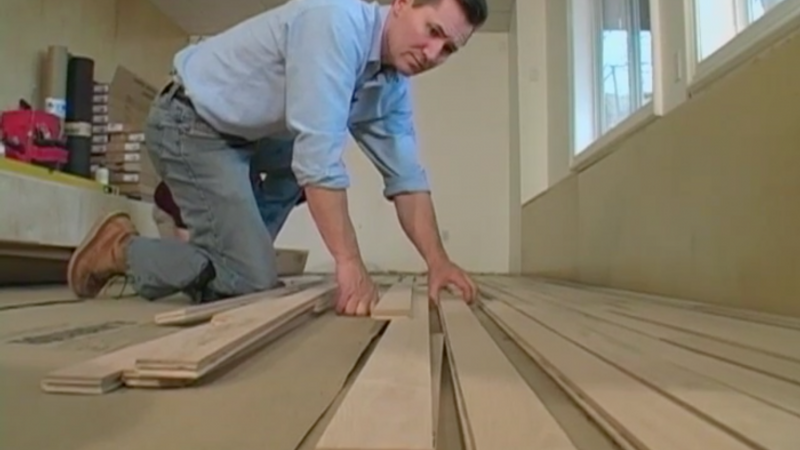
The next step in laying the floor is called “racking.” Take the boards from three or four boxes and start laying them out like a giant jigsaw puzzle. This method allows you to take the color variations from the different boxes and mix them all in. When you’re done racking the floor, you can stand back before nailing and check all the joints to make sure they’re staggered the way you want. Strip flooring comes in boxes of mixed lengths, ranging from a foot to 7 feet. When it’s all put together, it’ll look like a giant mosaic of wood.

Lay down the second row far enough away from the first row so that you’ll have room to nail and push the next boards in. The joints should be closer than 6 inches. There are things to watch out for. If you take the flooring and set it up so that the ends are graduated, like a staircase, it’s not aesthetically pleasing, but it also makes a very weak joint. Another thing to avoid is called “H’s”; that’s when two boards are even, but a board in the middle of them extends past them. It’s not visually appealing.

As you put down the boards, start by lining them up with the stop. Then look for boards that will fill in the empty spaces. This might seem like it takes a long time, but it’s the most efficient way of laying the floor. Nailing one board at a time and then searching for just the right one would take you forever. My method lets you stand back before the floor is finished and look for color variations, nailing patterns, and problems that might not be seen when you’re kneeling on the floor.

When you get to the end of each row, take out the board and turn it around. You want to keep the female groove, so don’t cut that end off. If a board is fractured, don’t use it in the middle of the floor. Try to use it at the end, where you can cut off the fractured piece. Don’t use a board that is a lot darker than the others in the middle of the floor, either. It’ll stand out.

Once you’ve racked out most or all of the room, look for damaged boards or boards that are a different color from all the rest, and check out the nailing patterns. At the end of the floor, use a spacer to give the right clearance from the wall. Mark the end boards in place and then take each one to the circular saw to cut it. Be sure to number the boards so that you can place them back where they belong.

In this members-only video series:

  • Series Introduction
  • Getting Ready
  • Laying Out Flooring
  • Racking the Floor
  • Nailing the Floor
  • Surfacing Equipment (Bonus Free Video)
  • Belt Sanding
  • Edging and Finish Sanding
  • Staining
  • Finishing
  • Floor Maintenance (Bonus Free Video)

Sign up for eletters today and get the latest how-to from Fine Homebuilding, plus special offers.

Sign Up

Get home building tips, offers, and expert advice in your inbox

×
X
X

New Feature

Fine Homebuilding Forums

Ask questions, offer advice, and share your work

Log in or create an account to post a comment.

Sign up Log in

Become a member and get full access to FineHomebuilding.com

Up Next

Featured Story

carpenter installing ICF foundation forms

Benefits of Building with ICFs

Builder Josh Salinger explains how and why he's creating the foundation for this new energy-efficient home out of insulated concrete forms.

Featured Video

SawStop's Portable Tablesaw is Bigger and Better Than Before

The 10-in. Jobsite Saw PRO has a wider table, a new dust-control port, and a more versatile fence, along with the same reliable safety mechanism included in all SawStop tablesaws.

Related Stories

  • How To Get Pet Stains Out of Oak

  • Interior Finishes for a Cabin in the Woods

  • Framing Floors and Stairs with Larry Haun

  • Dead-Flat Bathroom Floor

Discussion Forum

Recent Posts and Replies

  • |
  • |
  • |
  • |
  • |
  • |
View More Create Post

Highlights

  • Fine Homebuilding All Access
  • Fine Homebuilding Podcast
  • Tool Tech

    Plus, get an extra 20% off with code GIFT20

  • "I have learned so much thanks to the searchable articles on the FHB website. I can confidently say that I expect to be a life-long subscriber." - M.K.

    Get home building tips, offers, and expert advice in your inbox

    Sign Up See all newsletters

Video

View All
  • Shower niche

    Interior Finishes for a Cabin in the Woods

  • Framing Floors and Stairs with Larry Haun

  • Podcast 184: Insulating an All-Brick House, Working with Engineered Siding, and Carpentry as a Second Career

  • contractors working on subfloor installation

    Squeak-Free Subfloor Installation

View All

Floors and Coverings

View All
  • Dead-Flat Bathroom Floor

  • Floating Hardwood Floor with Unmatched Advantages

  • Patching a Hardwood Floor

    2 Methods for Patching a Hardwood Floor

  • Nearly Invisible Floor Finish

View All

BOOKS, DVDs, & MERCH

Shop the Store
  • 2020 Fine Homebuilding Archive

    Buy Now
  • Fine Homebuilding Magazine Slipcase

    Buy Now
  • Code Check Building 4th Edition

    Buy Now
  • Musings of an Energy Nerd

    Buy Now
  • Shop the Store

Fine Homebuilding Magazine

  • Issue 297 - Feb/Mar 2021

    • Foundations for Success
    • Staircase Renovation
    • Ditch the Hose
  • Issue 296 - Dec 2020/Jan 2021

    • Insulating Glass Keeps Getting Better
    • Simple Way to Make Old Walls Straight and Plumb
    • Making Sense of Minisplits
  • Issue 295 - Kitchens & Baths

    • Condo Kitchen Reimagined
    • Row-House Remodel
    • Rise of the IAQ Monitor
  • Issue 294 - Oct/Nov 2020

    • Schoolhouse Reimagined
    • Tool Test: Folding Sawhorses
    • A Better Way to Build Tall Walls
  • Issue 293 - Aug/Sept 2020

    • A Practical Guide to Fall Protection
    • Installing Frameless Cabinets
    • Make Any Tablesaw Safer

Fine Homebuilding

Follow

Newsletter

Get home building tips, offers, and expert advice in your inbox

Sign Up See all newsletters

Membership & Magazine

  • Online Archive
  • Start Free Trial
  • Magazine Subscription
  • Magazine Renewal
  • Gift a Subscription
  • Customer Support
  • Manage Preferences

Taunton Network

  • Green Building Advisor
  • Fine Woodworking
  • Fine Gardening
  • Threads
  • About
  • Contact
  • Advertise
  • Privacy Policy
  • Careers
  • Copyright
  • Terms of Use
  • Accessibility
  • CA Privacy Rights

© 2021 The Taunton Press, Inc. All rights reserved.

    Main Menu

  • How-To
  • Design
  • Tools & Materials
  • Video
  • Blogs
  • Forum
  • Reader Projects
  • Magazine
  • Members
  • FHB House
  • Podcasts

  • FHB Podcast
  • ProTalk
  • Account

  • Log In
  • Join

    Podcasts

  • FHB Podcast
  • ProTalk
  • Popular Topics

  • Kitchens
  • Business
  • Bedrooms
  • Roofs
  • Architecture and Design
  • Green Building
  • Decks
  • Framing
  • Safety
  • Remodeling
  • Bathrooms
  • Windows
  • Tilework
  • Ceilings
  • HVAC

    Magazine

  • Current Issue
  • Past Issues
  • Magazine Index
  • Subscribe
  • Online Archive
  • Author Guidelines

    All Access

  • Member Home
  • Start Free Trial
  • Gift Membership

    Shop the Store

  • Books
  • DVDs
  • Taunton Workshops

    More

  • FHB Ambassadors
  • Reader Projects
  • Podcast
  • Customer Support

    Account

  • Log In
  • Join

Newsletter

Get home building tips, offers, and expert advice in your inbox

Sign Up See all newsletters

Follow

Join All Access

Become a member and get instant access to thousands of videos, how-tos, tool reviews, and design features.

Start Your Free Trial

Subscribe

FHB Magazine

Start your subscription today and save up to 52%

Subscribe

We hope you’ve enjoyed your free articles. To keep reading, become a member today.

Get complete site access to expert advice, how-to videos, Code Check, and more, plus the print magazine.

Start your FREE trial

Already a member? Log in