21st Century Post-and-Beam Barn
Modern hardware takes the place of time-consuming traditional timber-framing joinery in this 14x20 barn.

Synopsis: This article, an excerpt from the forthcoming book Building Sheds (The Taunton Press), details a modern approach to building a traditional 14×20 timber-frame barn. Rather than relying on mortise-and-tenon joinery, this structure is fastened together with simple-to-use commercial connectors. Pine siding completes the traditional look.
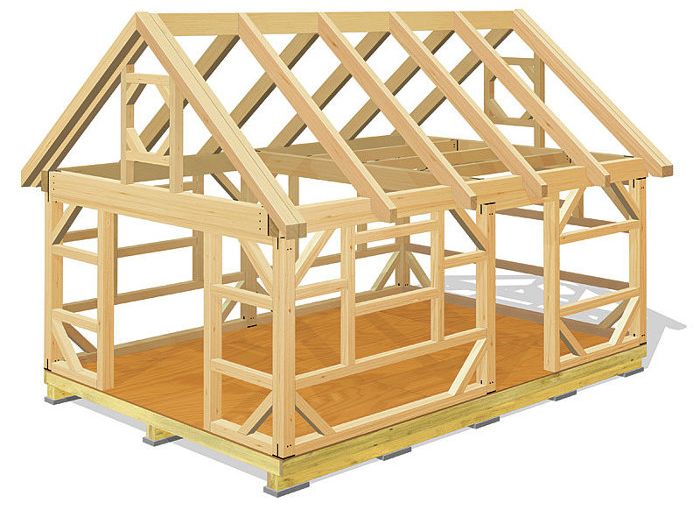
Unlike in a traditional post-and-beam structure, there’s not a single mortise-and-tenon or scarf joint in this whole barn. Built on a conventional 2×6 floor, the frame is assembled with metal fasteners called T-Rex connectors. Each connector’s flange is screwed to a supporting member, and its leg slides into a post or beam with a slot cut to receive it. These joints are held together with aluminum pins. This modern construction method might not impress timber-frame purists, but it does provide a quick and strong way to build a beautiful post-and-beam barn.
While it’s attractive on the outside, what makes this barn truly special is what’s visible on the inside: an exposed frame of large white-pine timbers that would warm the heart of any barn builder. Rough-sawn timbers, sometimes called “green” lumber, are cut to full dimension; a rough-sawn 6×6 post actually measures 6 in. by 6 in. Nominal-dimension lumber is milled and surfaced to slightly smaller sizes, so a nominal 6×6 is only 5 1⁄2 in. sq., and a nominal 4×4 is 3 1⁄2 in. sq.
You aren’t likely to find large timbers such as those used in this structure at home centers or at most lumberyards, so you’ll probably have to find a local sawmill to cut them. Most rural areas in forest country have a few such sawmills. Sources to help find them include woodweb.com and woodmizer.com. It’s likely that these web sources don’t come close to representing every local sawyer, so it may also be worth asking folks at lumberyards and with tree services (who may sell logs to mills). Many of these sawmills are low-tech operations, both in their equipment and in their marketing. For example, I only know when my local sawyer is open when I see that the cable he closes his driveway with is down. One advantage of finding a local sawyer is that, because the material hasn’t been marked up in price three times before you ever get a sniff of pine resin, it’s likely to be a comparative bargain.
On-grade footings and a conventional floor
Our local building department allowed us to build this 280-sq.-ft. barn on an on-grade foundation, meaning that we didn’t have to dig down to the frost line. Other jurisdictions may require different footings, so check with your local building department. Here, dry-stacked 2-in. solid concrete blocks support a conventionally-framed floor system. The blocks are placed in holes dug through the topsoil to the underlying subsoil. They stick at least 4 in. out of the ground so that the framing isn’t in contact with the dirt.
Raise the posts
Six 6×6 posts support the roof — one on each corner and at the middle of the two 20-ft.-long walls — and these are fastened to the floor below and the beams above with T-Rex connectors. Other posts used to frame door and window openings are simply toe-screwed in place. Large-capacity saws, which are available at most tool-rental dealers, are needed to cut the timbers accurately. We used three different saws, depending on the size of the timbers. We cut the rafters, ridge beam, diagonal braces, and other smaller timbers with a 12-in. sliding compound-miter saw or a 10-in. Big Foot circular saw. We cut the larger posts and beams to length with a Prazi Beam Cutter, a chainsaw fixture attached to a circular saw. We also used this fixture to cut slots in the ends of the posts and beams for the metal connectors.
For more photos, drawings, and details, click the View PDF button below:
Fine Homebuilding Recommended Products
Fine Homebuilding receives a commission for items purchased through links on this site, including Amazon Associates and other affiliate advertising programs.

Stabila Extendable Plate to Plate Level

Protective Eyewear

Speed Square


View Comments
The concept and shed are a nice idea with interesting appeal. Unfortunately several key elements are not provided in the article. I live in WA state and most County's/City's require building permits for any structure over 200 sf. Permits require stamped plans. Is the T-Rex system accepted by Planning Departments meeting code? Also foundations here require a base below 12" for frost penetration. I'm sure there are areas with deeper design requirements. The ground supported system will not meet code. Lastly an approximate building cost per sf or range would be very helpful for the reader before getting too excited about this shed as a project. Costs vary by area but general rules can be presented or the cost for the shed at the constructed location would be helpful.
Keep up the nice work but please finish the projects with what an owner will need to know before getting a contractor or architect.
I edited the article, and you ask some difficult questions. As to whether the T-Rex is accepted everywhere, I can't answer. An engineer's stamp on the drawings will usually fix that kind of issue. Our building departments in the rural bits of New England tend to be a little less restrictive than in other parts of the country. You should contact T-Rex and ask for their help with code compliance. As to the footings, again, that's a regional issue. It's only an outbuilding, so the local building department didn't have an issue with the footings as built. Is that the best approach? Probably not. As a practical matter for a shed? Probably fine. Pricing is another regional issue. Contractors in CT probably charge differently from those in Washington or in Arkansas, or indeed, from the their own local competition. And because the materials were locally sourced, what we might say about their price here is likely to have little resemblance to what you'll find where you live. Sorry, but sometimes the reader will have to do some legwork to adapt a project to a different area. Also, in some cases, either the homeowner or the contractor doesn't want to say the cost of a project. We'll try to find out, but in the end, the value of that information is questionable and we sometimes let it go.
save yourself "down the line" headache by using an entire pressure treated floor system including plywood and space your floor joists at 12 inches on center for a solid no-bounce floor !!!