FHB Logo Facebook LinkedIn Email Pinterest Twitter Instagram Plus Icon Close Icon Navigation Search Icon Navigation Search Icon Arrow Down Icon Video Guide Icon Article Guide Icon Modal Close Icon Guide Search Icon Skip to content
Subscribe

In every issue you'll find...

  • Expert insights on techniques and principles
  • Unbiased tool reviews
  • Step-by-step details to master the job
  • Field-tested advice and know-how
Subscribe Now!
Subscribe
  • How-To
  • Design
  • Tools & Materials
  • Videos
  • Blogs
  • Forum
  • Magazine
  • Members
  • FHB House
  • Podcast
  • Join
  • Log In
Subscribe

Discussion Forum

Discussion Forum

Deco rafter tail with trusses

| Posted in Construction Techniques on October 28, 2002 06:32am

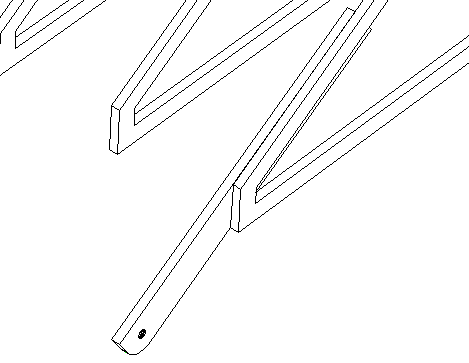
I want an exposed-sheathing-open-eave look with the rafter tails decoratively cut at the ends.  I plan to use roof trusses, and wonder if this is the way to do it.  The attached pic shows a 5/0 long 2×8 with the end detail I want, sistered to the truss, whose heel height matches the 8/12 pitch 2×8.  Is there an easier way? 

Reply

Replies

  1. UncleDunc | Oct 28, 2002 07:44pm | #1

    I'll bet a dollar you can get trusses with that much overhang and just cut the detail on site.

    1. User avater
      BossHog | Oct 28, 2002 08:12pm | #2

      You may or may not get a truss company to put a 2X8 top chord on the trusses so you can cut a detail. They may not want the liability of knowing that you're going to cut them.

      Of course - What they don't know won't hurt them..................(-:If it wasn't for plumbers, you'd have no place to go.

  2. Piffin | Oct 29, 2002 12:25am | #3

    I would try to get 2x8 top chords too. What you show is a cantilever that would probably need some engineering to hang out five feet l;ike that - or did you mean that it is five feet long with a two foot overhang?

    Just curious about what appears to be a hole at the end. I used something like that on mine. Different profile and it was on 4x8 timbers but I sunk a hole 1/2" in each and glued in a dowel between them as I was setting them. It serves for all my wife's decorations and hanging hooks for bird feeders and wind chimes. I also imagined that I might hang a shade clothe or awning from it in front of windows in sumer but that never happened.

    .

    Excellence is its own reward!

    1. r_ignacki | Oct 29, 2002 12:57am | #4

      I'd do it the other way, probably because I'm used to string line across the tails to line them up, hangingout five feet ain't gonna happen. Plus you could whack the flat tail to move the truss into alignment. And I don't know if you need to offset any around a fireplace or something, one or two seperate pieces could be mounted/ hung off a short header between trusses if  equidistant spacing was desired.listening for the secret.......searching for the sound...

      1. Boxduh | Oct 29, 2002 01:49am | #5

        The overhang is two feet.  My first thought was to whack 10/0 2x8s and use a 5/0 at each tail, sistering up about 2/10 or 2/11 against the truss chord.  I can whack 12s or 14s, to sister up higher if required.  The 2x8 tail is bored through with a decorative hole as shown in the pic.  Drawings show stick-frame; I think it can be trussed more economically, but I want to retain the look.  The bottom side of the roof sheathing will be seen from below, and although painted dark and in shadow, I am thinking of using 1x t&G pine boards at the overhangs, using 5/8 CDX sheathing on the trusses.  If I do it this way, I will have the truss engineer tweak the heel height a teenie bit so my 2x8 tops are dropped the 1/8-inch difference needed, to flush up the ply and 1x pine.

        1. Boxduh | Oct 29, 2002 05:09pm | #6

          Here is a new thought.  The o'hang is two feet.  Spec the trusses with two foot tails, straight cut, not plumb cut.  Shop-make the "tail scab" sandwiches as shown in the attached pic, use two pieces no-groove 3/8 T-111 and a piece of a 2x6 for each.  Put them together with a little gorilla glue and some SS trim screws, and prefinish with the dark brown exterior stain.  Slip one on each rafter tail, use same glue and screws to fasten, and touchup stain the end of the truss tail to match.  Comments?

  3. MJLonigro | Oct 29, 2002 11:23pm | #7

    Why not false frame the tails?? Have the trusses made so they are flush with the sidewall, then scab the tails on to a 1x that gets screwed on to the sidewall.

    Same look, no messing with the trusses.

    Just a thought..

    1. Boxduh | Oct 30, 2002 12:04am | #8

      I have a 60 psf snow load to consider in my roof structure, and my cantilevered eaves had better hold up when things get heavy.

  4. Framer | Oct 30, 2002 12:24am | #9

    Gene,

    The first picture you have is the way that I would do it. I would just adjust your hap cut/heel cut so that the top of your 2x8 is 3/4 lower then the top of your trusses.

    Maybe add a 2x8 perpedicular at the top end of your tail for added support in between the trusses. Or a 2x4 perp from the bottom of one tail to the other.

    I assume your using a 1x6 T&G or Beadboard so you can nail that on first and the top of that will be even with your trusses, then you can sheath right over your 1x6 and continue your way up the roof.

    With 3/4" 1x6 & 5/8" sheathing together you don't have worry about roof nails sticking threw the sheathing for your open soffit.

    Just a thought.

    Joe Carola

Log in or create an account to post a comment.

Sign up Log in

Become a member and get full access to FineHomebuilding.com

Video Shorts

Categories

  • Business
  • Code Questions
  • Construction Techniques
  • Energy, Heating & Insulation
  • General Discussion
  • Help/Work Wanted
  • Photo Gallery
  • Reader Classified
  • Tools for Home Building

Discussion Forum

Recent Posts and Replies

  • |
  • |
  • |
  • |
  • |
  • |
View More Create Post

Up Next

Video Shorts

Featured Story

Detailed Assemblies for an Airtight Small Home

Drawings and details for building a high-performing slab-on-grade foundation, double-stud wall, and truss roof with nontoxic materials

Featured Video

Micro-Adjust Deck-Baluster Spacing for an Eye-Deceiving Layout

No math, no measuring—just a simple jig made from an elastic band is all you need to lay out a good-looking deck railing.

Related Stories

  • Designer Kitchen Cabinets on a Budget
  • Podcast 459: Leaky Attic Stairs, Right-Sizing Heat Pumps, and Vapor Barriers in Dirt Crawlspaces
  • Linda Reeder: Architect, Professor, and Author
  • Podcast 458: PRO TALK With Glue Expert Bob Behnke

Highlights

Fine Homebuilding All Access
Justin Fink Deck Building Course announcement
Tool Tech
Plus, get an extra 20% off with code GIFT20

"I have learned so much thanks to the searchable articles on the FHB website. I can confidently say that I expect to be a life-long subscriber." - M.K.

Get home building tips, offers, and expert advice in your inbox

Sign Up See all newsletters

BOOKS, DVDs, & MERCH

Shop the Store
  • 2021 Fine Homebuilding Archive
    Buy Now
  • Outdoor Projects
    Buy Now
  • Tool Guide 2022
    Buy Now
  • Code Check Building 4th Edition
    Buy Now
  • Shop the Store

Fine Homebuilding Magazine

  • Issue 307 - June 2022
    • How to Raise a Post-Frame Home
    • Trimming Deck Stairs
    • Evolving an Energy-Efficient Envelope
  • Issue 306 - April/May 2022
    • Framing Stairs to an Out-of-Level Landing
    • Building a Zero-Energy Home for Less
    • Good-Looking and Long-Lasting Traditional Gutters
  • Issue 305 - Feb/March 2022
    • The Steady Surge in Residential Solar
    • The Fine Homebuilding Interview: William B. Rose
    • How Good Is Your Air Barrier?
  • Issue 304 - Dec 2021/Jan 2022
    • Why You Need Blower-Door Testing
    • Passive-House Standards for Everyone
    • Window Replacement With a Side of Rot Repair
  • Issue 303 - November 2021
    • Compact Cordless Miter Saws
    • Maximize Space with Thoughtful Built-Ins
    • 10 Essentials for Quality Trim Carpentry

Fine Homebuilding

Follow

  • twitter
  • facebook
  • instagram
  • pinterest

Newsletter

Get home building tips, offers, and expert advice in your inbox

Sign Up
This site is protected by reCAPTCHA and the Google Privacy Policy and Terms of Service apply.
See all newsletters

Membership & Magazine

  • Online Archive
  • Start Free Trial
  • Magazine Subscription
  • Magazine Renewal
  • Gift a Subscription
  • Customer Support
  • Privacy Preferences

Taunton Network

  • Green Building Advisor
  • Fine Woodworking
  • Fine Gardening
  • Threads
  • About
  • Contact
  • Advertise
  • Careers
  • Copyright
  • Terms of Use
  • Site Map
  • Do not sell my information
  • Privacy Policy
  • Accessibility
  • California Privacy Rights

© 2022 The Taunton Press, Inc. All rights reserved.

X
X
This is a dialog window which overlays the main content of the page. The modal window is a 'site map' of the most critical areas of the site. Pressing the Escape (ESC) button will close the modal and bring you back to where you were on the page.

Main Menu

  • How-To
  • Design
  • Tools & Materials
  • Video
  • Blogs
  • Forum
  • Reader Projects
  • Magazine
  • Members
  • FHB House

Podcasts

  • FHB Podcast
  • ProTalk

Webinars

  • Upcoming and On-Demand

Account

  • Log In
  • Join

Podcasts

  • FHB Podcast
  • ProTalk

Webinars

  • Upcoming and On-Demand

Popular Topics

  • Kitchens
  • Business
  • Bedrooms
  • Roofs
  • Architecture and Design
  • Green Building
  • Decks
  • Framing
  • Safety
  • Remodeling
  • Bathrooms
  • Windows
  • Tilework
  • Ceilings
  • HVAC

Magazine

  • Current Issue
  • Past Issues
  • Magazine Index
  • Subscribe
  • Online Archive
  • Author Guidelines

All Access

  • Member Home
  • Start Free Trial
  • Gift Membership

Shop the Store

  • Books
  • DVDs
  • Taunton Workshops

More

  • FHB Ambassadors
  • Reader Projects
  • Podcast
  • Customer Support

Account

  • Log In
  • Join

Newsletter

Get home building tips, offers, and expert advice in your inbox

Sign Up See all newsletters

Follow

  • twitter
  • facebook
  • instagram
  • pinterest

Join All Access

Become a member and get instant access to thousands of videos, how-tos, tool reviews, and design features.

Start Your Free Trial

Subscribe

FHB Magazine

Start your subscription today and save up to set_percent%

Subscribe

We hope you’ve enjoyed your free articles. To keep reading, become a member today.

Get complete site access to expert advice, how-to videos, Code Check, and more, plus the print magazine.

Start your FREE trial

Already a member? Log in