FHB Logo Facebook LinkedIn Email Pinterest Twitter Instagram Plus Icon Close Icon Navigation Search Icon Navigation Search Icon Arrow Down Icon Video Guide Icon Article Guide Icon Modal Close Icon Guide Search Icon Skip to content
Subscribe
Log In
  • How-To
  • Design
  • Tools & Materials
  • Videos
  • Blogs
  • Forum
  • Magazine
  • Members
  • FHB House
  • Podcast
Log In

Discussion Forum

Discussion Forum

how to laminate a curved shoe molding

riverman | Posted in Photo Gallery on April 17, 2007 02:53am

<!—-><!—-> <!—-><!—-><!—-><!—-> <!—-><!—-><!—-><!—-><!—-> <!—-><!—-><!—-><!—-><!—-> <!—-><!—-><!—-><!—-><!—-> <!—-><!—-><!—-><!—-><!—-> <!—-><!—-><!—-><!—-> <!—-><!—-><!—-> <!—-><!—-><!—-> <!—-><!—-><!—-><!—-><!—-><!—-><!—->

Thought I would share my method of fabricating a curved molding.


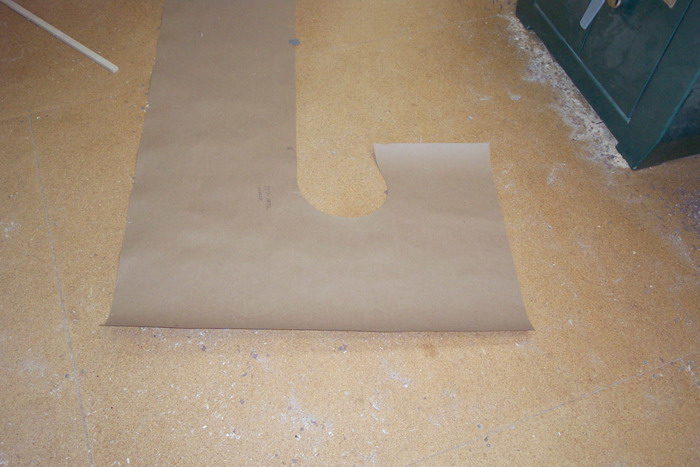
On occasion a client will need a curved shoe molding for a remodel project. In most cases the curved starting riser is anything but a perfect circle. That said I usually request the customer provide us with a full-scale template outlining the curve as it will be used in its final application. Photo 1 shows a customer provided paper template. Note the off round nature of the curve.

View Image

Reply

Replies

  1. riverman | Apr 17, 2007 02:54am | #1

    With a full-scale template it’s a simple matter to trace the outline on a section of ¾ plywood and cut the profile on the band saw.

    View Image

    1. riverman | Apr 17, 2007 02:56am | #2

      Once the wood pattern is cut I drill a series of 1-1/2 inch holes around the perimeter of the curve. The holes allow me to use spring clamps to force the laminates against the form.

      View Image

      1. riverman | Apr 17, 2007 02:57am | #3

        The curved pattern, along with the remaining straight tail is now screwed to the shop floor.

        View Image

        1. riverman | Apr 17, 2007 02:59am | #4

          <!----><!----><!----><!----><!----><!----><!----><!----><!----><!----><!----><!----><!----><!----><!----><!----><!----><!----><!----><!----><!----><!----><!----><!----><!----><!----><!----><!----><!----><!----><!----><!----><!----><!----><!----><!---->

          <!----><!----><!----><!----><!----><!----><!---->Once the bending jig has been fastened to the floor I measure out the length of the laminates. This molding has a finished profile dimension of 5/8 x 3/4 and 80 inches long including the length waste factor. This is a fairly tight radius so I opted for 8 plies of  .08 thick red oak. Spring back is always a concern; eight ply’s works well for this application, harder wood such as maple may require 10 plies. Prior to ripping the stock I mark a “V” reference line on one edge enabling me to re-stack the laminates in the same order for the best possible grain match. 


          1. riverman | Apr 17, 2007 03:02am | #5

            Once the laminates are sized and the edges de-fuzzed I stack the strips in the proper order and proceed to apply the glue. For stressed laminations my first choice of adhesives is Unibond 800, a powder catalyst resin based glue. Mixed at a ratio of 1 part catalyst to ten parts resin gives me about 45 minutes open time. I apply a thin uniform coat to both faces of the joint. The glue spreader is nothing more than a section of paint pad cut to size and tacked to a small wood block Cheap, fast and does the job nicely


            View Image


            View Image

          2. riverman | Apr 17, 2007 03:04am | #6

            Once all the strips have been coated I wrap the entire bundle with stretch wrap. Stretch wrap is pretty indispensable in lamination work.  It has the unique ability to keep all the plies in line yet still allow for individual longitudinal slippage as the stack is bent around the form.


            View Image

          3. riverman | Apr 17, 2007 03:05am | #7

            I’ll start on the tight end of the bend, clamping the wood to the form with one pony clamp. This is a simple bend so I work the long end of the laminate with my left hand while applying spring clamps into the fixture holes with the other hand. 

          4. riverman | Apr 17, 2007 03:07am | #8

            An assortment of clamps are used to complete the operation

            View Image

          5. riverman | Apr 17, 2007 03:09am | #9

            I try to time the gluing procedure so the glue has time to set up over night. Once the clamps are removed you can see how little spring back there is, about an 1/8 inch on the open end of the bend. The small amount can easily be pulled into place during the install.


            View Image

          6. riverman | Apr 17, 2007 03:11am | #10

            Notice how the stretch wrap contains the glue. No big drips and globs of hardened clue to contend with during machining operations.

            View Image

          7. riverman | Apr 17, 2007 03:13am | #11

            A wide belt sander makes quick work of truing up the faces of the molding. A belt sander or angle grinder fitted with a sanding disk would also do the job.

             View Image

          8. riverman | Apr 17, 2007 03:14am | #12

            I use a trim router to mill the round over. Note the stabilizer block attached to the underside of the router.

            View Image

          9. riverman | Apr 17, 2007 03:16am | #13

            A drill press mounted pneumatic drum sander cleans up the remaining tool marks and preps the surface for finishing.

            View Image

          10. riverman | Apr 17, 2007 03:18am | #14

            There you have it, a shepherds cane worthy of Little Miss Bo Peep. In real time, not counting the glue drying, this project took about two hours.

            View Image

          11. TomW | Apr 17, 2007 05:19am | #16

            Thanks, great series. I gotta get some of that wrap.

          12. jimblodgett | Apr 17, 2007 05:26am | #17

            That's some mighty fine homebuilding right there, Riverman.  Great technique (and nice photo essay, too). Thanks.Remodeling contractor who once visited the Glass City.

          13. BillBrennen | Apr 17, 2007 05:32am | #18

            Thanks for the lesson. That plastic wrap trick is very cool; I'll be using that for certain.Bill

          14. calvin | Apr 17, 2007 05:43am | #19

            Hey Armin, 

            One more for the hit parade.

            thanks.A great place for Information, Comraderie, and a sucker punch.

            Remodeling Contractor just outside the Glass City.

            http://www.quittintime.com/


          15. oldbeachbum | Apr 17, 2007 08:43am | #20

            Thank you. 

            That's why I enjoy this site and these threads so much.  The photo presentation makes me feel as though I am watching over your shoulder.  ...The unspoken word is capital. We can invest it or we can squander it.  -Mark Twain...

            Be kind to your children....they will choose your nursing home.

            ...aim low boys, they're ridin' shetland ponies !!

  2. IdahoDon | Apr 17, 2007 05:11am | #15

    The plastic wrap is a great idea!  Never heard that one before, but makes a great deal of sense.

    Great pictures.


    Beer was created so carpenters wouldn't rule the world.

  3. seeyou | Apr 17, 2007 02:46pm | #21

    Armin - thanks for posting that. Very Kewl.

    http://grantlogan.net/

  4. gzajac | Apr 17, 2007 06:26pm | #22

    Thanks for the effort in posting this educational series you are what fine homebuilding is all about. How would you make the riser that goes with that shoe moulding?

    Thanks for the education

    Greg in Rainy Connecticut

    1. riverman | Apr 18, 2007 03:20am | #23

      "How would you make the riser that goes with that shoe moulding?"Check out my thread in the photo section titled Birch Iron & Rustic Maple staircase post #12 April 4.Edited 4/17/2007 8:21 pm ET by riverman

      Edited 4/17/2007 8:22 pm ET by riverman

      1. riverman | Apr 18, 2007 03:22am | #24

        Thanks one and all I'm glad you found it informative.

Log in or create an account to post a comment.

Sign up Log in

Become a member and get full access to FineHomebuilding.com

Video Shorts

Categories

  • Business
  • Code Questions
  • Construction Techniques
  • Energy, Heating & Insulation
  • General Discussion
  • Help/Work Wanted
  • Photo Gallery
  • Reader Classified
  • Tools for Home Building

Discussion Forum

Recent Posts and Replies

  • |
  • |
  • |
  • |
  • |
  • |
View More Create Post

Up Next

Video Shorts

Featured Story

Behind the Scenes of a Concrete Batch Plant

The batch plant is your partner in getting high-quality concrete on your job site.

Featured Video

How to Install Cable Rail Around Wood-Post Corners

Use these tips to keep cables tight and straight for a professional-looking deck-railing job.

Related Stories

  • Podcast 548: PRO TALK With Design/Build Operations Manager Jessica Bishop-Smyser
  • Strategies for Venting a Roof Valley
  • Podcast 547: Basement Insulation, Historic Preservation Resources, and Shipping Container ADUs
  • Podcast 547: Members-only Aftershow—Fine Homebuilding House memories

Highlights

Fine Homebuilding All Access
Fine Homebuilding Podcast
Tool Tech
Plus, get an extra 20% off with code GIFT20

"I have learned so much thanks to the searchable articles on the FHB website. I can confidently say that I expect to be a life-long subscriber." - M.K.

Get home building tips, offers, and expert advice in your inbox

Signing you up...

This site is protected by reCAPTCHA and the Google Privacy Policy and Terms of Service apply.
See all newsletters
See all newsletters

BOOKS, DVDs, & MERCH

Shop the Store
  • 2022 Fine Homebuilding Archive
    Buy Now
  • Pretty Good House
    Buy Now
  • Code Check Building 4th Edition
    Buy Now
  • 2023 Tool Guide
    Buy Now
  • Shop the Store

Fine Homebuilding Magazine

  • Issue 314 - April/May 2023
    • 7 Options for Countertops
    • Tool Test: Wood-Boring Bits
    • Critical Details for Ductless Heat Pumps
  • Issue 313 - Feb/March 2023
    • Practical System for a Seismic Retrofit
    • Fine Homebuilding Issue #313 Online Highlights
    • Practical System for a Seismic Retrofit
  • Issue 312 - Dec 2022/Jan 2023
    • Tool Test: Cordless Tablesaws
    • Gray-Water System for a Sustainable Home
    • Insulate a Cape Roof to Avoid Ice Dams
  • Issue 311 - November 2022
    • 7 Steps to a Perfect Exterior Paint Job
    • Options for Smarter Home-Energy Tracking
    • The Fine Homebuilding Interview: James Metoyer
  • Issue 310 - October 2022
    • Choosing a Tile-Leveling System
    • Choosing Between HRVs and ERVs
    • Custom Built-in Cabinets Made Easy

Fine Homebuilding

Follow

  • twitter
  • facebook
  • instagram
  • pinterest

Newsletter

Get home building tips, offers, and expert advice in your inbox

Signing you up...

This site is protected by reCAPTCHA and the Google Privacy Policy and Terms of Service apply.
See all newsletters
See all newsletters

Membership & Magazine

  • Online Archive
  • Start Free Trial
  • Magazine Subscription
  • Magazine Renewal
  • Gift a Subscription
  • Customer Support
  • Privacy Preferences

Taunton Network

  • Green Building Advisor
  • Fine Woodworking
  • Fine Gardening
  • Threads
  • About
  • Contact
  • Advertise
  • Careers
  • Copyright
  • Terms of Use
  • Site Map
  • Do not sell or share my information
  • Privacy Policy
  • Accessibility
  • California Privacy Rights

© 2023 The Taunton Press, Inc. All rights reserved.

X
X
This is a dialog window which overlays the main content of the page. The modal window is a 'site map' of the most critical areas of the site. Pressing the Escape (ESC) button will close the modal and bring you back to where you were on the page.

Main Menu

  • How-To
  • Design
  • Tools & Materials
  • Video
  • Blogs
  • Forum
  • Reader Projects
  • Magazine
  • Members
  • FHB House

Podcasts

  • FHB Podcast
  • ProTalk

Webinars

  • Upcoming and On-Demand

Podcasts

  • FHB Podcast
  • ProTalk

Webinars

  • Upcoming and On-Demand

Popular Topics

  • Kitchens
  • Business
  • Bedrooms
  • Roofs
  • Architecture and Design
  • Green Building
  • Decks
  • Framing
  • Safety
  • Remodeling
  • Bathrooms
  • Windows
  • Tilework
  • Ceilings
  • HVAC

Magazine

  • Current Issue
  • Past Issues
  • Magazine Index
  • Subscribe
  • Online Archive
  • Author Guidelines

All Access

  • Member Home
  • Start Free Trial
  • Gift Membership

Shop the Store

  • Books
  • DVDs
  • Taunton Workshops

More

  • FHB Ambassadors
  • Reader Projects
  • Podcast
  • FHB House
  • Customer Support

Account

  • Log In
  • Join

Newsletter

Get home building tips, offers, and expert advice in your inbox

Signing you up...

This site is protected by reCAPTCHA and the Google Privacy Policy and Terms of Service apply.
See all newsletters
See all newsletters

Follow

  • twitter
  • facebook
  • instagram
  • pinterest

Join All Access

Become a member and get instant access to thousands of videos, how-tos, tool reviews, and design features.

Start Your Free Trial

Subscribe

FHB Magazine

Start your subscription today and save up to 70%

Subscribe

We hope you’ve enjoyed your free articles. To keep reading, become a member today.

Get complete site access to expert advice, how-to videos, Code Check, and more, plus the print magazine.

Start your FREE trial

Already a member? Log in