FHB Logo Facebook LinkedIn Email Pinterest Twitter X Instagram Tiktok YouTube Plus Icon Close Icon Navigation Search Icon Navigation Search Icon Arrow Down Icon Video Guide Icon Article Guide Icon Modal Close Icon Guide Search Icon Skip to content
Subscribe
Log In
  • How-To
  • Design
  • Tools & Materials
  • Restoration
  • Videos
  • Blogs
  • Forum
  • Magazine
  • Members
  • FHB House
  • Podcast
Log In

Discussion Forum

Discussion Forum

I’m not a framer. How should I do this?

Biff_Loman | Posted in Construction Techniques on November 6, 2007 01:59am

I’m framing some shear walls in my parents’ old barn, which has been converted into a wine press house. With most of the second floor removed, there’s not a whole lot to keep it from toppling over.

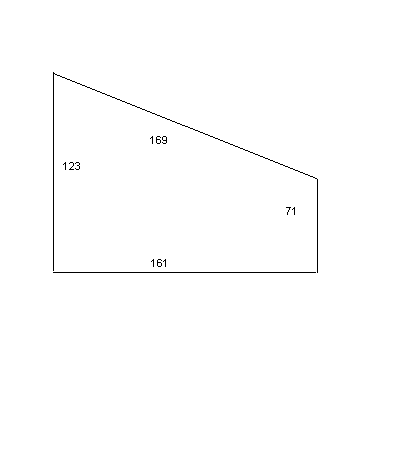
I’ve attached the dimensions of the wall I was working on today, in inches.

I’m no framer. Geometry is not my strong suit. I spent most of this afternoon scratching my head and trying to figure out what I’m doing. There’s no room to frame these walls on the floor and lift them into place, so I’m stuck stick-framing them.

Figuring out my varying stud heights is killing me. I eventually made some progress by chalking the entire wall out on the floor (in another location). I just pretended that the floor is level, which it isn’t, and that the adjacent wall (71″ high) is plumb, which it isn’t. The post on the left isn’t quite plumb, either.

Would you do this all this with just the Pythagorean theorem? Or is there some dumbass way of doing this efficiently? I’ll add that mocking it up on the floor was painfully slow.


Edited 11/5/2007 6:04 pm ET by Biff_Loman

Reply
  • X
  • facebook
  • linkedin
  • pinterest
  • email
  • add to favorites Log in or Sign up to save your favorite articles

Replies

  1. Biff_Loman | Nov 06, 2007 02:03am | #1

    Mad props to you framers, btw. I was using an air nailer, and it is deceptively heavy. And heights make me nervous. You manly men, you.

  2. User avater
    Sphere | Nov 06, 2007 02:10am | #2

    Plumb and nail the first two and measure the difference and add or subtract that # for the next ones..but if the floor is way out, I'd shim the bottom plate level.

    Spheramid Enterprises Architectural Woodworks

    "If you want something you've never had, do something you've never done"

    1. Biff_Loman | Nov 06, 2007 02:21am | #3

      Good lord, that sounds like the ticket. I'm also framing a door in these walls, so I'll place it such that one of the king studs falls on the stud lay-out. So I'll only have to measure for three studs in the wall. Also, using that method, I can start from the *short* side and work over to the side that's 10' tall. Trying to drop my tape measure that far was a b1tch.Right on.Edited 11/5/2007 6:24 pm ET by Biff_Loman

      Edited 11/5/2007 6:24 pm ET by Biff_Loman

      1. User avater
        Sphere | Nov 06, 2007 02:25am | #4

        Depending on your sheathing / sheetrock choices, the 16 or 24 layout doesn't have to be exact. I'd cut em long, plumb em up and nail away, just be certain to have a 4' and 8' and 12' or what ever the break will be, be on target.Spheramid Enterprises Architectural Woodworks

        "If you want something you've never had, do something you've never done"

        1. CAGIV | Nov 06, 2007 02:28am | #5

          Even if they end up being a tad off to not work with layout the cost of an extra 2x for a scab isn't horrible.

          I think I'd have shimmed the plate level like you suggested so you could just take the common difference and be done.


          Edited 11/5/2007 6:28 pm ET by CAGIV

          1. User avater
            Sphere | Nov 06, 2007 02:40am | #6

            That and I am beginning to be a convert to floating butt joints on sheetrock. A spline of osb behind the butt seems so much easier.Spheramid Enterprises Architectural Woodworks

            "If you want something you've never had, do something you've never done"

          2. Biff_Loman | Nov 06, 2007 02:43am | #7

            This is great. Thanks guys.All in all, it was a pretty humbling day. Before I could even start, I had to move quite a number of grape bins out of the way using a forklift. I operated a forklift, once, a year ago, for maybe an hour. It took me a looooong time to haphazardly scatter the bins, which had been stacked together very neatly.

  3. User avater
    Luka | Nov 06, 2007 03:07am | #8

    Biff,

    Build it as two walls.

    Build the red wall first.

    Then build the blue wall, and use that forklift of yours to lift it up onto the first wall.

    Build it so that when yo lift the top wall all the way up against the ceiling, there is exactly the space of a 2x, between that wall, and the wall below it. (The yellow in the picture.)

    That way, you will not be trying to pry this way and that, to get the top one in place. Just get it up against the ceiling, and then slip or pound the 2x in between the two.


    Get your head out of the box.

    1. Biff_Loman | Nov 06, 2007 03:57am | #9

      Good idea, but this is on a mezzanine. The top of triangular wall is 19' above the concrete floor, and not really accessible by the forklift.

  4. Jim_Allen | Nov 06, 2007 05:44am | #10

    There are many situations, especially in remodeling, that call for "jungle framing". This might be one of them.

    I can think of three or four different approaches but there are a lot of unanswered questions so I don't want to speculate.

    One stick at a time and in not time you'd be done. There are only ten or eleven studs....

    By the way, the pitch is: 12.3 rise and 16.1 run. Do some simple math (ratio and proportion) to get the difference in length. Without doing any figuring, I'd just use 12.2 inches if you were laying out on 16" centers. I'd start with my door king stud and go 16" from there.

    FKA Blue (eyeddevil)


    Edited 11/5/2007 9:48 pm ET by Jim_Allen

  5. Framer | Nov 06, 2007 06:01am | #11

    Biff,

    If you just wanted the stud height difference all you have to do is create the top triangle and forget about the bottom part for now by doing this;

    10'3" - 5'11" = 52"

    [Inch] [Rise]

    13'5 [Inch] [Run]

    [Pitch] = 17.90° or 3-7/8/12 Pitch (Pitch angle of wall)

    16[Inch] [Run] [Rise] = 5-3/16" (Stud Height Difference)

    If you wanted to frame the wall with continuous studs you just keep doing this;

    5'11 [Inch] [+] 5-3/16" = 6'4-3/16"

    [=] 6'9-5/16"

    [=] 7'2-1/2"

    [=] 7'7-11/16"

    [=] 8'13/16"

    [=] 8'6"

    [=] 8'11-3/16"

    [=] 9'4-5/16"

    [=] 9'9-1/2"

    Joe Carola
  6. MikeHennessy | Nov 06, 2007 02:16pm | #12

    Assuming that your top and bottom plates are relatively straight lines, as drawn, here's how I do it.

    Figure the number of studs you need. Let's say it's 8. Lay them down on the floor. Mark stud no. 1 (at the beginning of the row of studs) as the long stud. Mark stud no. 8 (at the end of the row) as the short stud. Connect the lines with a chalk line and cut on the line. Done. Perfectly cut and angled studs. (Also assumes equal spacing. Any oddballs for, e.g., windows, have to be individually measured & cut.)

    Mike Hennessy
    Pittsburgh, PA

    PS: I just re-read your OP and noticed that the ends are not plumb. Plumb them first by installing a plumb starter stud next to them and frame your wall between the starters.


    Edited 11/6/2007 6:18 am ET by MikeHennessy

    1. Biff_Loman | Nov 06, 2007 10:46pm | #13

      So all the studs are sitting on their sides?  The initial cut you make, then, doesn't go all the way through?

      1. Biff_Loman | Nov 06, 2007 10:56pm | #14

        MUCH smoother sailing today.  Thanks for the input.  The second wall, on the other side of the barn, is going up twice as fast. 

        Working next to the edge of the mezzanine - which is the high side, the peak being 19' feet from the floor - keeps reminding me of the time when I fell off that mezzanine, snapped my pinky finger in half and and got knocked unconscious.  What's funny is that I always had a fear of heights as a kid, got over it, but then it came back after I did that. 

        1. Biff_Loman | Nov 07, 2007 06:22am | #15

          All done! I felt like a pimp, what with pre-cutting my studs, putting them on the mark, slapping them against the top-plate and - BAM! - plumb. Well, maybe a few hammer taps, but nothing unreasonable.I've still got to sheath them tomorrow.

          1. User avater
            mmoogie | Nov 07, 2007 07:36am | #16

            Well, It's only ten studs, the floor is out of whack and the ceiling most likely is too. Put down the bottom plate, put up the top plate, layout the bottom plate, transfer the marks to the top plate with a 90 dollar laser plumb bob. There's 30 minutes. Take rough measurements for each stud, cut the top 1" longer than the rough measurement, then hold and mark each stud in place, cut and nail. Done in a couple of hours.Steve

          2. Jim_Allen | Nov 07, 2007 08:10am | #17

            I start with the longer studs and cut them to what I think they should be. If they are short, I eyeball the distance I have to add, cut a new one and use the short one for the next stud.Ten studs....five minutes per stud is generous....that makes this a one hour wall. FKA Blue (eyeddevil)

          3. User avater
            mmoogie | Nov 07, 2007 08:32am | #18

            Hi Blue,I absolutely love and could not live without my laser plumb bob. It saves so much time. And I live by the adage if you can hold it up and mark it in place, do it.Steve

      2. MikeHennessy | Nov 07, 2007 04:27pm | #19

        You just mark them while they are sitting on their sides, unless you have one of those BIG Makitas -- & I don't. You cut them as usual, but you can set the bevel on your saw (if it's big enough to make a difference) using the marked line as a guide.

        Mike HennessyPittsburgh, PA

Log in or create an account to post a comment.

Sign up Log in

Become a member and get full access to FineHomebuilding.com

Video Shorts

Categories

  • Business
  • Code Questions
  • Construction Techniques
  • Energy, Heating & Insulation
  • General Discussion
  • Help/Work Wanted
  • Photo Gallery
  • Reader Classified
  • Tools for Home Building

Discussion Forum

Recent Posts and Replies

  • |
  • |
  • |
  • |
  • |
  • |
View More Create Post

Up Next

Video Shorts

Featured Story

Podcast Episode 694: Bath Fans, Too Many Minisplits, and Second-Story Additions

Listeners write in about fire-rated doors, using seven minisplits for cooling, and how to build a second-story addition.

Featured Video

SawStop's Portable Tablesaw is Bigger and Better Than Before

The 10-in. Jobsite Saw PRO has a wider table, a new dust-control port, and a more versatile fence, along with the same reliable safety mechanism included in all SawStop tablesaws.

Related Stories

  • Repairing a Modern Window Sash
  • Landscape Lighting Essentials
  • Podcast Episode 694: Bath Fans, Too Many Minisplits, and Second-Story Additions
  • FHB Podcast Segment: Can You Have Too Many Minisplits?

Highlights

Fine Homebuilding All Access
Fine Homebuilding Podcast
Tool Tech
Plus, get an extra 20% off with code GIFT20

"I have learned so much thanks to the searchable articles on the FHB website. I can confidently say that I expect to be a life-long subscriber." - M.K.

Get home building tips, offers, and expert advice in your inbox

Signing you up...

This site is protected by reCAPTCHA and the Google Privacy Policy and Terms of Service apply.
See all newsletters
See all newsletters

Fine Homebuilding Magazine

  • Issue 332 - July 2025
    • Custom Built-ins With Job-Site Tools
    • Fight House Fires Through Design
    • Making the Move to Multifamily
  • Issue 331 - June 2025
    • A More Resilient Roof
    • Tool Test: You Need a Drywall Sander
    • Ducted vs. Ductless Heat Pumps
  • Issue 330 - April/May 2025
    • Deck Details for Durability
    • FAQs on HPWHs
    • 10 Tips for a Long-Lasting Paint Job
  • Issue 329 - Feb/Mar 2025
    • Smart Foundation for a Small Addition
    • A Kominka Comes West
    • Making Small Kitchens Work
  • Issue 328 - Dec/Jan 2025
    • How a Pro Replaces Columns
    • Passive House 3.0
    • Tool Test: Compact Line Lasers

Fine Home Building

Newsletter Sign-up

  • Fine Homebuilding

    Home building tips, offers, and expert advice in your inbox.

  • Green Building Advisor

    Building science and energy efficiency advice, plus special offers, in your inbox.

  • Old House Journal

    Repair, renovation, and restoration tips, plus special offers, in your inbox.

Signing you up...

This site is protected by reCAPTCHA and the Google Privacy Policy and Terms of Service apply.
See all newsletters

Follow

  • Fine Homebuilding

    Dig into cutting-edge approaches and decades of proven solutions with total access to our experts and tradespeople.

    Start Free Trial Now
    • Facebook
    • Instagram
    • X
    • LinkedIn
  • GBA Prime

    Get instant access to the latest developments in green building, research, and reports from the field.

    Start Free Trial Now
    • Facebook
    • YouTube
  • Old House Journal

    Learn how to restore, repair, update, and decorate your home.

    Subscribe Now
    • Facebook
    • Instagram
    • X

Membership & Magazine

  • Online Archive
  • Start Free Trial
  • Magazine Subscription
  • Magazine Renewal
  • Gift a Subscription
  • Customer Support
  • Privacy Preferences
  • About
  • Contact
  • Advertise
  • Careers
  • Terms of Use
  • Site Map
  • Do not sell or share my information
  • Privacy Policy
  • Accessibility
  • California Privacy Rights

© 2025 Active Interest Media. All rights reserved.

Fine Homebuilding receives a commission for items purchased through links on this site, including Amazon Associates and other affiliate advertising programs.

  • Home Group
  • Antique Trader
  • Arts & Crafts Homes
  • Bank Note Reporter
  • Cabin Life
  • Cuisine at Home
  • Fine Gardening
  • Fine Woodworking
  • Green Building Advisor
  • Garden Gate
  • Horticulture
  • Keep Craft Alive
  • Log Home Living
  • Military Trader/Vehicles
  • Numismatic News
  • Numismaster
  • Old Cars Weekly
  • Old House Journal
  • Period Homes
  • Popular Woodworking
  • Script
  • ShopNotes
  • Sports Collectors Digest
  • Threads
  • Timber Home Living
  • Traditional Building
  • Woodsmith
  • World Coin News
  • Writer's Digest
Active Interest Media logo
X
X
This is a dialog window which overlays the main content of the page. The modal window is a 'site map' of the most critical areas of the site. Pressing the Escape (ESC) button will close the modal and bring you back to where you were on the page.

Main Menu

  • How-To
  • Design
  • Tools & Materials
  • Video
  • Blogs
  • Forum
  • Project Guides
  • Reader Projects
  • Magazine
  • Members
  • FHB House

Podcasts

  • FHB Podcast
  • ProTalk

Webinars

  • Upcoming and On-Demand

Podcasts

  • FHB Podcast
  • ProTalk

Webinars

  • Upcoming and On-Demand

Popular Topics

  • Kitchens
  • Business
  • Bedrooms
  • Roofs
  • Architecture and Design
  • Green Building
  • Decks
  • Framing
  • Safety
  • Remodeling
  • Bathrooms
  • Windows
  • Tilework
  • Ceilings
  • HVAC

Magazine

  • Current Issue
  • Past Issues
  • Magazine Index
  • Subscribe
  • Online Archive
  • Author Guidelines

All Access

  • Member Home
  • Start Free Trial
  • Gift Membership

Online Learning

  • Courses
  • Project Guides
  • Reader Projects
  • Podcast

More

  • FHB Ambassadors
  • FHB House
  • Customer Support

Account

  • Log In
  • Join

Newsletter

Get home building tips, offers, and expert advice in your inbox

Signing you up...

This site is protected by reCAPTCHA and the Google Privacy Policy and Terms of Service apply.
See all newsletters
See all newsletters

Follow

  • X
  • YouTube
  • instagram
  • facebook
  • pinterest
  • Tiktok

Join All Access

Become a member and get instant access to thousands of videos, how-tos, tool reviews, and design features.

Start Your Free Trial

Subscribe

FHB Magazine

Start your subscription today and save up to 70%

Subscribe

Enjoy unlimited access to Fine Homebuilding. Join Now

Already a member? Log in

We hope you’ve enjoyed your free articles. To keep reading, become a member today.

Get complete site access to expert advice, how-to videos, Code Check, and more, plus the print magazine.

Start your FREE trial

Already a member? Log in

Privacy Policy Update

We use cookies, pixels, script and other tracking technologies to analyze and improve our service, to improve and personalize content, and for advertising to you. We also share information about your use of our site with third-party social media, advertising and analytics partners. You can view our Privacy Policy here and our Terms of Use here.

Cookies

Analytics

These cookies help us track site metrics to improve our sites and provide a better user experience.

Advertising/Social Media

These cookies are used to serve advertisements aligned with your interests.

Essential

These cookies are required to provide basic functions like page navigation and access to secure areas of the website.

Delete My Data

Delete all cookies and associated data